[ad_1]
Apple TV 1st era.

Apple first launched the Apple TV set-top field in 2006. Here is the best way to refurbish and restore one of many unique models, to make the set-top field nearly as good as new.
All by way of the Nineties, Apple had been toying with the concept of constructing a set-top TV field for residence customers. Like a cable TV field, Apple wished to have a TV platform that was compact, cheap, and simple to make use of.
However by 1995, Apple had deserted the mission, and work started to plot a brand new machine that was smaller and less complicated. 9 years later, the outcome was the primary Apple TV.
Not like as we speak’s Apple TV, the unique system did not have an App Retailer. As an alternative, Apple’s iTunes app was used to synchronize films, music, photographs, and different media to the system over a community, or by way of the USB port.
Many of those units are nonetheless out there on-line, in working situation at low costs.
We discovered ours on eBay for lower than $15. Nonetheless, its inner drive had been wiped of the working system, which can current a problem for some customers.
The technical specs for the first-generation Apple TV could be discovered at everymac.com.
Based mostly on Mac OS X Tiger
The primary era Apple TV launched to the general public was truly a minimized Mac, working a specifically modified model of Mac OS X Tiger (10.4). The machine was primarily based round an Intel Pentium M chip working at 1GHz, an Nvidia GeForce Go 7300 GPU, and 256MB RAM.
Design-wise the system might theoretically assist 1GB of RAM, though not one of the units ever shipped with greater than 256MB. As we are going to see beneath, it’s attainable to hack the Apple TV to assist 512MB, nevertheless it’s very tough.
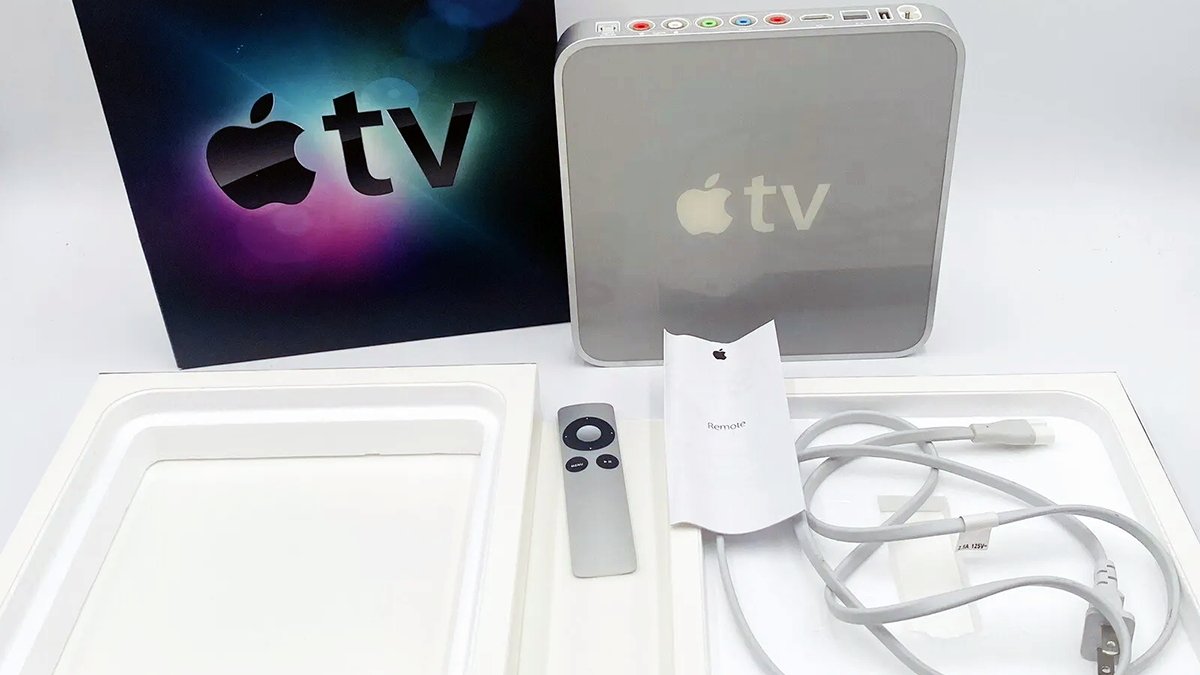
Authentic 1st era Apple TV with field.
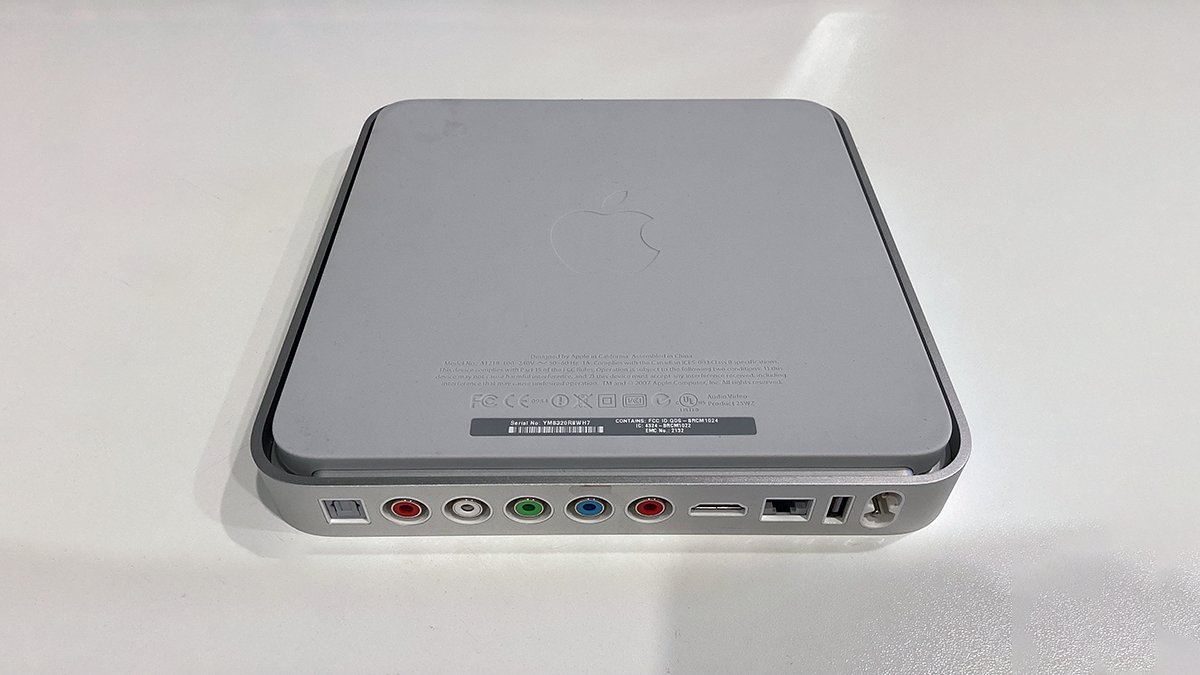
On the rear of the system are a wide range of ports: energy, USB, Ethernet, HDMI, element video, analog stereo audio, and optical audio (TOSLINK). All first era Apple TVs additionally included WiFi built-in.
The system is constructed round a steel body, a transparent and white lucite prime, a steel backside cowl, and a single massive rubber pad on the underside held on with adhesive. The motherboard and many of the electronics are literally constructed into the highest of the system.
There’s solely a single inner 2.5-inch ATA onerous drive secured to the underside steel cowl with 4 Torx screws.
On this article, we’ll have a look at the best way to disassemble, clear, restore, and optionally improve the unique Apple TV.
Backside view: the massive rubber foot, steel cowl, and steel body.
Disassembly
Earlier than continuing, we must always warn you that disassembling the unique Apple TV requires some talent and a few particular instruments.
You also needs to ask your self the query: Am I keen to simply accept some small minor harm to my Apple TV in change for cleansing, upgrading, and repairing it?
This query is vital, as a result of because of the age of the system, it might be unattainable to open it with out incurring some small harm to components (most notably the underside foot and inner fan).
Having stated that, it is also utterly attainable to carry out the restore with out inflicting any everlasting main harm – if you’re cautious. Additionally, bear in mind there are some excessive voltages within the Apple TV energy provide (250V) and it is attainable to get shocked in some circumstances if you’re not cautious.
Try this restore at your personal threat.
As with earlier refurbs, you may want a particular set of instruments to open the machine:
- A 4.5-inch (11.5cm) wall spackling instrument
- A medium magnetized Phillips-head screwdriver
- A tiny magnetized Phillips-head electronics screwdriver, or jeweler’s screwdriver
- A small flat plastic or steel spudger
- Small Torx screwdrivers
- Scissors
- A small pastime knife
- A tiny artist’s paintbrush
- A multimeter
- Compressed air or an air compressor
- A vibrant flashlight
- Vivid room lighting
- Optionally a microscope, or a small magnifier or jeweler’s loupe
- Kapton tape and masking tape
- A CR2032 substitute button-cell battery
Maybe essentially the most tough step in opening your Apple TV is eradicating the massive rubber foot. This half is definitely two layers of rubber fused collectively and glued to the underside steel cowl with plastic adhesive.
When attempting to take away the foot, it’ll seemingly start to separate and tear in spots the place the rubber had bonded to the adhesive. Because of this, you could use a large spacking knife to pry the foot off very slowly.
To start, place the system face-down on a well-lit floor on prime of a soldering mat or comfortable hand towel with the rear ports going through in direction of you. Utilizing each fingers gently and slowly start prying up the rubber foot at one nook along with your fingers.
Go slowly and periodically cease to verify if the underside of the rubber foot is tearing on the skin. Whether it is, cease and use the spackling knife to get beneath the adhesive and pry it up together with the foot.
Work from one nook horizontally throughout to the opposite, then ahead evenly in direction of the entrance of the system. Cease at intervals to verify for tears on the skin.
If tears do happen it is not the top of the world – if you happen to cease instantly and use the knife to peel the glue off, the tearing could be minimized and will not be clearly seen on the skin.
You may additionally need to strive heating the foot barely with a sizzling air gun or hair dryer to melt the glue, but when the adhesive is just too outdated and brittle, this will likely not have a lot of an impact.
Lastly, take away the rubber foot completely as you progress ahead in direction of the entrance of the system. As soon as all of the glue is separated, the foot will come free. Set it apart for now.
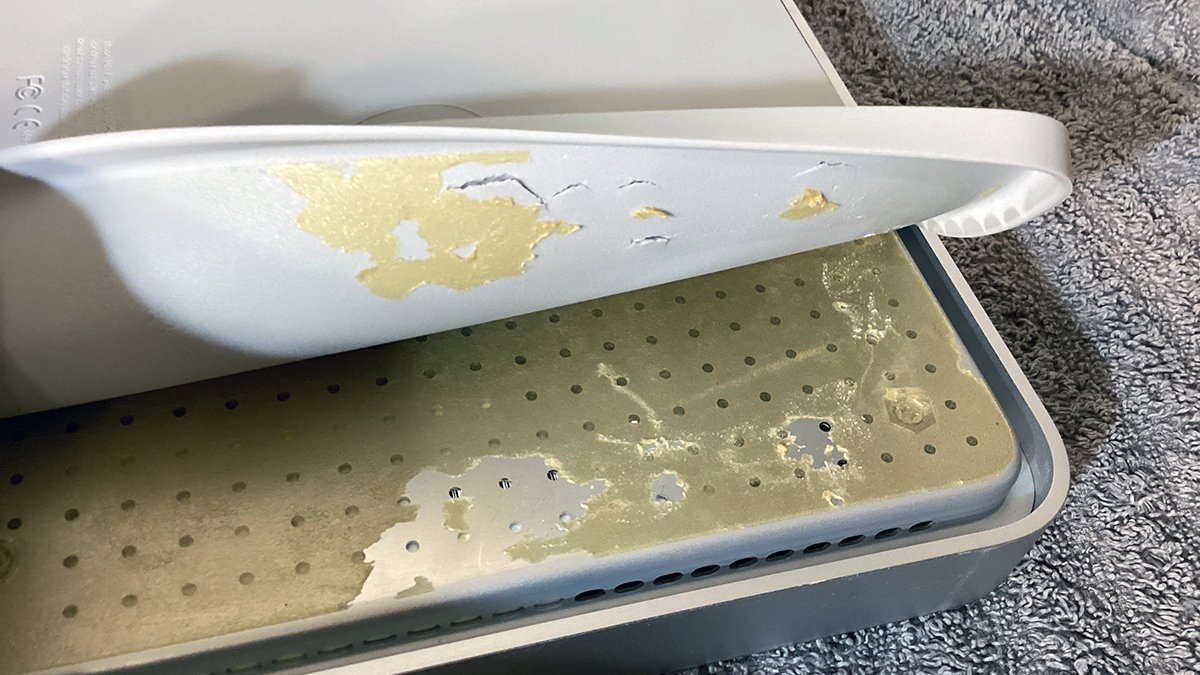
Rubber foot removing and small tear harm. Proceed slowly.
Step 2: Open your Apple TV
If there’s any residual glue protecting the 4 Torx screws on the underside cowl, take away it with a pastime knife, then take away the 4 screws.
These screws maintain the underside cowl to the highest lid. There are 4 extra Torx screws that maintain the inner ATA/IDE onerous drive to the underside cowl – however do not take away these but.
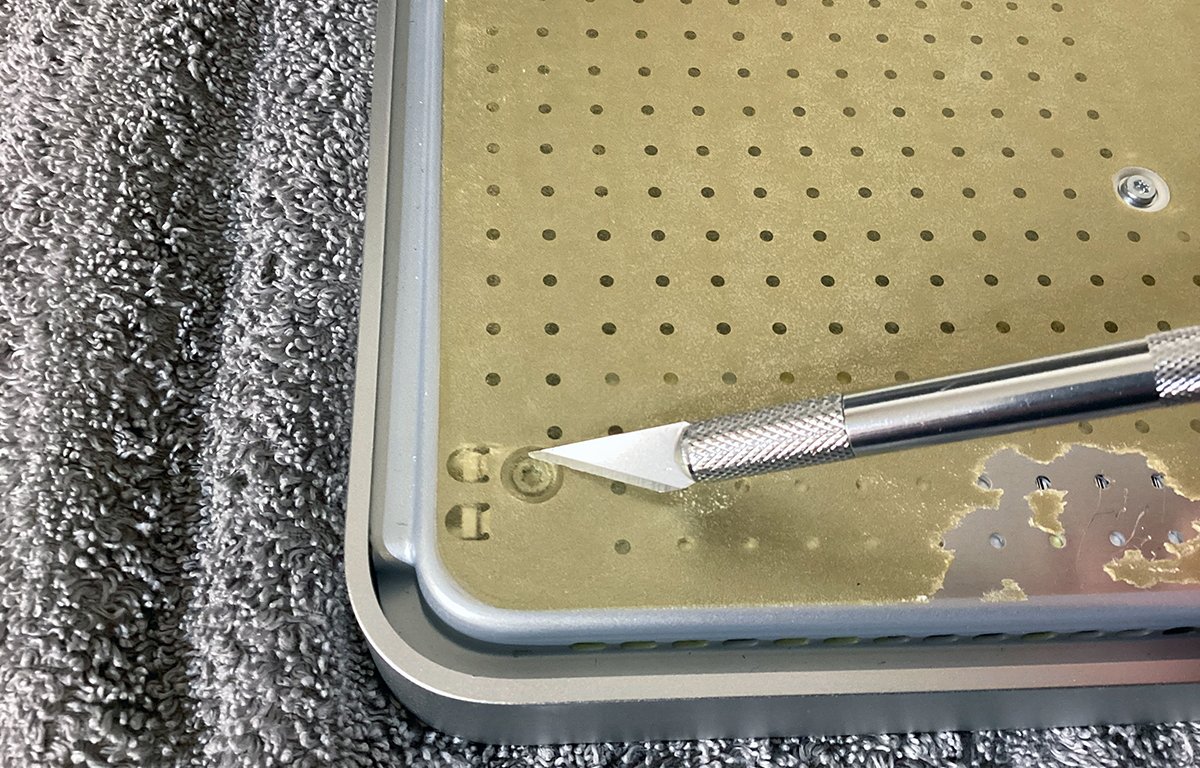
Take away extra glue from the nook Torx screws utilizing a pastime knife.
Step 3: Take away the onerous drive
Subsequent, flip the underside cowl over, and take away the onerous drive’s ATA ribbon cable from the connector on the motherboard. As soon as it is free, flip it again over and take away the 4 Torx screws holding the drive to the quilt.
Detach the ATA cable and examine it for harm. Clear each the drive and cable with compressed air adopted by a moist fabric. Additionally, clear the within of the quilt to take away any mud.
Set all three components apart for later.
Word that not like as we speak’s computer systems, the first era Apple TV used ATA/IDE drives. 2.5-inch ATA drives have been the usual for many laptops within the late 1990’s. SATA hadn’t but been broadly deployed on the time.
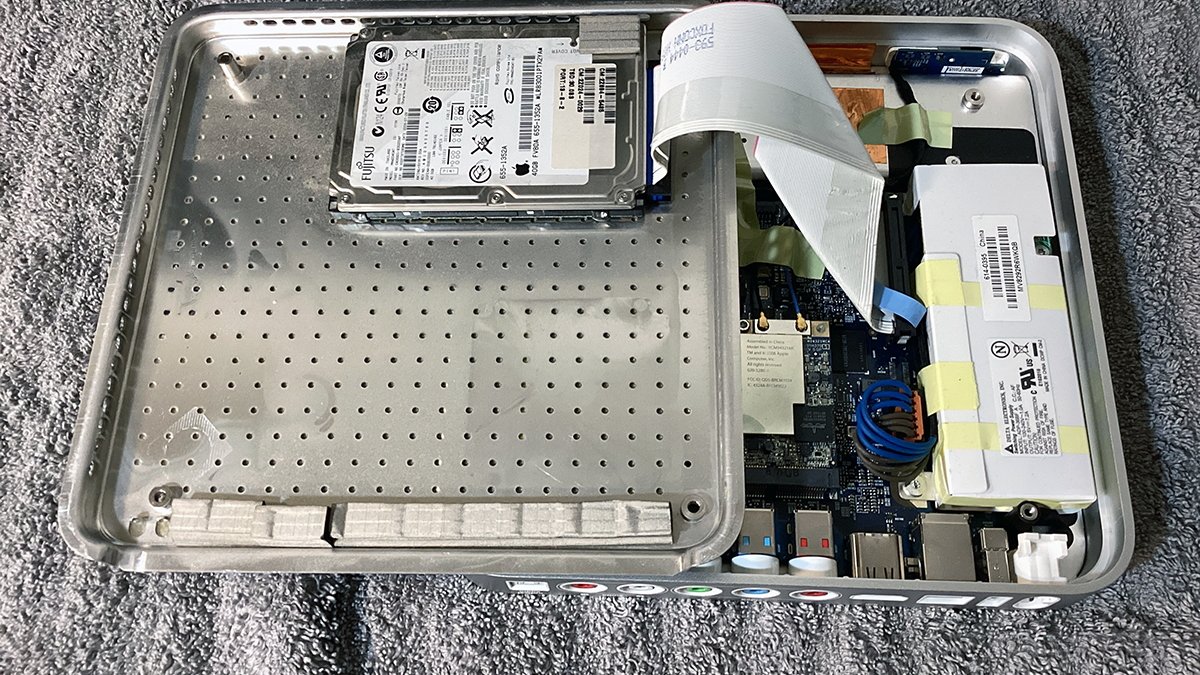
Take away the ATA drive, its ribbon cable, and the quilt.
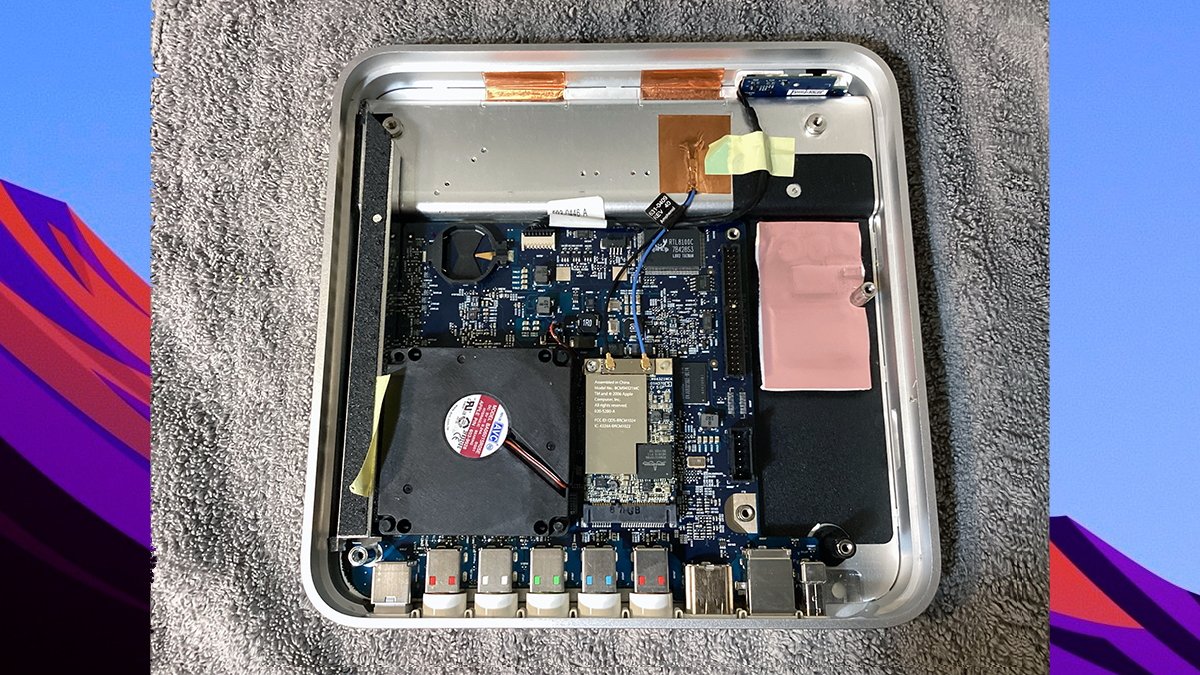
As soon as the drive and canopy are free, we will examine the motherboard and predominant elements. Clockwise from higher left, they’re:
- CR2032 coin-cell battery
- Community and LED/distant wires
- ATA connector
- Energy provide
- Rear ports
- WiFi card
- Fan
- Lid assist/warmth conduit
Above the motherboard is a small inner area the place the wi-fi antennae reside. Except your Apple TV could be very soiled inside, there isn’t any must open this cowl.
Word that the small warmth conduit subsequent to the fan is product of aluminum. This half acts as each a warmth spreader which conducts fan exhaust warmth to the steel body, and acts as a assist for the underside cowl.
The warmth conduit is held down by a steel put up on the backside and a single Torx screw on the prime. You will not be capable to entry this screw with out the proper dimension Torx mini screwdriver that may match by way of the small gap above it.
Really, there is a manner round this if you do not have the proper instrument, which we’ll get to beneath.
There are literally three components to the highest cowl: a steel plate the motherboard is mounted on, a steel body, and the clear/white plastic prime. All three components are held in place till you take away the warmth conduit and its two screws (and the WiFi card).
Apple TV’s motherboard and case.
Step 4: Take away and take a look at the battery
Utilizing a pastime knife, take away the CR2032 coin-cell battery as proven. Watch out to not brief something, and to not harm the plastic battery holder both.
One of the simplest ways to take away the battery is to insert a pastime knife into the holder on the backside proper or prime edge and pry in the wrong way. The battery will come out of the holder.
Take away the battery rapidly so it would not contact any motherboard elements and brief them.
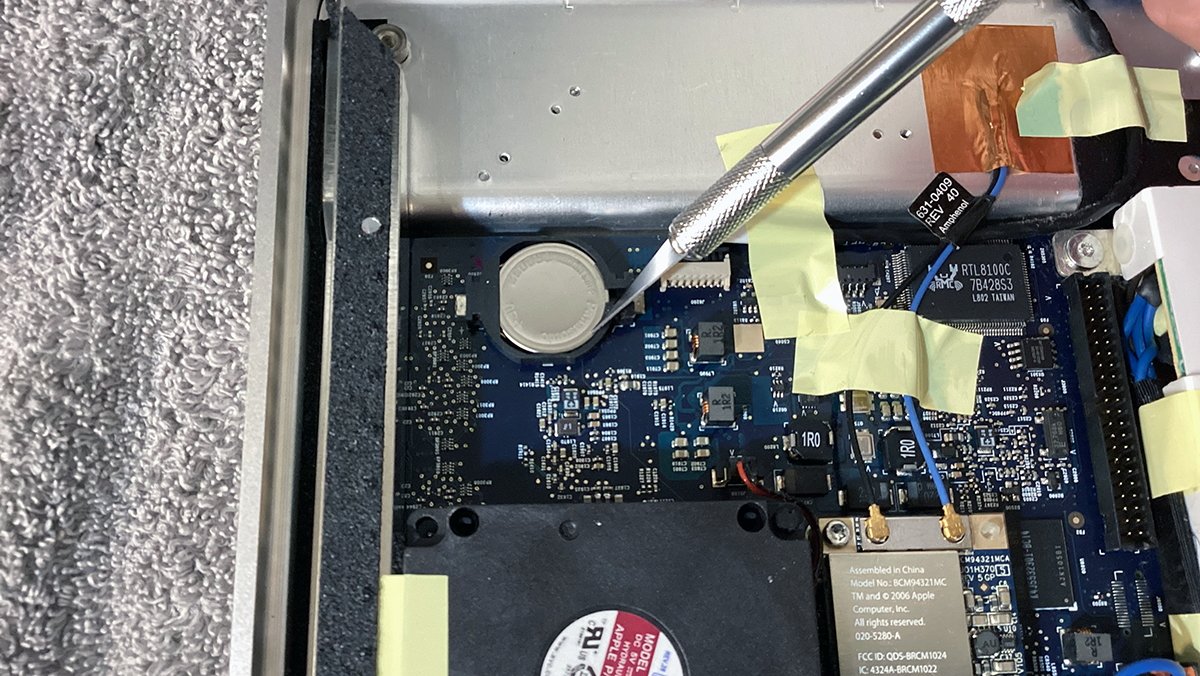
Take away the CR2032 battery utilizing a pastime knife.
Check the battery utilizing a multimeter by setting it to 20V DC (the facet with the dotted traces on it). The right full voltage for CR2032 is 3.3V. Ours measured 2.89 volts – a bit beneath regular.
We determined to switch the battery anyway with a brand new one. Nonetheless, do that final after the machine is reassembled.
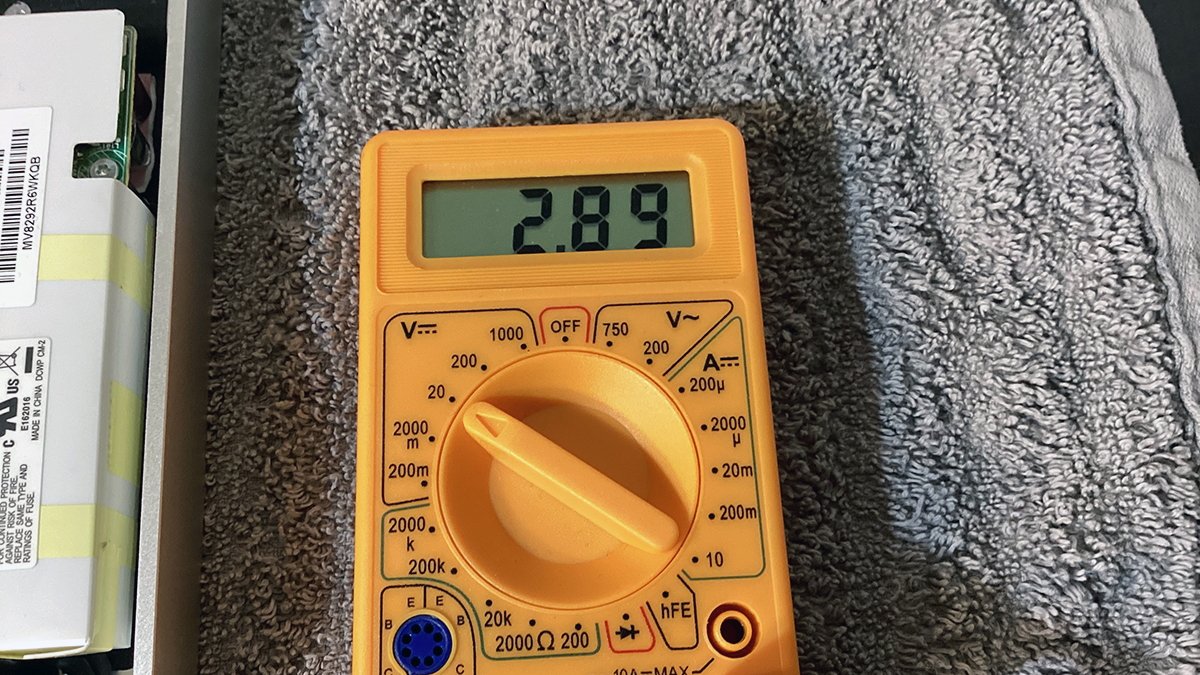
Check the battery with a multimeter. Right max voltage is 3.3V.
Step 4: Check energy
At this level, you possibly can plug your Apple TV right into a wall outlet to see what the entrance mild exhibits. The entrance panel LED ought to flash a gradual amber.
If it would not then it means there’s another {hardware} failure aside from the lacking onerous drive and OS.
In the event you do get another error, the machine will want restore, or if you’re an electronics skilled, additional analysis.
Make sure that to not contact any a part of the facility provide at this level. Inside the facility provide are high-voltage 250V capacitors and if you happen to contact them along with your naked fingers it is prone to knock you off your toes or worse.
Commonplace US family outlet present is 120V, and the Apple TV energy provide is designed to deal with this and 240V for different nations corresponding to in Europe and the UK. That is sufficient voltage to electrocute people.
It is because of this the facility provide is wrapped in an insulating plastic cowl and sealed with tape. Even so, it is nonetheless harmful when dwell.
Remember even after being disconnected capacitors inside energy provides can retain their voltages for a number of minutes.
In case your Apple TV’s energy provide is not working, you may must take away it in an effort to exchange it. This process is for superior customers so we’ll depart this as an additional step on the finish.
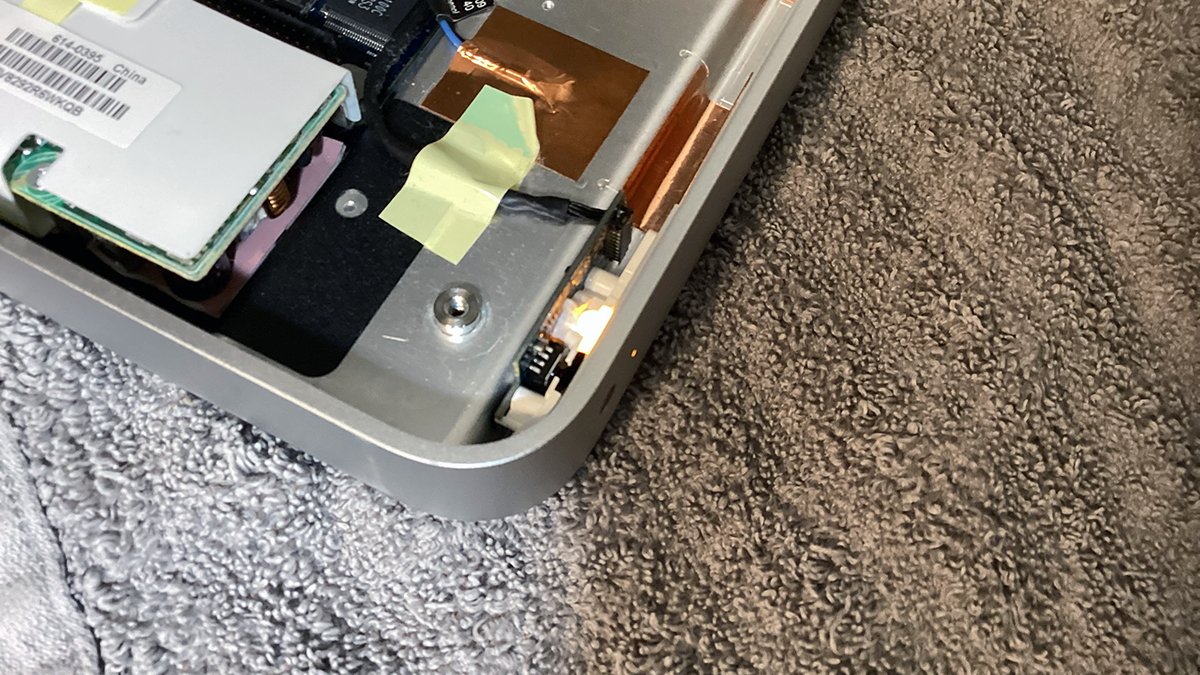
Testing energy. With out the onerous drive connected, it is best to get a gradual blinking amber LED.
Step 5: Take away and clear fan
The Apple TV’s fan is held in by three small plastic posts with clips a the tops. The clips snap into holes on the fan’s edges, locking it in place. At this level, you may must resolve if you wish to threat damaging these posts in an effort to take away the fan.
After seventeen years, the plastic in these clips will likely be extraordinarily brittle and liable to breaking. You’ll be able to nonetheless reinstall and safe the fan utilizing different strategies later, nevertheless it’s seemingly eradicating the fan will break at the very least one in every of them.
In the event you do resolve to take away the fan, you may must squeeze the highest of every put up with small tweezers, then gently pull up on the nook of the fan to free it. Repeat this step for the opposite two posts till the fan is free.
You may additionally must disconnect the fan’s wire connector on the motherboard. Watch out since this connector will likely be brittle too.
The fan would not truly cool something straight. All the most important chips are on the opposite facet of the motherboard. There’s a small financial institution of resistors and capacitors beneath the fan, and it retains these components cool since they energy the chips on the opposite facet.
Many of the warmth on the motherboard is cooled by way of convection. The fan attracts air throughout the board and sends it out to the warmth conduit the place it will get unfold to the principle body and backside plate.

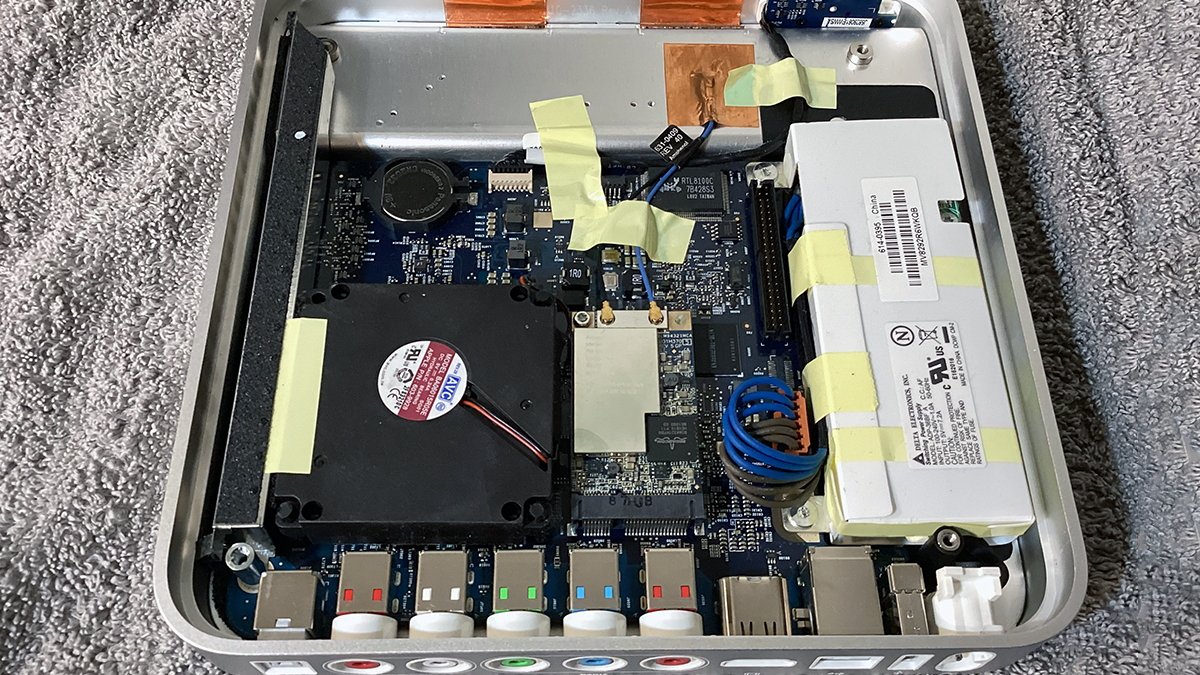
The principle cooling fan. Word the posts on the three corners.
At this level, until your Apple TV could be very soiled inside, or the facility provide is not working, you are principally completed with disassembly. You may need to use compressed air to blast any mud out of the fan, and from across the motherboard.
Except you need to take away the motherboard you need not take away the WiFi card or energy provide. You should utilize compressed air to wash the remainder of the motherboard and from across the elements.
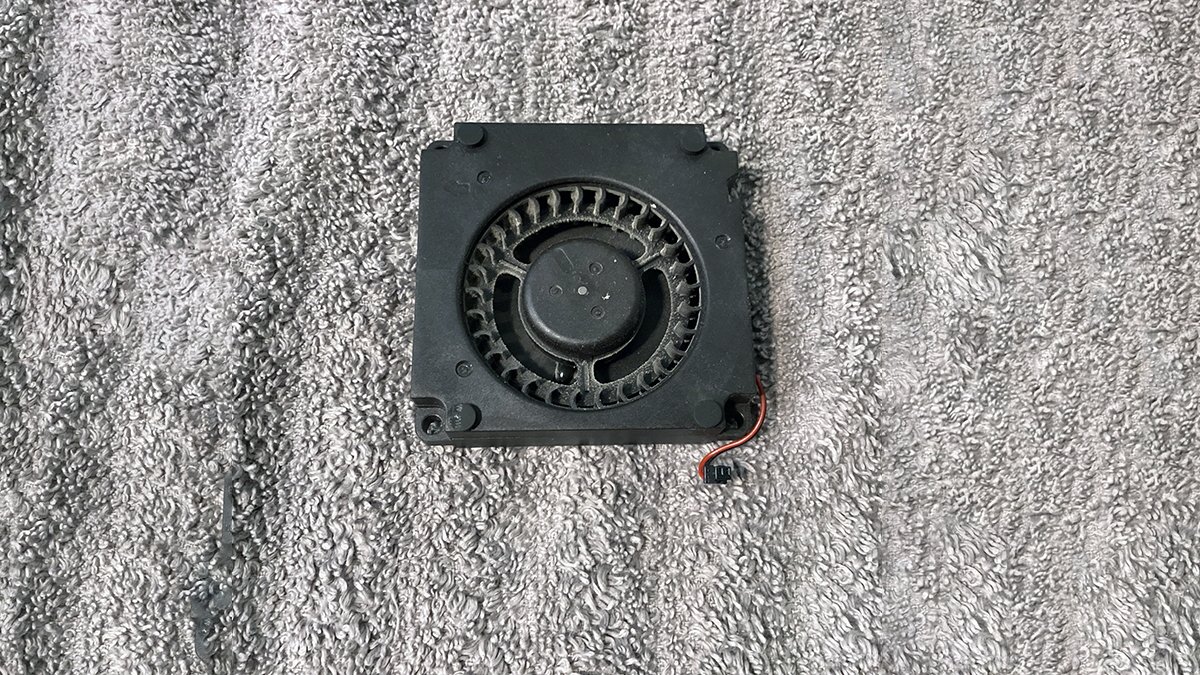
Fan eliminated and prepared for cleansing. Ours was solely barely soiled.
Step 6 (Optionally available): Take away and clear energy provide
In the event you do must take away the facility provide, proceed with warning. As we talked about it could actually comprise harmful excessive voltage.
At all times put on rubber gloves when dealing with the facility provide, and by no means contact it whereas the system is plugged in.
This step ought to solely be tried by skilled customers with information of electronics and electrical energy. Proceed with warning.
In the event you merely need to clear the facility provide of mud you need not take away it. As an alternative, simply use compressed air across the ends and the small openings to blast any mud out of it
In case your energy provide would not work, you may must discover a new substitute on-line and exchange the whole unit.
That is pretty simple: to take action, take away the three Torx screws holding the facility provide down, disconnect its connector from the motherboard, then slowly peel it up from its sticky insulating pad.
The insulating pad has sturdy adhesive on it and you will must fastidiously and slowly pry the facility provide up from the pad to free it. Set up of a brand new energy provide is the reverse of removing.
One purpose Apple makes use of this type of insulating pad to carry the facility provide in place is to make sure no excessive voltages arc from the provision to the steel chassis of the system – which might pose a well being hazard for customers.
Because of this, do not take away the insulating pad from the system – you may want it if you set up the brand new energy provide.
Energy provide eliminated. Word the adhesive insulating pad and the three mounting holes.
Energy provide deep dive
Only for enjoyable, let’s check out the within of the facility provide. Ours is mannequin ADP-36BF A from Delta Electronics of Taiwan, INPUT: 100-240V~1.0A 50-60Hz, OUTPUT: 5V @ 7.2A.
You’ll be able to skip this part if you happen to’re not within the inner workings of the Apple TV energy provide.
Many of the work of this provide entails taking the enter 120V or 240V home AC present and stepping it right down to 5V DC the system can use.

Apple TV 1st era energy provide from Delta Electronics.
To open the facility provide (assuming you have confirmed it is totally discharged first), you may must take away its outer plastic cowl. In the event you simply unplugged the Apple TV wait just a few hours earlier than trying this in an effort to give the capacitors time to discharge.
There are two small plastic clips on one facet of the provision you may must take away with a pastime knife.
You may additionally must peel again three items of tape holding the plastic cowl on. As soon as that is completed you possibly can fastidiously take away the quilt.
It’s possible you’ll want to attain the tape in just a few locations to free the quilt, however this may be re-taped later – or sealed with sizzling glue.
It’s possible you’ll want to attain the tape in just a few locations.
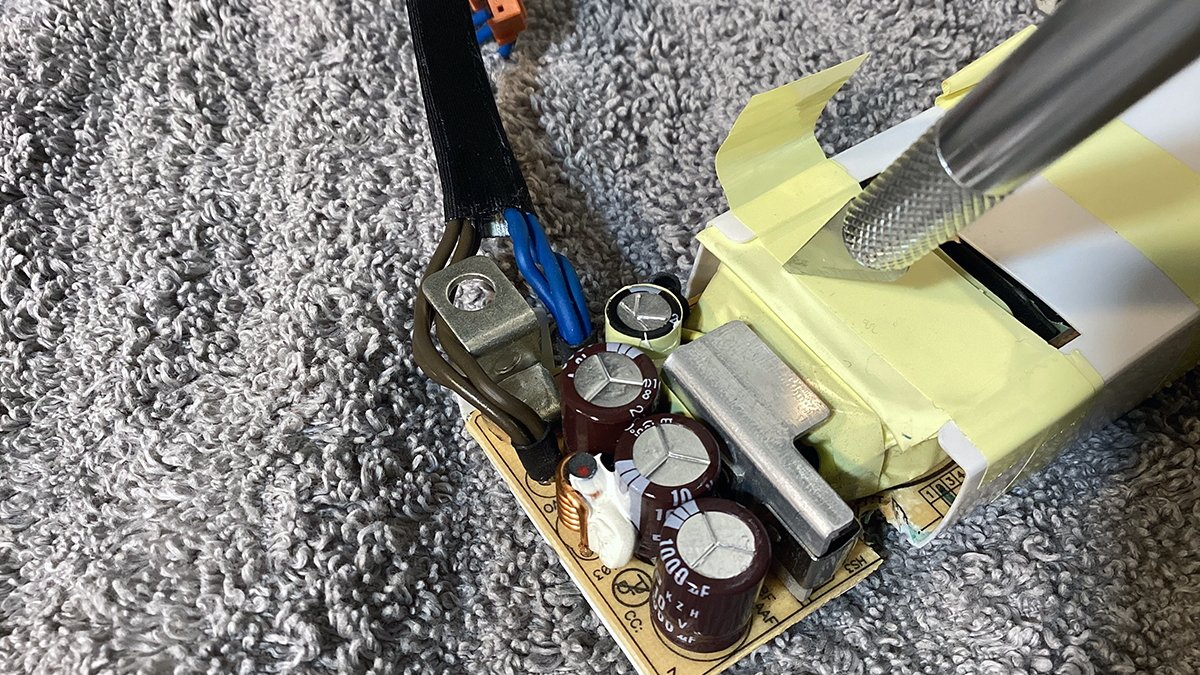
With the quilt eliminated, we will see the facility provide’s elements. From proper to left within the picture beneath:
- Enter
- 250V rectifier
- Two massive EMI movie caps
- Inductor
- Excessive voltage ceramic cap (blue)
- Bridge rectifier
- Two massive smoothing caps
- Smaller cap and excessive voltage ceramic cap
- STB10NK60Z 600V MOSFET transistor
- Giant choke
- Three 10V output caps
- Output
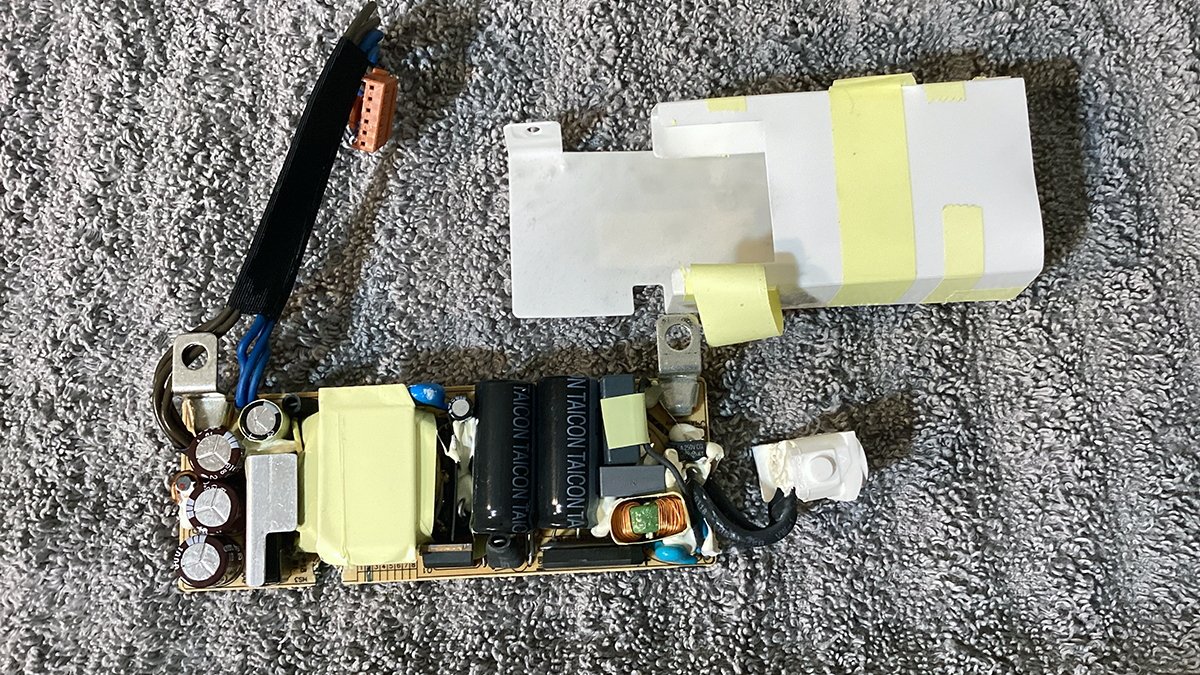
Apple TV 1st era energy provide with cowl eliminated.
Briefly, the facility provide works like this:
At enter, the AC present is stabilized and filtered by the enter rectifier and the 2 EMI movie caps. These caps assist take away any static or electromagnetic interference which may be within the constructing’s electrical wiring.
Movie caps are additionally identified for having the ability to stand up to excessive voltages with out producing numerous warmth. Many movie caps present in private computer systems courting all the way in which again to the Eighties are rated at 100V or extra.
The coiled inductor then additional stabilizes the present by way of an electromagnetic discipline. The aim of most inductors is to retailer power and resist any modifications in present passing by way of them.
Subsequent the present passes by way of the MOSFET transistor and the bridge rectifier. They’re partly accountable for changing them to DC and stepping them right down to a decrease voltage, together with the massive coiled choke to the left.
Chokes act considerably like massive resistors and so they work by means of a big copper wire winding which gives resistance to present passing by way of it. Relying on the facet of the coil, voltages could be both elevated or decreased by both drawing kind of energy on the alternative facet.
Additionally they block higher-frequency AC present whereas permitting lower-frequency AC and DC present to go by way of. Widespread mode chokes are additionally used as a part of EMI suppression.
MOSFETs are multi-use transistors that may act each as amplifiers and switches. MOSFETs can be utilized as gates that change the conductivity of the system primarily based on the worth of an enter voltage at one of many system’s terminals.
Subsequent, energy is saved within the energy provide within the two massive electrolytic caps to easy it. Often called smoothing caps, these elements act like small batteries and forestall any spikes or surges which may be current within the enter circuit.
Bridge rectifiers or “diode bridges” are small packages that comprise a number of diodes which stop present from flowing in the wrong way. Additionally they deal with changing AC present to DC present.
On this case, the facility provide comprises a D2SB bridge rectifier rated for 200V @ 1.5A.
Most bridge rectifiers work by changing the destructive portion of the AC enter to a optimistic voltage. They then easy it to provide a single steady DC present.
Some bridge rectifiers can deal with two AC inputs and two DC outputs on the similar time.
These elements are sometimes present in switching energy provides corresponding to those present in Apple TV.
Bridge rectifiers have been invented within the late 1800s and have been a essential step crucial earlier than built-in circuits may very well be produced.
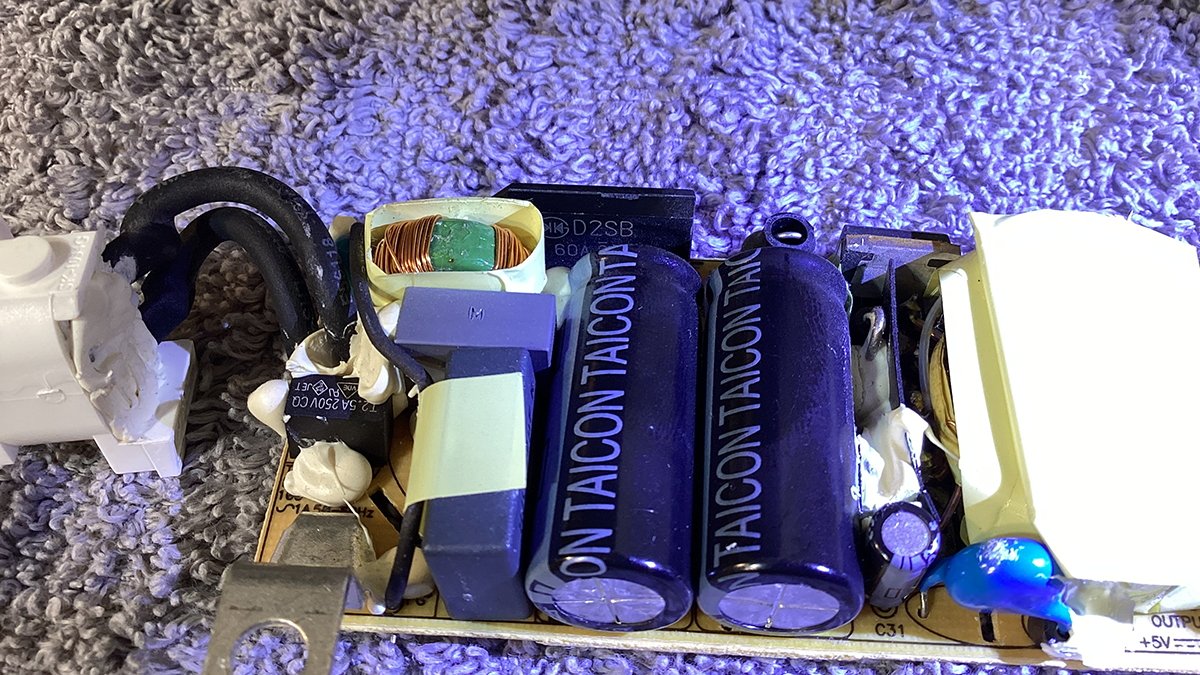
Reverse view of the facility provide. Word the D2SB bridge rectifier lurking on the heart.
You might have famous a whole lot of hardened white putty round a number of of the facility provide’s elements.
This putty is used to carry elements in place so they do not contact, nevertheless it additionally acts as a high-voltage insulating materials to stop electrical arcing. This arcing might probably brief and destroy the facility provide, trigger fireplace, or injure customers.
By sealing lots of the high-voltage elements in insulating putty the designers of the facility provide can guarantee no opposed results or harm. For these causes by no means take away any of the putty from the facility provide – until you must in an effort to exchange a element.
In the event you open the facility provide, examine all of the electrolytic caps for leakage or bulging. When some electrolytic caps get outdated they begin to bulge on the prime alongside the steel disk and plastic wrapper.
If the steel disk on prime of a cap seems swollen, or if it seems unusually huge with solely a small quantity of plastic round it, the cap could also be unhealthy.
When the electrolytic fluid leaks out of a cap it often does so alongside the underside across the connecting pins. So search for discoloration alongside the underside edge or on the reverse facet of the board.
As soon as you have cleaned or obtained a brand new energy provide, you are prepared to maneuver on to the subsequent step. To take action the facility provide should be eliminated first.
In the event you opened your Apple TV’s energy provide and plan to maintain it, reinstall the plastic cowl and plastic snaps, and reseal the tape.
Step 7 (Optionally available): Take away and clear the motherboard
This step can be optionally available. In case your Apple TV is not very soiled this step is not actually crucial. Dust and mud can acquire beneath the motherboard and forestall airflow and warmth dissipation.
In case your Apple TV motherboard could be very soiled you may need to clear beneath it.
To take away the motherboard, you may first must take away the WiFi card by eradicating its screw and wires, after which eradicating the warmth conduit on the left facet.
If you cannot attain the recessed Torx screw by way of the opening within the prime of the conduit, you possibly can nonetheless take away it by barely (and thoroughly) bending the highest facet to the best to permit entry with a traditional Torx driver.
In the event you do that, achieve this fastidiously, and do not bend it an excessive amount of. The highest of the conduit additionally acts as a assist for the underside cowl so it has to take a seat evenly with the body.
When you take away each the conduit screws, carry the conduit out of the system.
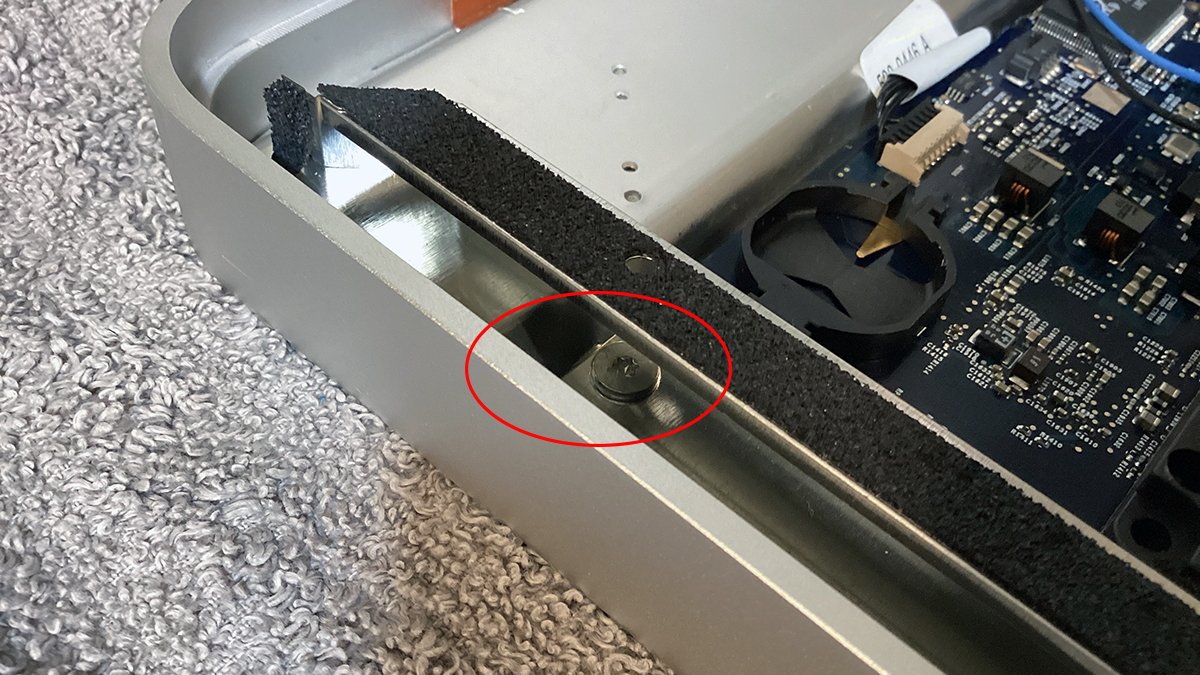
The hidden Torx screw beneath the warmth conduit.
At this level, the motherboard is successfully free, nevertheless it’s nonetheless being held into the body by the ports in the back of the machine. To take away the motherboard, slide it ahead and carry its entrance edge up and out.
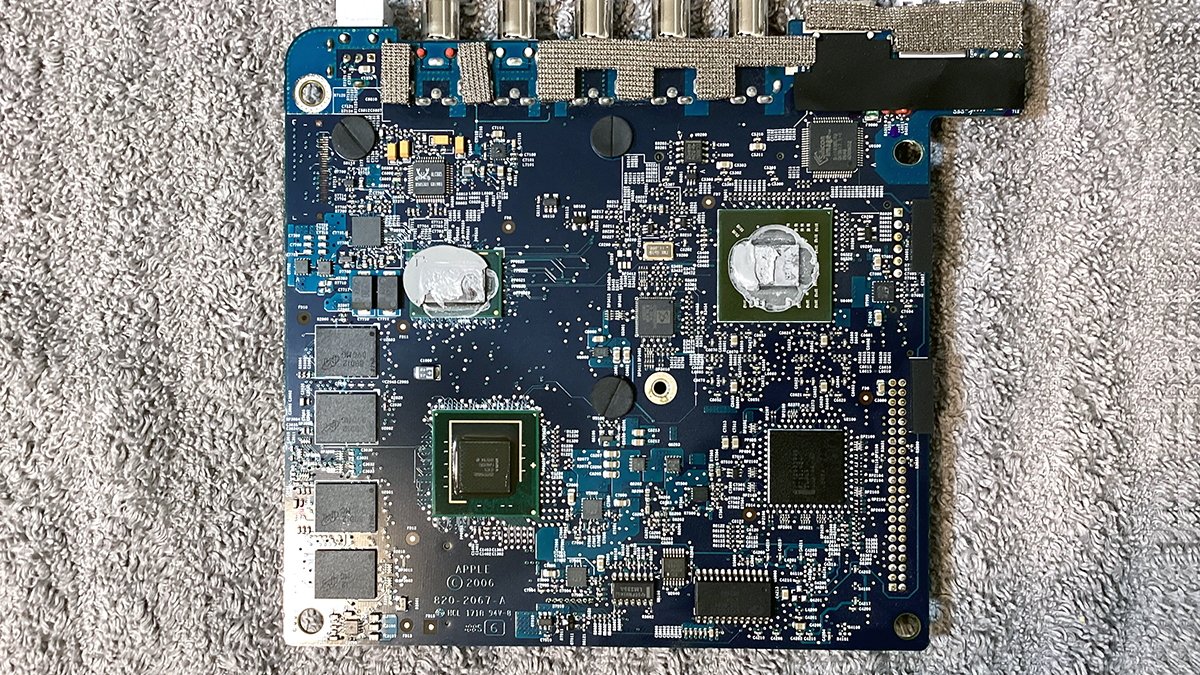
As soon as the motherboard is free, flip it over and examine it for any harm, burn marks, corrosion or different inconsistencies.
Two of the chips on the underside of the board have thermal paste on them. Except it is extraordinarily dried out and flaky, there isn’t any actual purpose to take away and exchange it. Attempt to not disturb it if you happen to’re not changing it with new paste.
Re-installation and re-assembly of the motherboard is the reverse of removing.
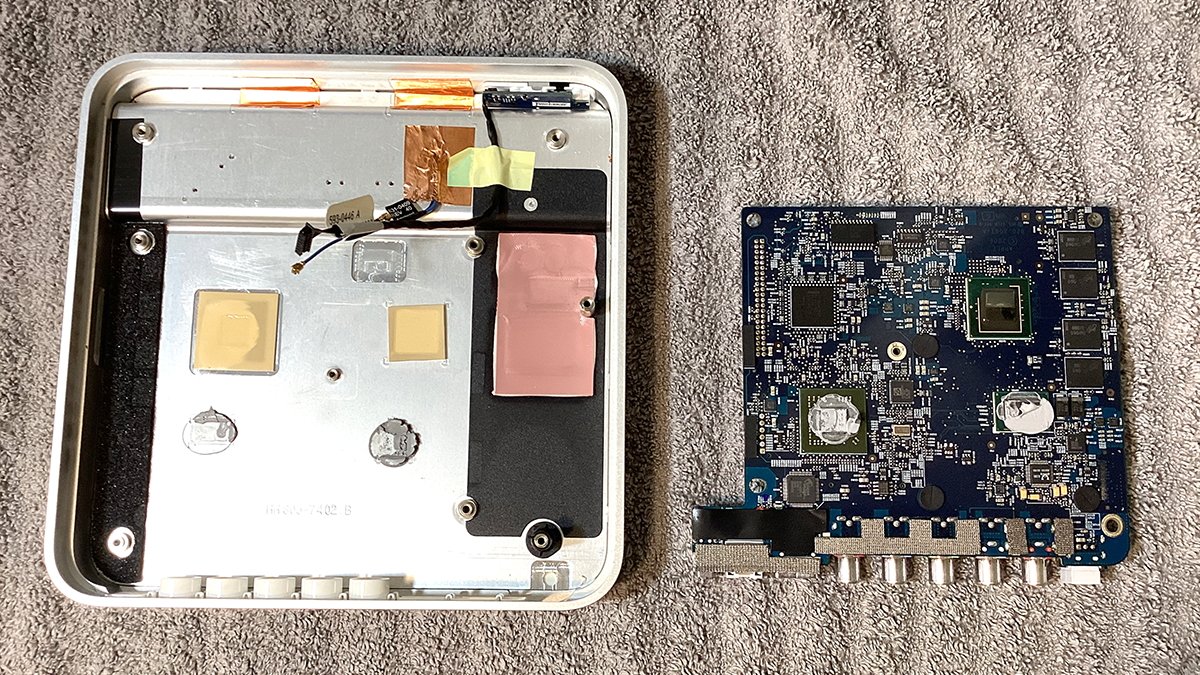
Motherboard eliminated with underside seen. The highest case additionally has two stick-on thermal pads for the opposite two chips.
This step can be optionally available. In the event you do not need to improve your Apple TV’s RAM, skip this step (it is fairly lengthy and complicated).
As talked about, the primary era Apple TV solely shipped with 256MB RAM. The structure of the system permits for as much as 1GB of RAM, however as many Apple TV modders have found, the actual higher restrict is 512MB.
This improve is extraordinarily tough and also you threat damaging your Apple TV motherboard within the course of.
The RAM improve is not as simple as merely changing chips. It additionally entails soldering bodge wires, eradicating the chipset controller (Intel G45U), eradicating, reprogramming and re-flashing the firmware ROM, and superior SMD and sizzling air soldering expertise.
To carry out the RAM improve you may additionally want particular gear and solder flux. This contains:
- SMD solder paste
- Sizzling air board preheat system
- Sizzling air soldering station
- Soldering iron
- Solder wick
- High-quality enamel-coated wire
- Voltmeter
- Tweezers
- Optionally a microscope
- 4 substitute 128GB DDR2 SMD RAM chips
You may additionally want a USB EPROM programmer and a Home windows laptop to connect it to. The programmer should additionally embody the proper adapters to suit the small SMD ROM chip you may must de-solder and modify.
You carry out this step by de-soldering the ROM, putting it within the USB programmer, dumping its ROM code to a Home windows machine, patching the code for bigger RAM chips, then flashing the modified ROM again to the chip and re-soldering it.
Worse, the higher-density RAM chips have totally different reminiscence lanes and among the RAM connection factors on the Apple TV motherboard aren’t linked to something.
This implies you may must solder further bodge wires onto the chip pads. You’d additionally must de-solder and re-solder the built-in Intel chipset controller to attach the extra RAM traces.
All of it is a daunting process and if you happen to’re not 100% sure of your expertise, do not do it – it is too simple to destroy the motherboard or elements within the blink of an eye fixed.
As in a number of late-model Macs, the RAM is soldered to the Apple TV motherboard as surface-mount units (SMD). These units are flat and have a solder-ball matrix on their undersides.
There are not any through-hole or edge connectors and these RAM units can solely be soldered on with sizzling air.
Eradicating and re-soldering these units entails heating the motherboard with sizzling air to take away the components, then melting the outdated solder, making use of flux and including new solder. After that, you place the brand new elements and connect them to the motherboard with sizzling air.
Because the solder heats up, every system is robotically drawn into place on the solder grid on the motherboard. When sizzling air is eliminated, the solder hardens securing every half in place.
It is actually simple to mess this type of restore up and render the pc un-bootable. Therefore, solely try this step if you’re totally assured in your SMD soldering expertise.
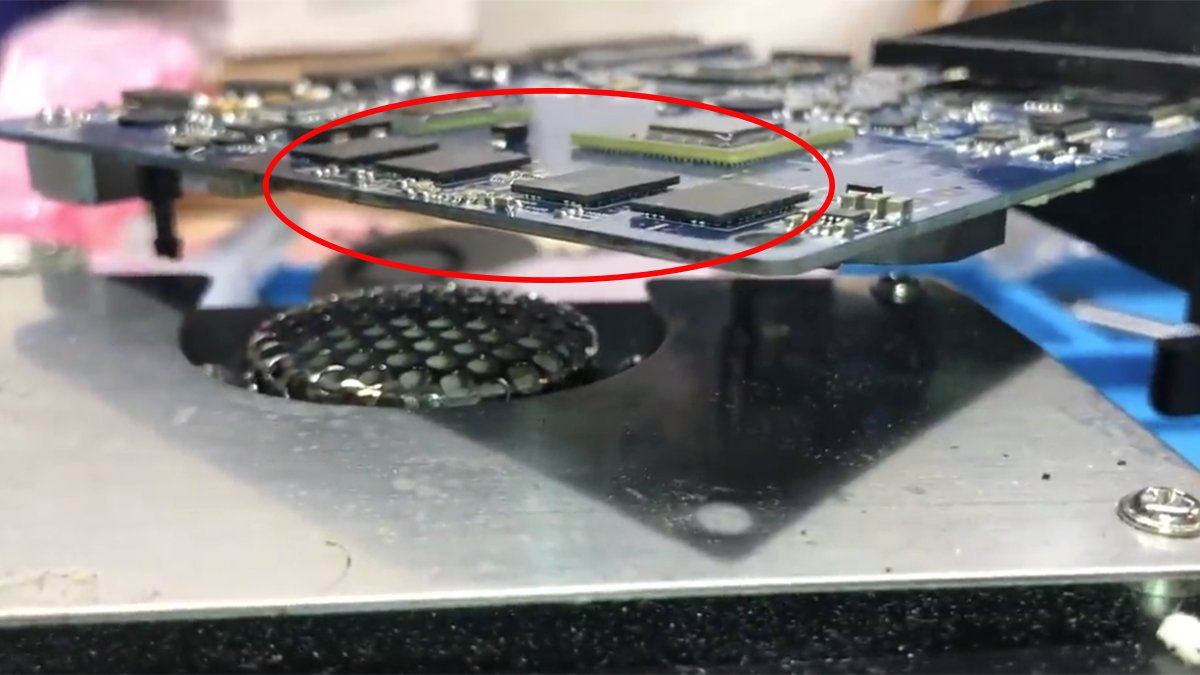
A detailed-up view of the underside of the Apple TV motherboard reveals 4 64MB RAM units alongside the left facet for a complete of 256MB of RAM. The unique RAM chips are made by Micron and are DDR2:
4 DDR2 RAM units alongside the left facet of the underside of the motherboard.
To get began place the motherboard face down on a hot-air SMD preheating system. You do not need to use an “oven” model PCB preheater to warmth the board – you need the type which blows sizzling air out of the highest to evenly warmth the board beneath the spot its laid on.
One instance of such a preheater is the Hakko FR830-02 from Japan, nevertheless it’s actually costly (near $400).
The preheater retains the motherboard at an elevated temperature in order that if you hit the RAM chips along with your sizzling air-station, they arrive proper off with out an excessive amount of time.
Subsequent, apply additional flux to the perimeters of the RAM chips take away all 4 chips along with your sizzling air soldering station and a pair of tweezers.
Apply additional flux to the pads the place the RAM chips have been soldered to the motherboard, warmth them, after which take away any extra solder from the pads with a solder wick.
Additionally utilizing the preheater and your sizzling air station, take away the firmware ROM chip on the front-side of the motherboard. Relying on which motherboard you could have, the dimensions and site of this chip might differ.
Often, it is a 14-pin or 8-pin SMD system close to the highest fringe of the motherboard. You may must de-solder it, clear it, and place it in a correctly-sized EPROM adapter.
For some EPROM programmers, you may must first solder the ROM chip onto one other adapter board which then will get inserted into the programmer.
Now plug the adapter into the EPROM USB programmer and plug the programmer into your Home windows laptop. Utilizing the software program that got here along with your EPROM programmer, copy the contents of the ROM to a file and save the file to disk.
You may later modify this ROM file by patching a bit of it and re-flashing it again to the ROM chip utilizing the programmer. This step permits you to inform the firmware what dimension RAM the pc has.
Lastly, take away all the additional flux from the RAM solder pads utilizing a paper towel and isopropyl alcohol.
The 4 RAM chips soldered to the motherboard atop the recent air preheater. Word the solder balls beneath the chips. Courtesy dosdude1.
Word the structure of every matrix on the motherboard the place the RAM chips have been. These pads join components of every RAM chip with totally different components of the pc.
You’ll be able to lookup the solder matrix on Micron’s RAM web site to see what every pad is used for.
A few of the solder pads join the tackle traces of every RAM chip to the chipset controller which accesses their knowledge by way of these connections. Sadly, the larger-sized RAM chips require further entry (tackle line 13) to work which Apple did not anticipate utilizing.
So among the pads required for bigger chips aren’t linked to something on the Apple TV motherboard. Due to this unlucky oversight, you may want to attach these RAM traces your self utilizing bodge wires.
And you will want to do that for every of the 4 RAM chips.
A bodge wire is just a further additional wire utilized in electronics to attach one thing that wasn’t meant to be linked, or to bypass circuits on a board to rewire connections.
You additionally want to attach every of the bodge wires linked to the proper pin on the controller chip to a spare unused pin on a pullup resistor on the motherboard in an effort to join every to the DDR2 energy rail.
The entire bodge wires on all 4 RAM chips join the identical factor since they’re all a part of the identical RAM financial institution.
On this case, the bodge wires will join the extra tackle line to the chipset controller straight. However first, you may want to switch the ROM’s SPD knowledge for the brand new reminiscence chips and reflash the ROM.
To take action, open the ROM file you dumped above in a Home windows hex editor and seek for the string “80 08 08 0D 0A”. That is the header for the SPD knowledge within the ROM file.
Every byte within the string tells the firmware concerning the traits of the RAM put in on the motherboard.
You may must dump the 256 bytes following this string to a file. Then you’ll have to open it in a Home windows app known as SPDTool which lets you view the SPD knowledge in a UI, modifications its values, then reserve it again to a file.
As soon as you have modified and saved the file, you possibly can dump that knowledge again to the unique knowledge within the ROM file. This overwrites it and thus updating the SPD knowledge which tells the Apple TV firmware what sort of RAM is within the machine.
If all this sounds complicated, it’s. However fortunately legendary retro YouTuber dosdude1 has a video detailing the whole RAM substitute and firmware enhancing course of.
He additionally explains the variations within the reminiscence lanes between the 2 totally different dimension RAM chips, and the best way to do the bodge wire soldering to bypass the RAM connection limitations on the Apple TV motherboard.
As soon as you have up to date and re-flashed your Apple TV ROM with the brand new SPD knowledge, apply some new solder paste flux to its pads on the motherboard. Use it to re-solder the ROM again onto the motherboard utilizing a sizzling air station.
Clear the ROM space with isopropyl alcohol and a cotton swab.
Earlier than you truly connect the bodge wires, you may must take away the Intel G45U controller chip utilizing sizzling air, “reball” it (reflow its solder balls on the underside utilizing sizzling air), and clear off any left over flux.
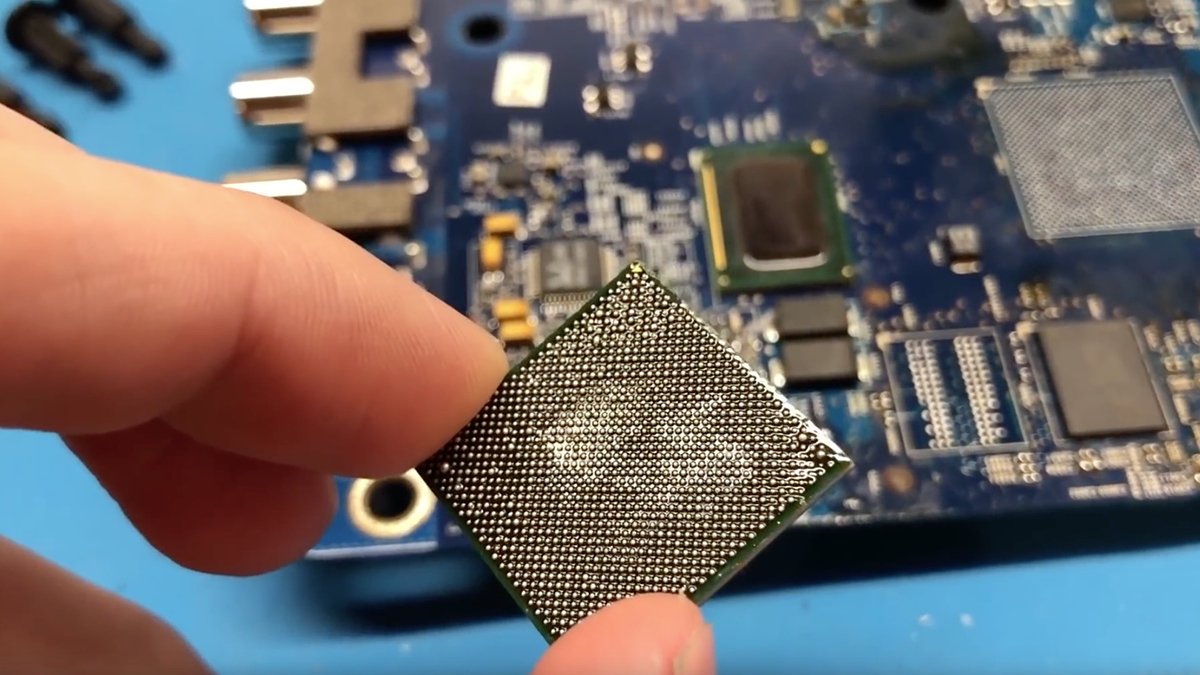
Intel G45 controller chip. Discover the solder-ball matrix on the underside. Courtesy dosdude1.
You may want to attach a bodge wire from pin seven on the G45 chip to the pad for tackle line 13 on the first of the RAM chips.
It seems Apple offered a by way of – a pass-through gap to the opposite facet of the board on pin seven on the underside row of the G45 chip on the motherboard (the G45 pin row closest to the RAM chips).
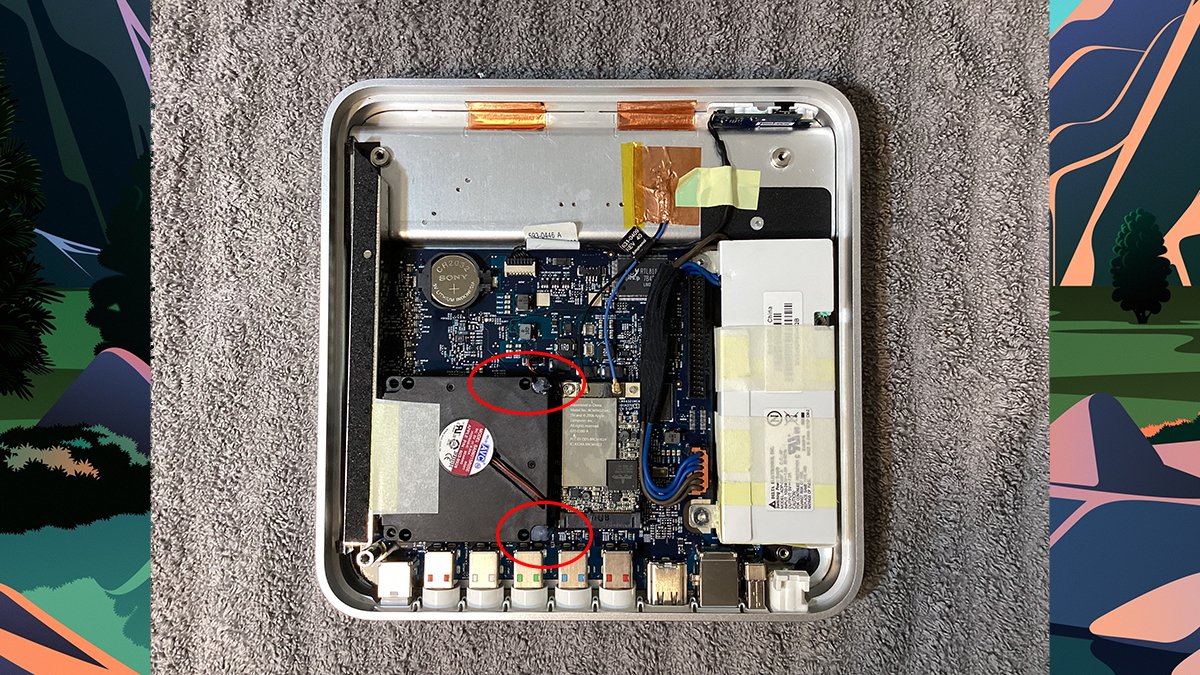
On the topside of the board, this by way of attaches to a testpoint not removed from the coin-cell battery holder. This implies you possibly can join the bodge wire from tackle line 13 on the primary RAM chip to the testpoint on the topside of the board and never must mess with soldering the wire to the G45 chip itself.
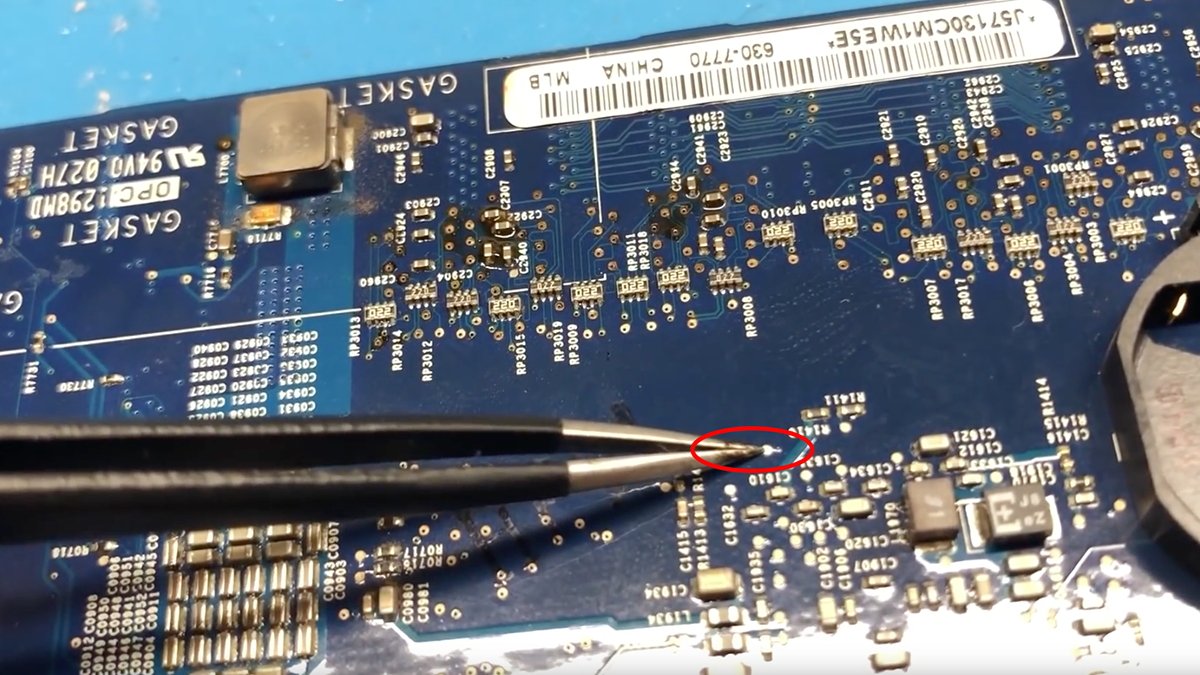
The topside testpoint close to the coin-cell holder which attaches to pin seven on the G45 chip on the opposite facet of the motherboard. Courtesy dosdude1.
You may additionally must solder one other bodge wire from the fourth RAM chip’s tackle line 13 to the spare pullup resistor pin on the underside of the board for DDR2 energy. This resistor is slightly below the RAM chips.
Do that step after the G45 chip has been reballed and resoldered to the motherboard
Subsequent, solder a bodge wire from every of the RAM pads for tackle line 13 to the adjoining RAM chip’s tackle line 13 pad. On every chip that is the decrease backside proper pin in every solder matrix.
You need to join all 4 tackle line 13 pins along with wire.
By soldering all these pins along with wires you full the circuit for tackle line 13 so the G45 chip can entry the brand new RAM totally. That is by far essentially the most tough step within the RAM improve.
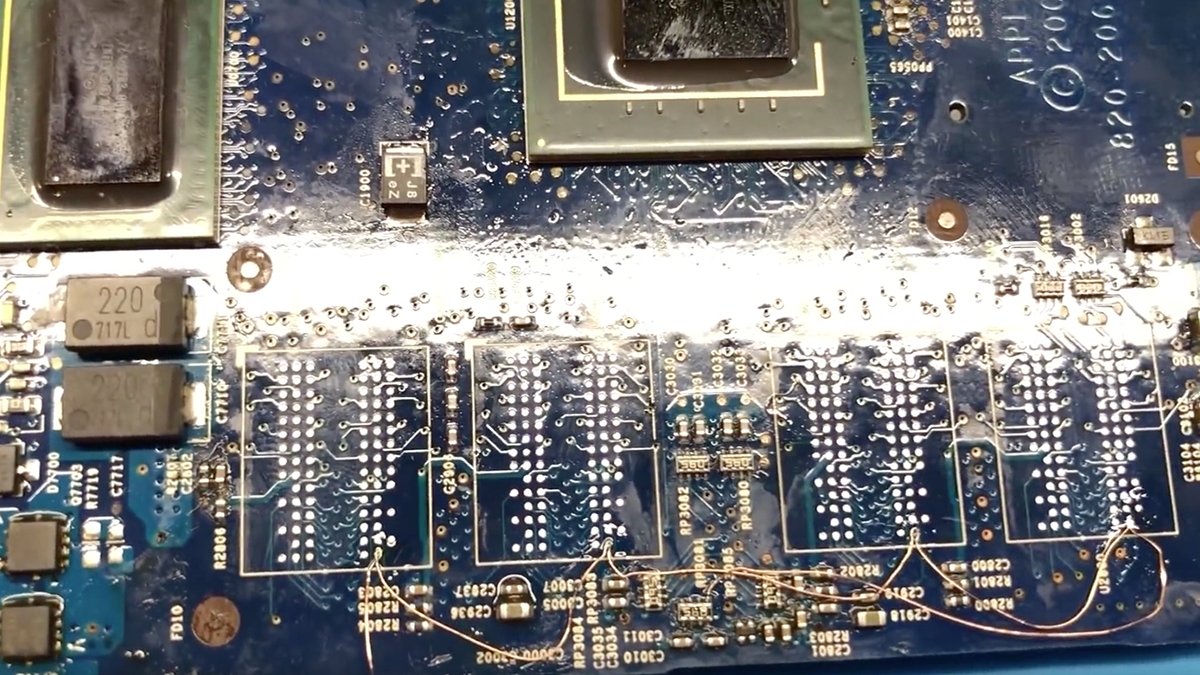
Bodge wire set up – bridging tackle line 13 on all RAM chips, to the pullup resistor, and at last on the left to the topside of the board.
Lastly because the final step, solder all 4 new RAM chips onto their pads on the motherboard utilizing sizzling air after including new flux to the chip pads – ensuring not one of the bodge wires transfer or come free.
Clear any extra flux from the world with isopropyl alcohol (fastidiously so you do not pull the bodge wires free). Lastly, reinstall the motherboard again into the Apple TV chassis, reinstall the warmth conduit, and the WiFi card.
It’s possible you’ll need to cowl the bodge wire space with huge Kapton tape simply to insure not one of the connections can brief to the chassis or to the motherboard.
Reattach the WiFi card antennae wires, then reinstall the facility provide after all of the motherboard components are secured to the Apple TV.
Step 9: Reinstall the fan and shut the case
Now that many of the Apple TV is again collectively, you continue to must reinstall the fan.
If a number of of the plastic posts holding the fan in broke if you eliminated it, concern not. Drop the fan again in place on its posts, and if the tops of any of the posts broke off, merely add a big drop of sizzling glue with a glue gun to the highest of the posts.
If you do not have a glue gun, a small quantity of waterproof lavatory caulking will work. Use simply sufficient to cowl the highest of every damaged put up, and let it dry.
This could securely maintain the fan on. In our refurb we misplaced two of the three put up clips when eradicating them however sizzling glue labored simply fantastic after changing the fan:
Fan reinstalled with sizzling glue used on the 2 posts on the best.
Remember to reconnect the fan connector to the motherboard.
Lastly, plug the ATA drive’s ribbon connector again into the ATA connector on the motherboard, and exchange and safe the underside cowl with the 4 nook Torx screws. This completes the restore.
Take away any extra glue from the underside of the quilt. You need not take away all of it however take away any that sticks up even somewhat since it’ll stop the underside rubber foot from laying flat on the quilt.
What sort of glue to make use of to reseal the underside foot is as much as you. Do not use rubber cement. It is not sturdy sufficient and the chemical substances in it trigger the rubber foot to twist up making it unattainable to re-secure it.
We used small quantities of Cheesy Glue from Fabrique Pour (aleenes.com).
It’s possible you’ll not must cowl the whole backside of the quilt with glue to re-attach the foot. A small quantity within the corners and within the center might suffice. Attempt it and see.
Set a heavy object corresponding to a big e-book or weight on the foot till the glue dries to ensure it sticks evenly.
Step 10: Reinstall the OS
In the event you upgraded the Apple TV’s onerous drive, or wiped it whereas it was disconnected, you may must reinstall the working system.
To take action, use a instrument known as OpenELEC and a USB thumb drive. You may additionally want a Mac drive flasher utility corresponding to BalenaEtcher to flash the manufacturing facility restore installer picture onto your USB thumb drive.
The unique infrared distant management included with the first era Apple TV can be required. That is wanted as a result of holding down a particular key mixture on the distant tells the Apple TV in addition from the USB port as an alternative of from the inner onerous drive. Extra on this beneath.
The web site tweaking4all.com has detailed directions on the best way to use OpenELEC to reinstall the OS.
Additionally see this web page on Apple’s dialogue boards.
Basically the method entails downloading the three.0.2 restore picture for Apple TV (factoryrestore-3.0.2.img.zip) flashing it to a USB thumb drive, inserting the drive into the Apple TV’s rear USB port, then rebooting the Apple TV.
Unzipping the above file yields a picture file named “factoryrestore3.img”. Use BalenaEtcher to flash this picture file to a USB thumb drive. Remember doing so will erase all the things beforehand on the thumb drive.
After the flashing completes, the Mac Finder offers you an error saying the USB drive is unreadable. Click on Eject then take away the USB thumb drive out of your Mac.
Plug the newly flashed USB drive into your Apple TV, plug it into an HDMI TV and a wall outlet, then energy it on. As quickly as you see the amber flashing LED on the entrance of the Apple TV, maintain down MENU and the + buttons on the distant management.
As quickly as you see an exercise mild on the USB thumb drive, launch the 2 buttons on the distant.
Shortly you may see the OpenELEC app load:

OpenELEC boot sequence on Apple TV.
There isn’t any interplay onscreen with OpenELEC – as soon as it hundreds it wipes the Apple TV inner drive and begins restoring the Apple TV OS to it. After it finishes, OpenELEC will reboot your Apple TV, dropping it into the default Restoration mode.
Use the distant to scroll right down to Manufacturing facility Restore and click on the heart button on the distant to verify. Apple TV will reboot and go into full restore mode to revive the system to manufacturing facility situations.
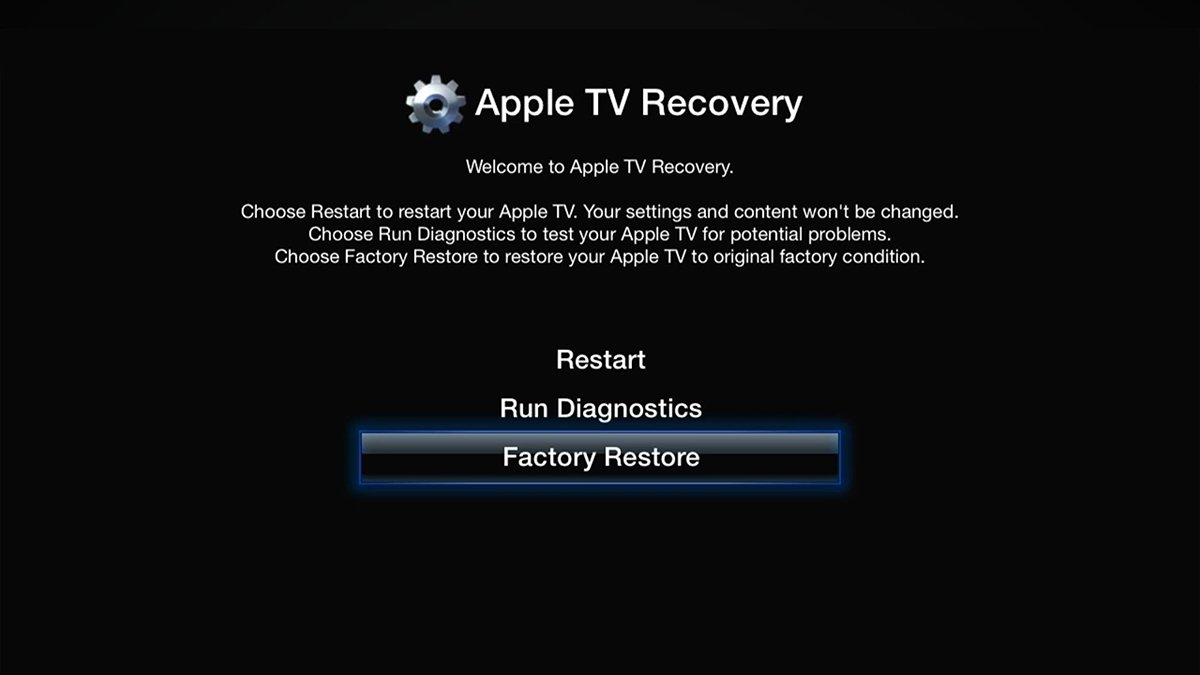
Apple TV Restoration mode. Scroll down and click on “Manufacturing facility Restore” then press the middle button on the distant.
After TV Restoration mode does its factor, the Apple TV will reboot once more, and this time you may be thrown into the default manufacturing facility setup sequence. You may see a little bit of animation adopted by just a few setup screens.
Enter your information to arrange your Apple TV. As soon as setup is full, you may be on the predominant menu immediate with none content material:
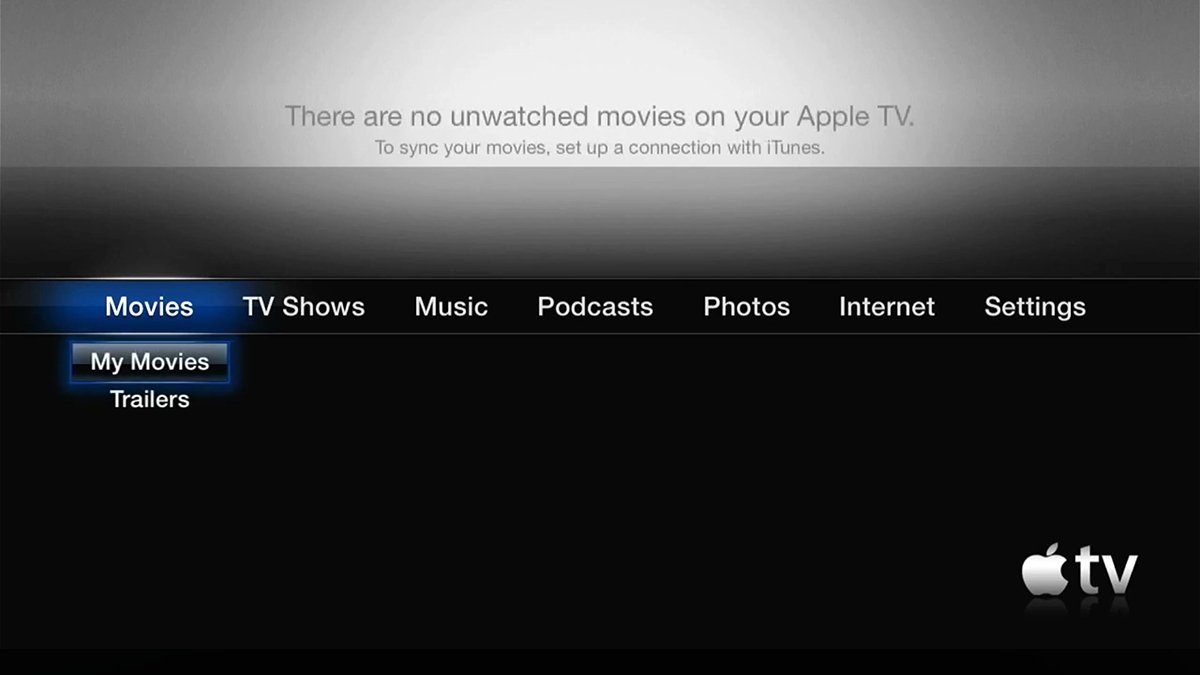
Apple TV 1st era predominant menu.
Step 11: Hook up with iTunes
As we talked about beforehand there isn’t any App Retailer for the primary era Apple TV. To add content material to your Apple TV you may want to attach it to an older Mac or Home windows 7 laptop and run Apple’s iTunes app – the predecessor of as we speak’s Apple Music app.
In iTunes you possibly can hook up with your Apple TV and sync any media content material to it you need to play. To do that, run iTunes, choose your Apple TV in its sidebar, then choose what media to sync within the righthand pane and click on Sync.
It’s possible you’ll be requested to enter a code displayed in your Apple TV’s show in iTunes in an effort to join.
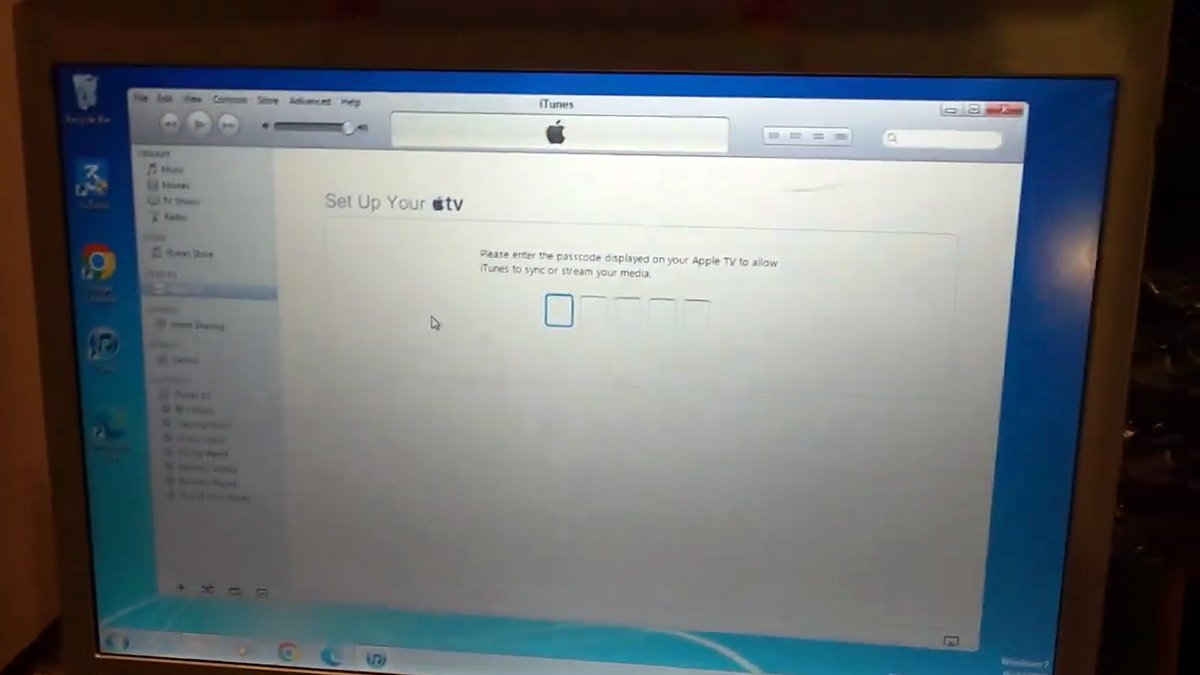
Connecting in Apple’s iTunes on Home windows 7. Courtesy dosdude1.
The unique Apple TV was a revolutionary system for its time and despite the fact that it did not have entry to an app retailer, it was nonetheless helpful. You’ll be able to nonetheless use these units for picture albums, music, films, or if it’s worthwhile to run older apps.
The primary-generation Apple TV was quickly changed with the extra fashionable fashions we all know and love as we speak.
Steve Jobs as soon as known as the Apple TV “Our pastime” nevertheless it has advanced into far more than that – and it’ll seemingly be with us for a very long time to come back.
[ad_2]