[ad_1]

Picture by creator
Mannequin deployment is the method of educated fashions being built-in into sensible functions. This consists of defining the required setting, specifying how enter knowledge is launched into the mannequin and the output produced, and the capability to investigate new knowledge and supply related predictions or categorizations. Allow us to discover the method of deploying fashions in manufacturing.
Step 1: Knowledge Preprocessing
Take care of lacking values by imputing them utilizing imply values or deleting the rows/columns. Be sure that categorical variables are additionally reworked from qualitative knowledge to quantitative knowledge by One-Sizzling Encoding or by Label Encoding. Normalize and standardize numerical options to remodel them to a standard scale.
import pandas as pd
from sklearn.impute import SimpleImputer
from sklearn.preprocessing import OneHotEncoder, StandardScaler, MinMaxScaler

# Load your knowledge
df = pd.read_csv('your_data.csv')

# Deal with lacking values
imputer_mean = SimpleImputer(technique='imply')
df['numeric_column'] = imputer_mean.fit_transform(df[['numeric_column']])

# Encode categorical variables
one_hot_encoder = OneHotEncoder()
encoded_features = one_hot_encoder.fit_transform(df[['categorical_column']]).toarray()
encoded_df = pd.DataFrame(encoded_features, columns=one_hot_encoder.get_feature_names_out(['categorical_column']))

# Normalize and standardize numerical options
# Standardization (zero imply, unit variance)
scaler = StandardScaler()
df['standardized_column'] = scaler.fit_transform(df[['numeric_column']])

# Normalization (scaling to a variety of [0, 1])
normalizer = MinMaxScaler()
df['normalized_column'] = normalizer.fit_transform(df[['numeric_column']])
Step 2: Mannequin Coaching and Analysis
Divide knowledge into two teams: coaching knowledge set and testing knowledge set to coach the mannequin. Select a mannequin and prepare it to the used knowledge. Positive-tuning hyperparameters selects the best-performing machine studying fashions. The mannequin is checked for its stability with totally different sub-groups of the info for implementing cross-validation.
import pandas as pd
from sklearn.model_selection import train_test_split, GridSearchCV, cross_val_score
from sklearn.ensemble import RandomForestClassifier
from sklearn.metrics import accuracy_score, precision_score, recall_score
from sklearn.impute import SimpleImputer
from sklearn.preprocessing import OneHotEncoder, StandardScaler, MinMaxScaler

# Load your knowledge
df = pd.read_csv('knowledge.csv')

# Break up knowledge into coaching and testing units
X = df.drop(columns=['target_column'])
y = df['target_column']

X_train, X_test, y_train, y_test = train_test_split(X, y, test_size=0.2, random_state=42)

# Hyperparameter tuning
param_grid = {
    'n_estimators': [50, 100, 200],
    'max_depth': [None, 10, 20, 30],
    'min_samples_split': [2, 5, 10]
}

grid_search = GridSearchCV(estimator=RandomForestClassifier(random_state=42),
                           param_grid=param_grid,
                           cv=5,
                           scoring='accuracy',
                           n_jobs=-1)

# Match the grid search to the info
grid_search.match(X_train, y_train)

# Get one of the best mannequin from the grid search
best_model = grid_search.best_estimator_

# Cross-validation to evaluate mannequin generalization and robustness
cv_scores = cross_val_score(best_model, X_train, y_train, cv=5, scoring='accuracy')

print(f"Cross-validation scores: {cv_scores}")
print(f"Imply cross-validation rating: {cv_scores.imply()}")
Step 3: Mannequin Packaging
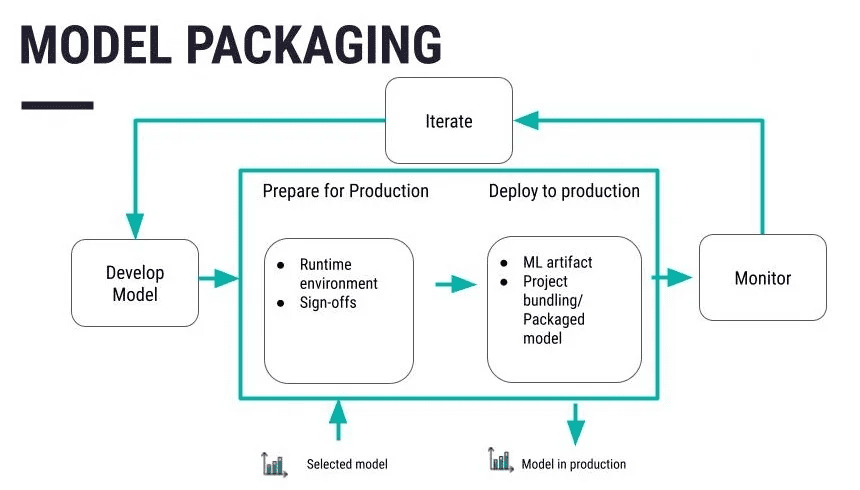
Supply: https://data.dataiku.com/newest/mlops-o16n/structure/concept-model-packaging.html
Serialize the code right into a extra appropriate format that may be saved or distributed to the opposite system. Pickle is likely one of the standard codecs adopted by joblib and ONNX codecs based mostly on the person’s necessities. After you will have outlined and optimized your mannequin, retailer it in a file or database. Platforms corresponding to Git additionally come in useful to deal with the alterations and modifications to be made. Apply particular measures like encryption of knowledge each whereas saved and in transit in order that the info shouldn’t be simply accessible to anybody else.
import joblib

joblib.dump(mannequin, 'mannequin.pkl')
Put your serialized mannequin right into a container corresponding to Docker. This makes it transportable and simpler to move machine studying fashions to totally different environments.
# Docker code
FROM python:3.8-slim
COPY mannequin.pkl /app/mannequin.pkl
COPY app.py /app/app.py
WORKDIR /app
RUN pip set up -r necessities.txt
CMD ["python", "app.py"]
Step 4: Atmosphere Setup for Deployment
To set infrastructure and sources for mannequin deployment, it is strongly recommended to make use of cloud companies like AWS, Azure, or Google Cloud. Modify the required parts wanted for internet hosting of the mannequin corresponding to servers, databases and all that may be finished on the precise cloud infrastructure companies of the chosen cloud platform.
AWS: Setup EC2 occasion utilizing AWS CLI
aws ec2 run-instances
    --image-id ami-0abcdef1234567890
    --count 1
    --instance-type t2.micro
    --key-name MyKeyPair
    --security-group-ids sg-0abcdef1234567890
    --subnet-id subnet-0abcdef1234567890
Azure: Setup Digital Machine utilizing Azure CLI
az vm create
  --resource-group myResourceGroup
  --name myVM
  --image UbuntuLTS
  --admin-username azureuser
  --generate-ssh-keys
Google Cloud: Setup Compute Engine occasion utilizing Google Cloud CLI
gcloud compute situations create my-instance
  --zone=us-central1-a
  --machine-type=e2-medium
  --subnet=default
  --network-tier=PREMIUM
  --maintenance-policy=MIGRATE
  --image=debian-9-stretch-v20200902
  --image-project=debian-cloud
  --boot-disk-size=10GB
  --boot-disk-type=pd-standard
  --boot-disk-device-name=my-instance
Step 5: Constructing the Deployment Pipeline
Use corresponding to Jenkins, or GitLab CI/CD to automate the step of deploying the mannequin. Design a listing of steps to be executed so as to make the deploymnt course of extra environment friendly and use a Jenkinsfile or YAML configuration within the context of GitHub Actions.
# Utilizing Jenkins for CI/CD pipeline
pipeline {
  agent any
  phases {
    stage('Construct') {
      steps {
        sh 'python setup.py construct'
      }
    }
    stage('Check') {
      steps {
        sh 'python -m unittest uncover'
      }
    }
    stage('Deploy') {
      steps {
        sh 'docker construct -t mymodel:newest .'
        sh 'docker run -d -p 5000:5000 mymodel:newest'
      }
    }
  }
}
Step 6: Mannequin Testing
Perform checks to see to it that every one the features of the mannequin are appropriately fulfilled. After that, the forecasted quantities are in contrast with the outcomes this mannequin is meant to supply. Test the mannequin’s generalization functionality to establish whether or not it would carry out effectively on different new knowledge. To check with the pattern knowledge, select the precise analysis standards – accuracy, precision, recall.
# Import essential libraries
from sklearn.metrics import accuracy_score, precision_score, recall_score

# Load your check knowledge
test_df = pd.read_csv('your_test_data.csv')

X_test = test_df.drop(columns=['target_column'])
y_test = test_df['target_column']

# Predict outcomes on the check set
y_pred_test = best_model.predict(X_test)

# Consider efficiency metrics
test_accuracy = accuracy_score(y_test, y_pred_test)
test_precision = precision_score(y_test, y_pred_test, common="weighted")
test_recall = recall_score(y_test, y_pred_test, common="weighted")

# Print efficiency metrics
print(f"Check Set Accuracy: {test_accuracy}")
print(f"Check Set Precision: {test_precision}")
print(f"Check Set Recall: {test_recall}")
Step 7: Monitoring and Upkeep
Be sure that there are not any errors within the mannequin with the assistance of instruments corresponding to AWS CloudWatch, Azure Monitor or Google Cloud Monitoring. This can require exhibiting how the mannequin deployed sooner or later ought to be modified to make it even higher.
AWS CloudWatch
aws cloudwatch put-metric-alarm --alarm-name CPUAlarm --metric-name CPUUtilization
--namespace AWS/EC2 --statistic Common --period 300 --threshold 70
--comparison-operator GreaterThanThreshold --dimensions "Identify=InstanceId,Worth=i-1234567890abcdef0"
--evaluation-periods 2 --alarm-actions arn:aws:sns:us-east-1:123456789012:my-sns-topic
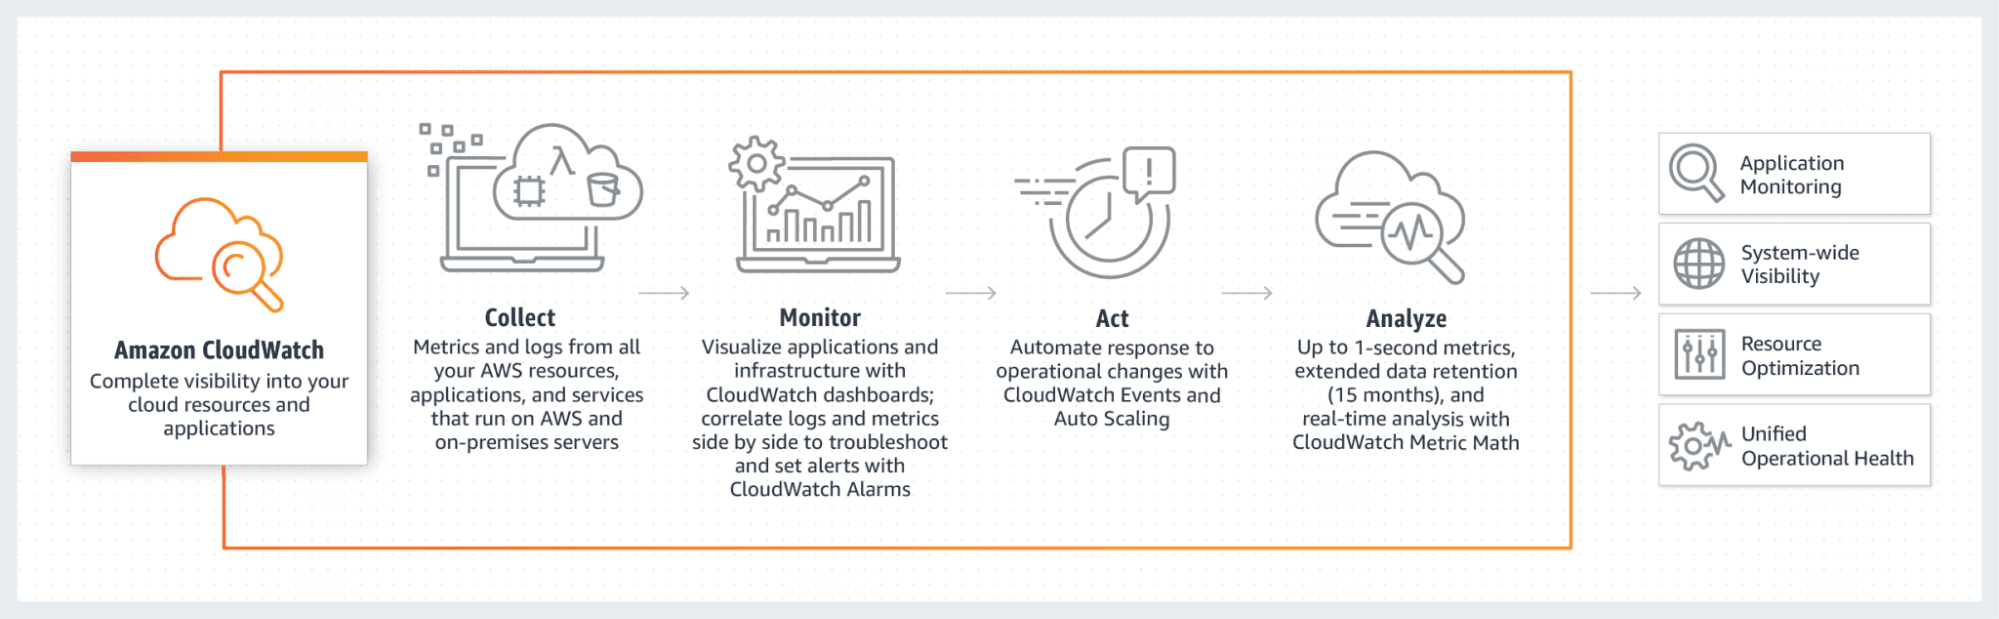
Supply: https://blogs.vmware.com/administration/2021/03/cloud-services-aws-cloudwatch-azure-monitor.html
Azure Monitor
az monitor metrics alert create --name 'CPU Alert' --resource-group myResourceGroup
--scopes /subscriptions/{subscription-id}/resourceGroups/{resource-group-name}/suppliers/Microsoft.Compute/virtualMachines/{vm-name}
--condition "avg Share CPU > 80" --description 'Alert if CPU utilization exceeds 80%'
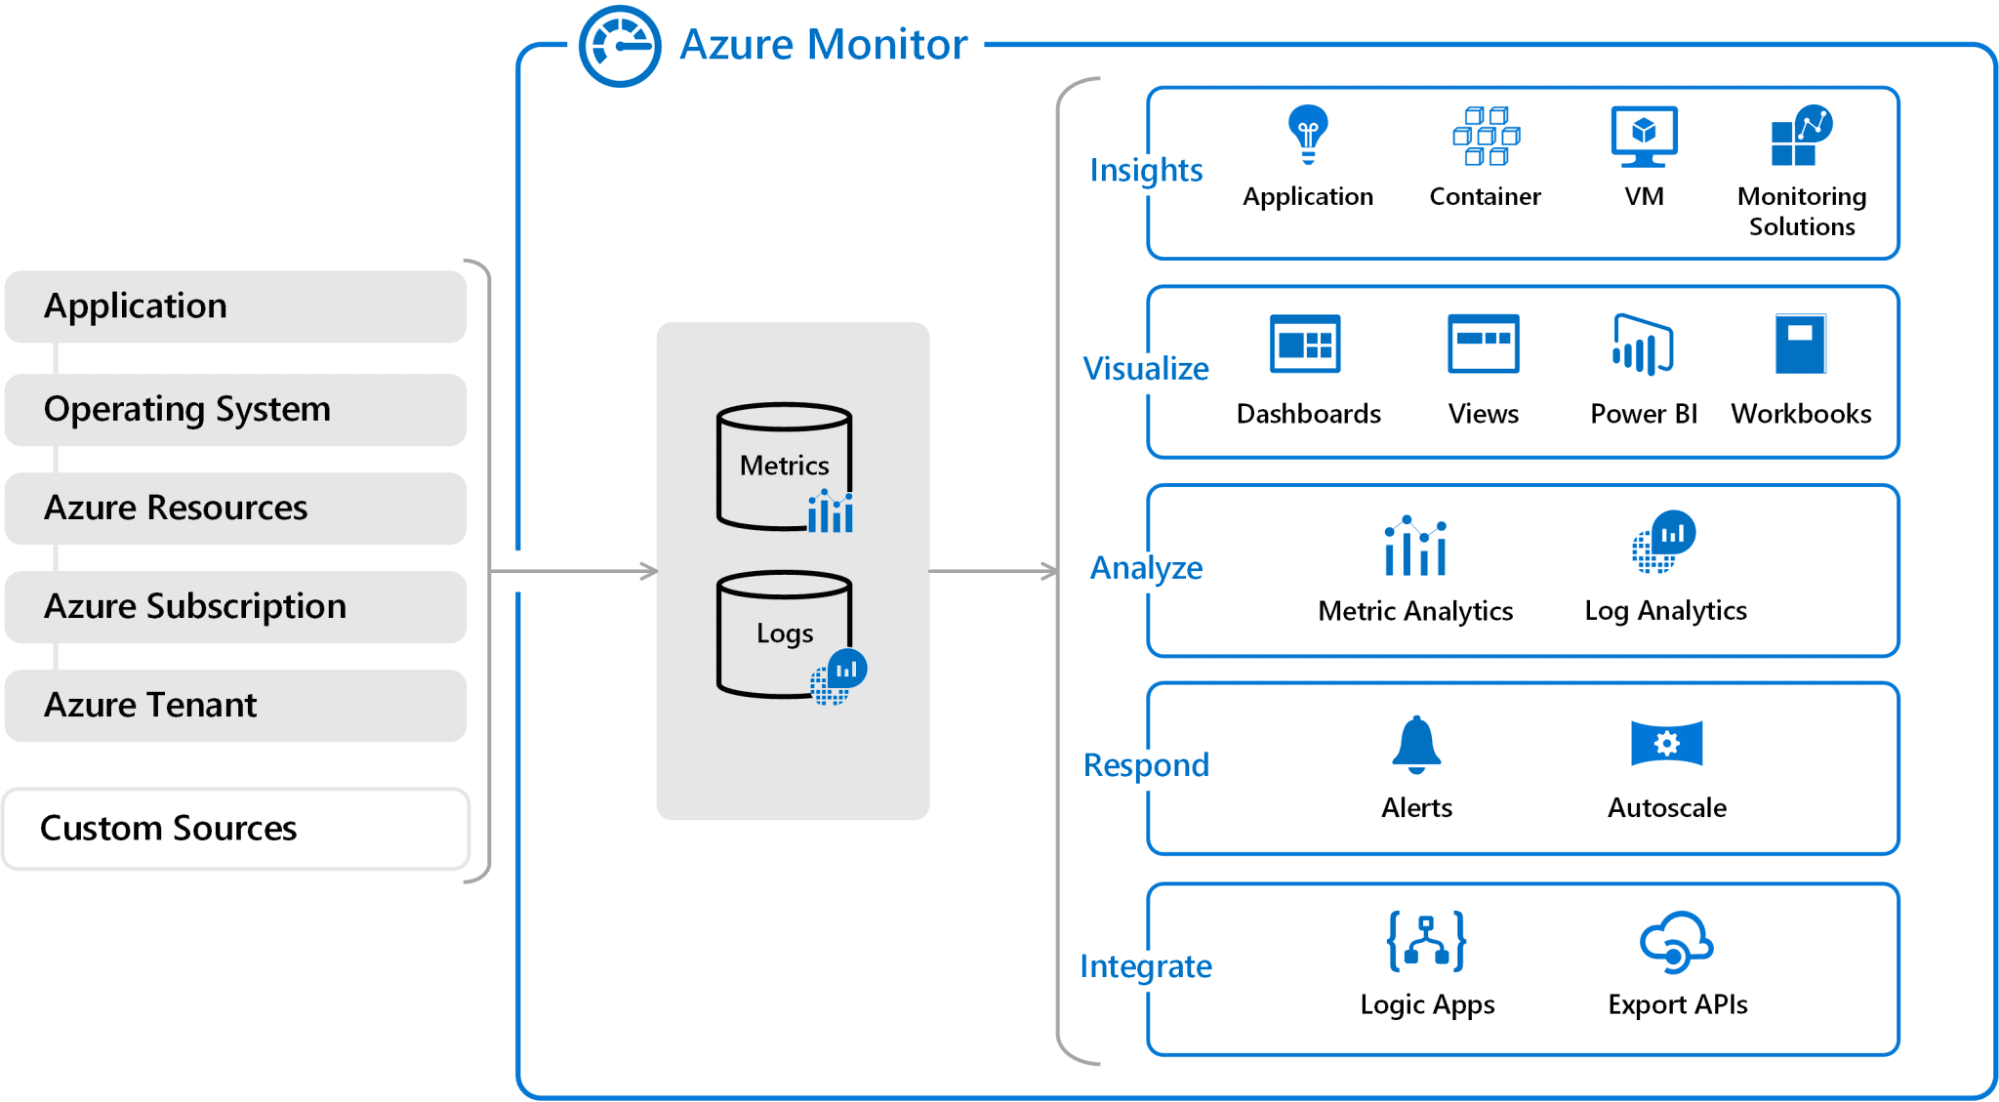
Supply:https://blogs.vmware.com/administration/2021/03/cloud-services-aws-cloudwatch-azure-monitor.html
Wrapping Up
The methods outlined on this tutorial will guarantee that you’ve got the important thing steps which might be wanted to make machine studying fashions deploy. Following the aforementioned steps, one could make the educated fashions usable and simply deployable for practice-based use. From constructing the mannequin to configuring and validating the construction, you now know methods to take your machine studying endeavors from hypothetical to sensible.
Jayita Gulati is a machine studying fanatic and technical author pushed by her ardour for constructing machine studying fashions. She holds a Grasp’s diploma in Laptop Science from the College of Liverpool.
[ad_2]