[ad_1]

Picture by Creator
FastAPI is a well-liked internet framework for constructing APIs with Python. It is tremendous easy to be taught and is liked by builders.
FastAPI leverages Python kind hints and relies on Pydantic. This makes it easy to outline knowledge fashions and request/response schemas. The framework robotically validates request knowledge towards these schemas, decreasing potential errors. It additionally natively helps asynchronous endpoints, making it simpler to construct performant APIs that may deal with I/O-bound operations effectively.
This tutorial will educate you learn how to construct your first API with FastAPI. From organising your improvement setting to constructing an API for a easy machine studying app, this tutorial takes you thru all of the steps: defining knowledge fashions, API endpoints, dealing with requests, and extra. By the top of this tutorial, you’ll have a very good understanding of learn how to use FastAPI to construct APIs rapidly and effectively. So let’s get began.
Step 1: Set Up the Surroundings
FastAPI requires Python 3.7 or later. So be sure to have a current model of Python put in. Within the undertaking listing, create and activate a devoted digital setting for the undertaking:
$ python3 -m venv v1
$ supply v1/bin/activate
The above command to activate the digital setting works for those who’re on Linux or MacOS. For those who’re a Home windows person, test the docs to create and activate digital environments.
Subsequent, set up the required packages. You’ll be able to set up FastAPI and uvicorn utilizing pip:
$ pip3 set up fastapi uvicorn
This installs FastAPI and all of the required dependencies as properly uvicorn, the server that we’ll use to run and take a look at the API that we construct. As a result of we’ll construct a easy machine studying mannequin utilizing scikit-learn, set up it in your undertaking setting as properly:
$ pip3 set up scikit-learn
With the installations out of the way in which, we will get to coding! You will discover the code on GitHub.
Step 2: Create a FastAPI App
Create a primary.py file within the undertaking listing. Step one is to create a FastAPI app occasion like so:
# Create a FastAPI app
# Root endpoint returns the app description

from fastapi import FastAPI

app = FastAPI()
The Iris dataset is without doubt one of the toy datasets that you just work with when beginning out with knowledge science. It has 150 knowledge data, 4 options, and a goal label (species of Iris flowers). To maintain issues easy, let’s create an API to foretell the Iris species.
Within the coming steps, we’ll construct a logistic regression mannequin and create an API endpoint for prediction. After you’ve constructed the mannequin and outlined the /predict/ API endpoint, you need to have the ability to make a POST request to the API with the enter options and obtain the anticipated species as a response.
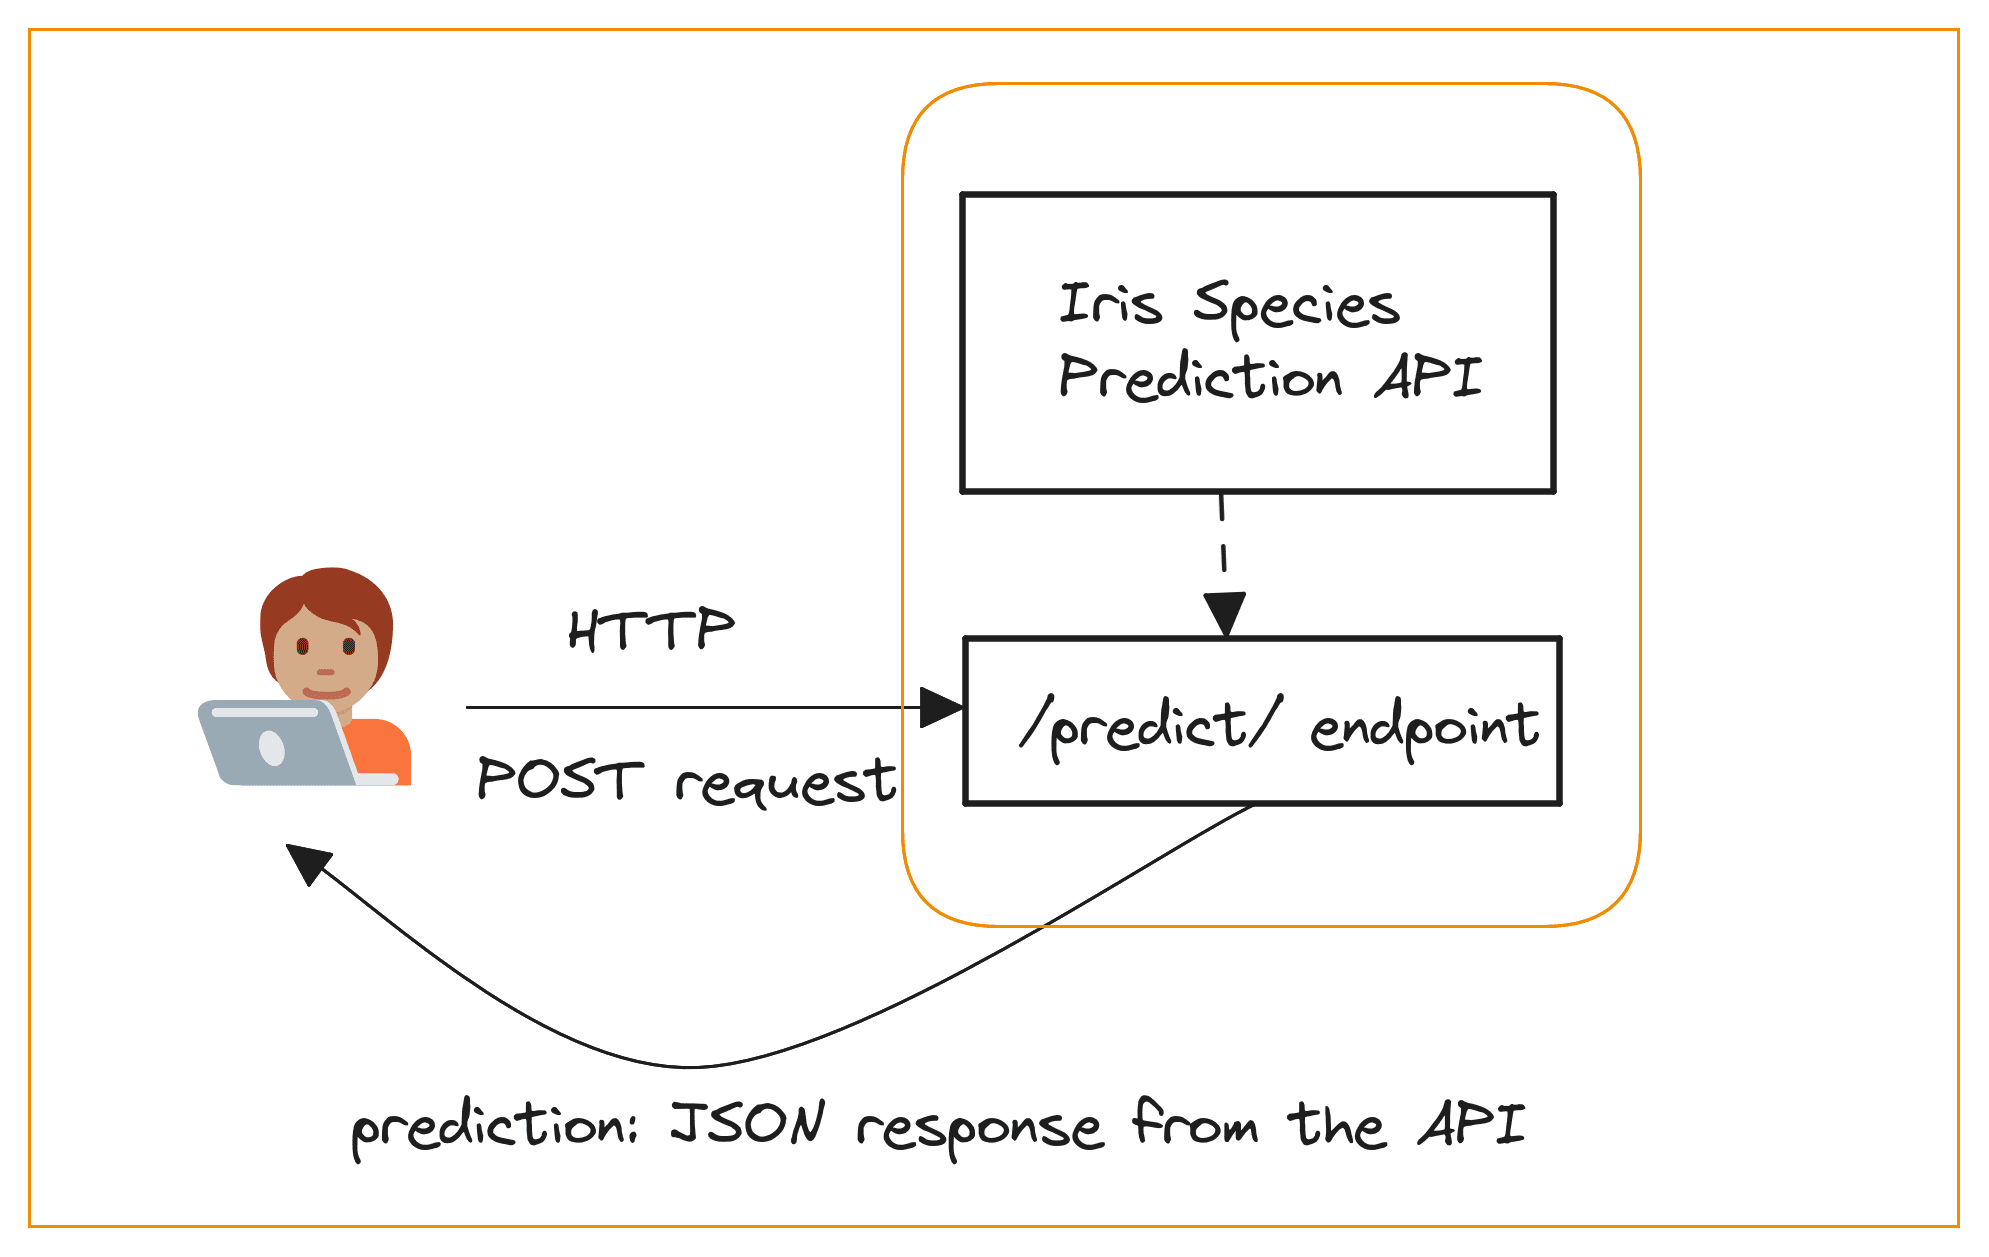
Iris Prediction API | Picture by Creator
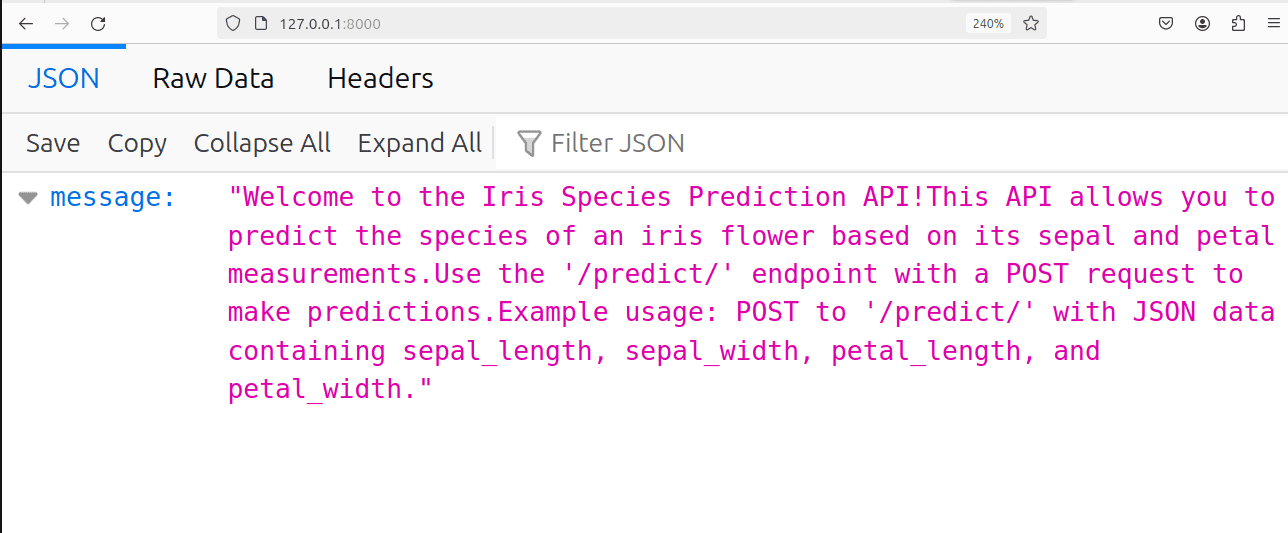
Simply so it’s useful, let’s additionally outline a root endpoint which returns the outline of the app that we’re constructing. To take action, we outline the get_app_description operate and create the basis endpoint with the @app decorator like so:
# Outline a operate to return an outline of the app
def get_app_description():
	return (
    	"Welcome to the Iris Species Prediction API!"
    	"This API lets you predict the species of an iris flower primarily based on its sepal and petal measurements."
    	"Use the '/predict/' endpoint with a POST request to make predictions."
    	"Instance utilization: POST to '/predict/' with JSON knowledge containing sepal_length, sepal_width, petal_length, and petal_width."
	)

# Outline the basis endpoint to return the app description
@app.get("https://www.kdnuggets.com/")
async def root():
	return {"message": get_app_description()}
Sending a GET request to the basis endpoint returns the outline.
Step 3: Construct a Logistic Regression Classifier
Thus far we’ve instantiated a FastAPI app and have outlined a root endpoint. It’s now time to do the next:
- Construct a machine studying mannequin. We’ll use a logistic regression classifier. For those who’d wish to be taught extra about logistics regression, learn Constructing Predictive Fashions: Logistic Regression in Python.
- Outline a prediction operate that receives the enter options and makes use of the machine studying mannequin to make a prediction for the species (considered one of setosa, versicolor, and virginica).
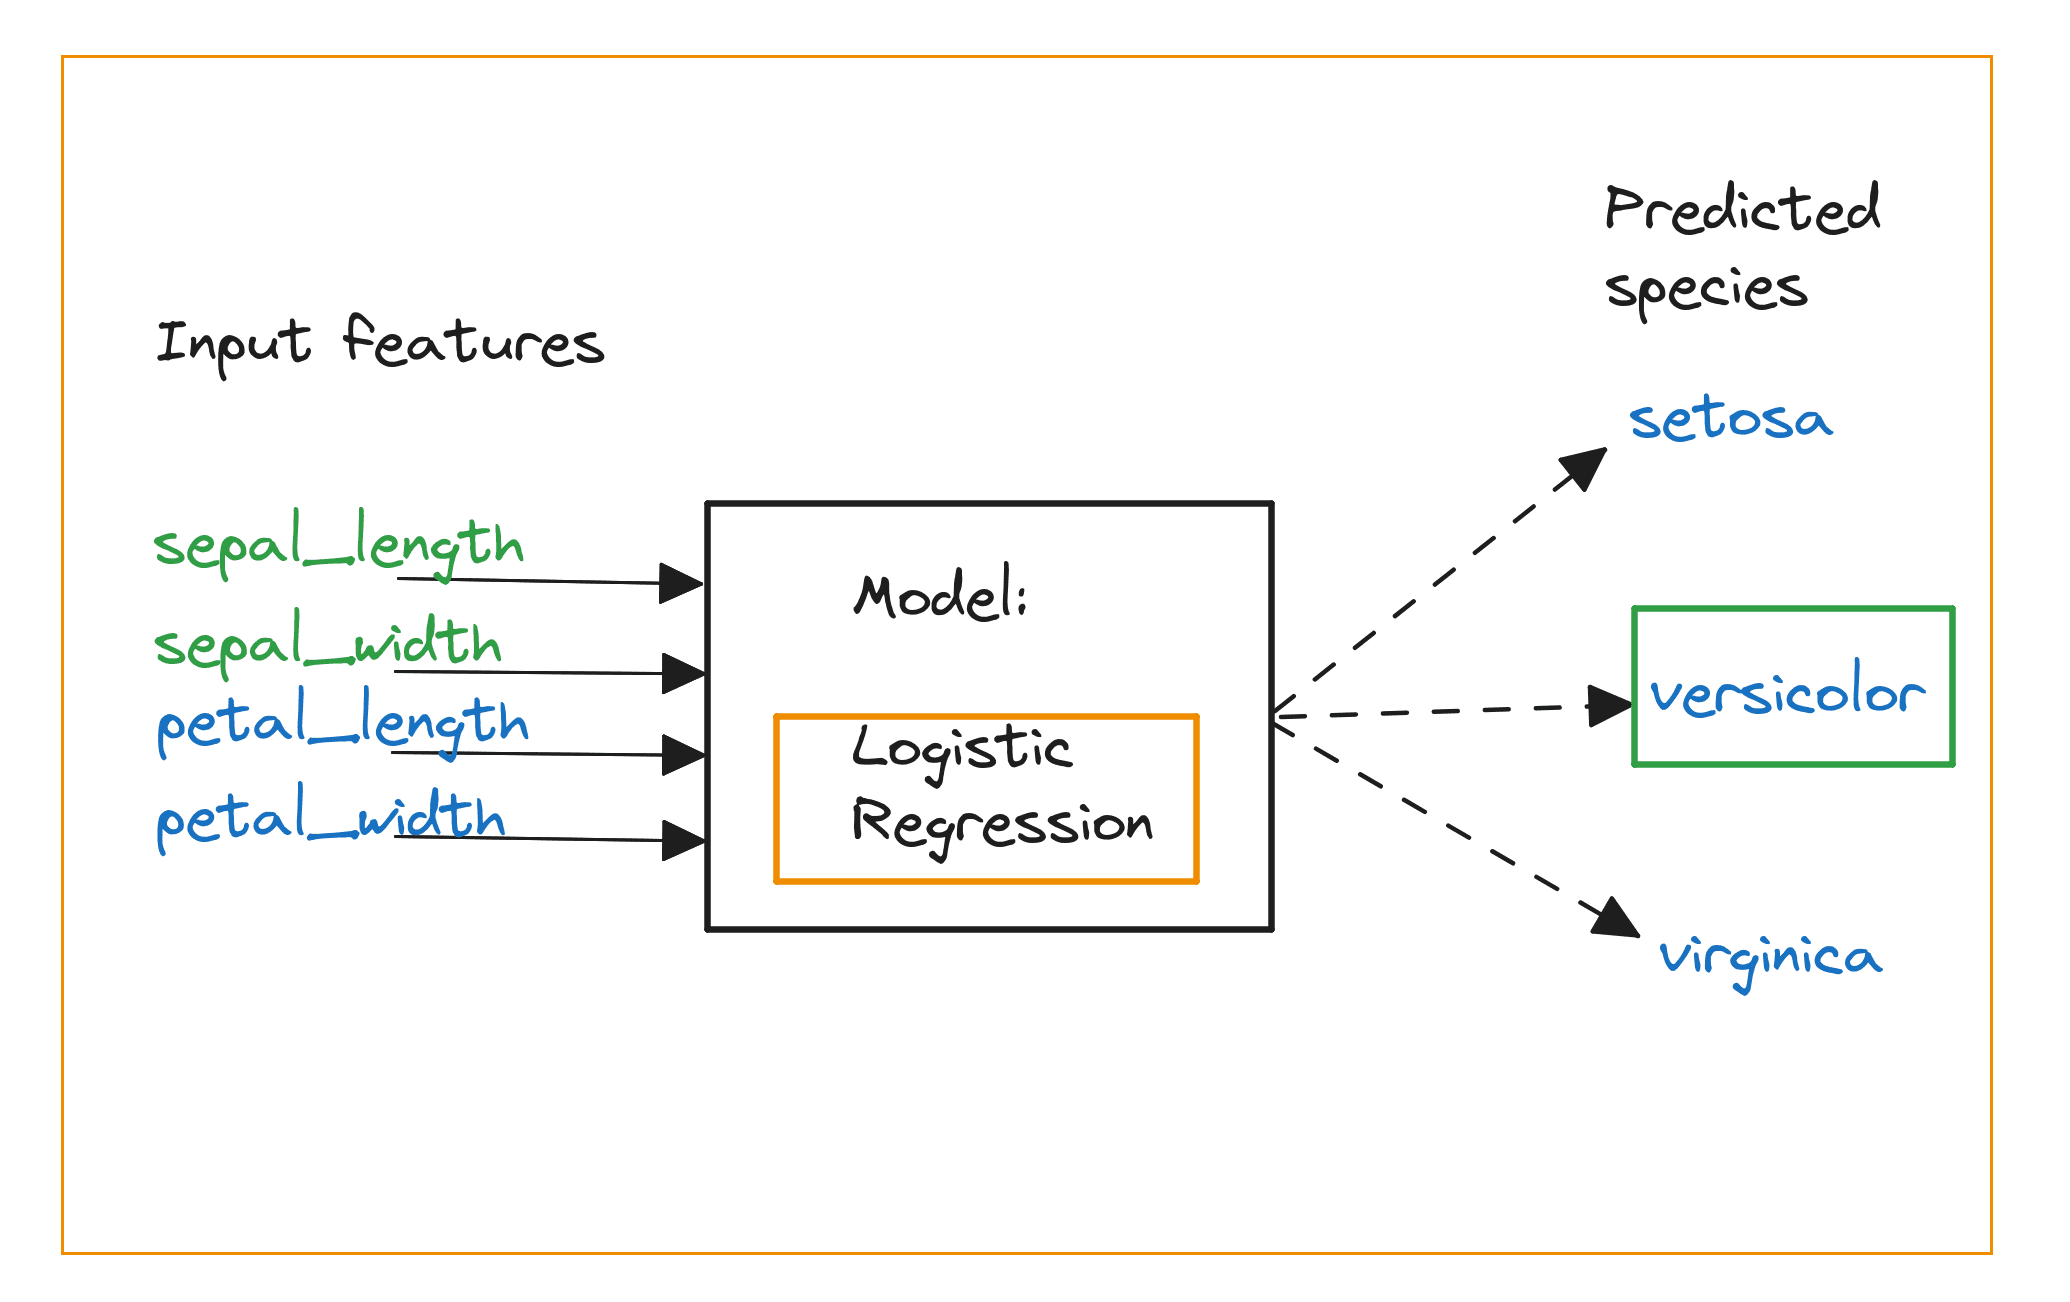
Logistic Regression Classifier | Picture by Creator
We construct a easy logistic regression classifier from scikit-learn and outline the predict_species operate as proven:
# Construct a logistic regression classifier
from sklearn.datasets import load_iris
from sklearn.linear_model import LogisticRegression

# Load the Iris dataset
iris = load_iris()
X, y = iris.knowledge, iris.goal

# Prepare a logistic regression mannequin
mannequin = LogisticRegression()
mannequin.match(X, y)

# Outline a operate to foretell the species
def predict_species(sepal_length, sepal_width, petal_length, petal_width):
	options = [[sepal_length, sepal_width, petal_length, petal_width]]
	prediction = mannequin.predict(options)
	return iris.target_names[prediction[0]]
Step 4: Outline Pydantic Mannequin for Enter Information
Subsequent, we should always mannequin the information that we ship within the POST request. Right here the enter options are the size and width of the sepals and petals—all floating level values. To mannequin this, we create an IrisData class that inherits from the Pydantic BaseModel class like so:
# Outline the Pydantic mannequin on your enter knowledge
from pydantic import BaseModel

class IrisData(BaseModel):
	sepal_length: float
	sepal_width: float
	petal_length: float
	petal_width: float
For those who want a fast tutorial on utilizing Pydantic for knowledge modeling and validation, learn Pydantic Tutorial: Information Validation in Python Made Tremendous Easy.
Step 5: Create an API Endpoint
Now that we’ve constructed the classifier and have outlined the predict_species operate prepared, we will create the API endpoint for prediction. Like earlier, we will use the @app decorator to outline the /predict/ endpoint that accepts a POST request and returns the anticipated species:
# Create API endpoint
@app.submit("/predict/")
async def predict_species_api(iris_data: IrisData):
	species = predict_species(iris_data.sepal_length, iris_data.sepal_width, iris_data.petal_length, iris_data.petal_width)
	return {"species": species}
And it’s time to run the app!
Step 6: Run the App
You’ll be able to run the app with the next command:
$ uvicorn primary:app --reload
Right here primary is the title of the module and app is the FastAPI occasion. The --reload flag ensures that the app reloads if there are any modifications within the supply code.
Upon working the command, you need to see related INFO messages:
INFO: 	Will look ahead to modifications in these directories: ['/home/balapriya/fastapi-tutorial']
INFO: 	Uvicorn working on http://127.0.0.1:8000 (Press CTRL+C to give up)
INFO: 	Began reloader course of [11243] utilizing WatchFiles
INFO: 	Began server course of [11245]
INFO: 	Ready for software startup.
INFO: 	Utility startup full.
…
…
For those who navigate to “http://127.0.0.1:8000″(localhost), you need to see the app description:
App Working on localhost
Step 7: Take a look at the API
Now you can ship POST requests to the /predict/ endpoint with the sepal and petal measurements—with legitimate values—and get the anticipated species. You need to use a command-line utility like cURL. Right here’s an instance:
curl -X 'POST'
  'http://localhost:8000/predict/'
  -H 'Content material-Kind: software/json'
  -d '{
  "sepal_length": 5.1,
  "sepal_width": 3.5,
  "petal_length": 1.4,
  "petal_width": 0.2
}'
For this instance request that is the anticipated output:
Wrapping Up
On this tutorial, we went over constructing an API with FastAPI for a easy classification mannequin. We went by modeling the enter knowledge for use within the requests, defining API endpoints, working the app, and querying the API.
As an train, take an present machine studying mannequin and construct an API on high of it utilizing FastAPI. Blissful coding!
Bala Priya C is a developer and technical author from India. She likes working on the intersection of math, programming, knowledge science, and content material creation. Her areas of curiosity and experience embrace DevOps, knowledge science, and pure language processing. She enjoys studying, writing, coding, and low! Presently, she’s engaged on studying and sharing her information with the developer neighborhood by authoring tutorials, how-to guides, opinion items, and extra. Bala additionally creates participating useful resource overviews and coding tutorials.
[ad_2]