[ad_1]
Introduction
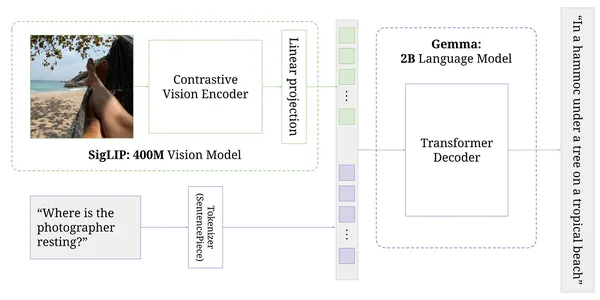
PaLiGemma is an open-source state-of-the-art mannequin launched alongside different merchandise at Google I/O 2024 and combines two different fashions developed by Google. Primarily based on open elements just like the SigLIP imaginative and prescient mannequin and the Gemma language mannequin, PaliGemma is a versatile and light-weight vision-language mannequin (VLM) that pulls inspiration from PaLI-3. It helps a number of languages and produces textual content output after accepting photos and textual content as enter. It’s meant to function a mannequin for numerous vision-language actions, together with textual content studying, object identification and segmentation, visible query answering, and captioning photos and quick movies.
In distinction to different VLMs which have had hassle with object detection and segmentation, notably OpenAI’s GPT-4o, Google Gemini, and Anthropic’s Claude 3, PaliGemma presents all kinds of capabilities and will be finetuned for improved efficiency on specific duties.
In in the present day’s weblog, we’ll study the pipeline for fine-tuning the PaLiGemma mannequin and deploying it over one of many service suppliers. All through the tutorial, we’ll use Roboflow for straightforward dataset entry within the desired format, Kaggle for loading the mannequin weights, and at last, Azure Digital Machines. A Colab occasion with an NVIDIA T4 GPU could be ample for the duty.
Studying Goals
On this weblog, you’ll study:
- Concerning the PaLiGemma mannequin and its elements.
- Learn how to arrange the surroundings for fine-tuning PaLiGemma.
- Knowledge preparation strategies in JSONL format.
- The method of downloading and configuring PaLiGemma mannequin weights.
- Steps for fine-tuning PaLiGemma and saving the fine-tuned mannequin.
- Deployment methods for the fine-tuned mannequin utilizing Azure Digital Machines.
This text was printed as part of the Knowledge Science Blogathon.
Earlier than we Start
Earlier than studying this weblog, you have to be accustomed to Python programming and the coaching course of for big language fashions (LLMs). Though not obligatory, having a rudimentary understanding of JAX (or associated applied sciences like Keras) could be useful when analyzing the pattern code snippets.
Additionally, for fine-tuning the PaLiGemma, we’ll comply with the under steps:
- Set up the required dependencies
- Obtain any picture dataset in PaliGemma JSONL format
- Obtain pre-trained PaliGemma weights and tokenizer from Kaggle
- Finetune PaLiGemma utilizing JAX
- Save our mannequin for later use
- Deploy the finetuned mannequin
Step 1: Set up and Setup the Mannequin
A. PaliGemma and Kaggle Setup
For first-time customers, we should request PaLiGemma entry by Kaggle and configure our API key, the steps of that are talked about under.
- Login or Signal Up on Kaggle: Log in to your Kaggle account or create a brand new one if you happen to don’t have one.
- Request Entry to PaliGemma: Go to the PaLiGemma mannequin card on Kaggle, click on “Request Entry,” full the consent type, and settle for the phrases and circumstances.
- Generate Kaggle API Key: Open your Settings web page on Kaggle and click on “Create New Token” to obtain the `kaggle.json` file containing your API credentials.
- Add Kaggle API Key to Colab: In Colab, choose “Secrets and techniques” (????) within the left pane and add your Kaggle username and API key. Retailer your username below `KAGGLE_USERNAME` and your API key below `KAGGLE_KEY`.
- Retailer Credentials Securely: Guarantee your Kaggle API key’s saved securely and solely used as wanted to entry Kaggle datasets or fashions.
As soon as all is finished, set the surroundings variables as proven under.
import os
from google.colab import userdata

# Notice: `userdata.get` is a Colab API. Should you're not utilizing Colab, set the env
# vars as acceptable or make your credentials out there in ~/.kaggle/kaggle.json

os.environ["KAGGLE_USERNAME"] = userdata.get('KAGGLE_USERNAME')
os.environ["KAGGLE_KEY"] = userdata.get('KAGGLE_KEY')
B. Fetch the big_vision repository and dependencies
To fine-tune the PaLiGemma mannequin, we’ll use the big_vision mission maintained by Google Analysis. The code under can set up the repository and corresponding dependencies in your notebooks.
import os
import sys

# TPUs with
if "COLAB_TPU_ADDR" in os.environ:
  elevate "It appears you might be utilizing Colab with distant TPUs which isn't supported."

# Fetch big_vision repository if python would not learn about it and set up
# dependencies wanted for this pocket book.
if not os.path.exists("big_vision_repo"):
  !git clone --quiet --branch=most important --depth=1
     https://github.com/google-research/big_vision big_vision_repo

# Append big_vision code to python import path
if "big_vision_repo" not in sys.path:
  sys.path.append("big_vision_repo")

# Set up lacking dependencies. Assume jax~=0.4.25 with GPU out there.
!pip3 set up -q "overrides" "ml_collections" "einops~=0.7" "sentencepiece"
C. Import JAX and dependencies
The code under will import the mandatory frameworks, like JAX, to finish the mannequin setup.
import base64
import functools
import html
import io
import os
import warnings

import jax
import jax.numpy as jnp
import numpy as np
import ml_collections

import tensorflow as tf
import sentencepiece

from IPython.core.show import show, HTML
from PIL import Picture

# Import mannequin definition from big_vision
from big_vision.fashions.proj.paligemma import paligemma
from big_vision.trainers.proj.paligemma import predict_fns

# Import massive imaginative and prescient utilities
import big_vision.datasets.jsonl
import big_vision.utils
import big_vision.sharding

# Do not let TF use the GPU or TPUs
tf.config.set_visible_devices([], "GPU")
tf.config.set_visible_devices([], "TPU")

backend = jax.lib.xla_bridge.get_backend()
print(f"JAX model:  {jax.__version__}")
print(f"JAX platform: {backend.platform}")
print(f"JAX gadgets:  {jax.device_count()}")
Additionally learn: PaliGemma: Google’s New AI Sees Like You and Writes Like Shakespeare!
Step 2: Selected appropriate information in your process and put together it within the JSONL format
For any finetuning duties utilizing PaLiGemma, we want that information within the PaLiGemma JSONL format. You won’t be accustomed to this format, as it isn’t a standard information format (like YOLO) for picture duties, however JSONL (JSON Strains) is commonly used for coaching massive fashions as a result of it permits for environment friendly line-by-line processing. Beneath is an instance of the JSONL format for information storage.
{"title": "John Doe", "age": 30, "metropolis": "New York"}
{"title": "Jane Smith", "age": 25, "metropolis": "Los Angeles"}
{"title": "Sam Brown", "age": 22, "metropolis": "Chicago"}
Creating the information in a JSONL format is simple, and under, I’m offering pattern code to do the identical.
import json
import os

# Listing containing the photographs
image_dir="/path/to/photos"

# Dictionary containing the picture labels
labels = {
    "image1.jpg": "label1",
    "image2.jpg": "label2",
    "image3.jpg": "label3"
}

# Create a listing of dictionaries with picture path and label
information = []
for image_name, label in labels.gadgets():
    image_path = os.path.be part of(image_dir, image_name)
    information.append({"image_path": image_path, "label": label})

# Write the information to a JSONL file
with open('images_labels.jsonl', 'w') as file:
    for entry in information:
        file.write(json.dumps(entry) + 'n')
Nevertheless, right here we’ll use Roboflow for straightforward process achievement. Roboflow has already supplied full assist to the PaLiGemma JSONL format, which can be utilized to entry any datasets from the Roboflow Universe. You need to use any of the datasets in keeping with your process necessities by utilizing the Roboflow API key. Beneath is a code snippet exhibiting obtain the identical.
#Set up the required dependencies to obtain and parse a dataset
!pip set up roboflow supervision

from google.colab import userdata
from roboflow import Roboflow

ROBOFLOW_API_KEY = userdata.get('ROBOFLOW_API_KEY')

rf = Roboflow(api_key=ROBOFLOW_API_KEY)
mission = rf.workspace("workspace-user-id").mission("sample-project-name")
model = mission.model(#enterversionnumber)
dataset = model.obtain("PaliGemma")
Now that we have now efficiently accomplished the mannequin setup and imported the information within the desired format and platform, we are able to get hold of the PaLiGemma weights to finetune the mannequin additional.
Step 3: Obtain and Configure PaLiGemma Mannequin Weights
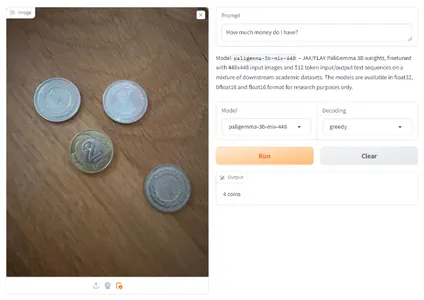
This step entails downloading the PaLiGemma weights from Kaggle. For straightforward computation in restricted assets, we’ll use the paligemma-3b-pt-224 model. JAX/FLAX PaliGemma 3B is offered in three totally different variations, differing in enter picture decision (224, 448, and 896) and enter textual content sequence size (128, 512, and 512 tokens, respectively).
The float16 model of the mannequin checkpoint will be downloaded from Kaggle by operating the next code. This course of could also be a bit time-consuming.
import os
import kagglehub

MODEL_PATH = "./pt_224_128.params.f16.npz"
if not os.path.exists(MODEL_PATH):
  MODEL_PATH = kagglehub.model_download
  ('google/paligemma/jax/paligemma-3b-pt-224', 'paligemma-3b-pt-224.f16.npz')
  print(f"Mannequin path: {MODEL_PATH}")

TOKENIZER_PATH = "./paligemma_tokenizer.mannequin"
if not os.path.exists(TOKENIZER_PATPaLiGemma modelH):
  print("Downloading the mannequin tokenizer...")
  !gsutil cp gs://big_vision/paligemma_tokenizer.mannequin {TOKENIZER_PATH}
  print(f"Tokenizer path: {TOKENIZER_PATH}")

DATA_DIR="./longcap100"
if not os.path.exists(DATA_DIR):
  print("Downloading the dataset...")
  !gsutil -m -q cp -n -r gs://longcap100/ .
  print(f"Knowledge path: {DATA_DIR}")
The following step would require configuring and transferring the mannequin to suit with the Colab T4 GPU. To arrange the mannequin, begin by initializing the `model_config` as a `FrozenConfigDict,` which helps freeze sure parameters and reduces reminiscence utilization. Then, create an occasion of the `PaliGemma Mannequin` class, utilizing `model_config` for its settings. Load the mannequin parameters into RAM and outline a decode perform to pattern outputs from the mannequin. As soon as accomplished, the mannequin can then be moved to the T4 GPU. The under code will information each steps.
# Outline mannequin
model_config = ml_collections.FrozenConfigDict({
    "llm": {"vocab_size": 257_152},
    "img": {"variant": "So400m/14", "pool_type": "none", "scan": True,
     "dtype_mm": "float16"}
})
mannequin = paligemma.Mannequin(**model_config)
tokenizer = sentencepiece.SentencePieceProcessor(TOKENIZER_PATH)

# Load params - this will take as much as 1 minute in T4 colabs.
params = paligemma.load(None, MODEL_PATH, model_config)

# Outline `decode` perform to pattern outputs from the mannequin.
decode_fn = predict_fns.get_all(mannequin)['decode']
decode = functools.partial(decode_fn, gadgets=jax.gadgets(),
eos_token=tokenizer.eos_id())

#Transfer mannequin to T4 GPU
# Create a pytree masks of the trainable params.
def is_trainable_param(title, param):  # pylint: disable=unused-argument
  if title.startswith("llm/layers/attn/"):  return True
  if title.startswith("llm/"):              return False
  if title.startswith("img/"):              return False
  elevate ValueError(f"Surprising param title {title}")
trainable_mask = big_vision.utils.tree_map_with_names(is_trainable_param, params)

# If a couple of machine is offered (e.g. a number of GPUs) the parameters can
# be sharded throughout them to scale back HBM utilization per machine.
mesh = jax.sharding.Mesh(jax.gadgets(), ("information"))

data_sharding = jax.sharding.NamedSharding(
    mesh, jax.sharding.PartitionSpec("information"))

params_sharding = big_vision.sharding.infer_sharding(
    params, technique=[('.*', 'fsdp(axis="data")')], mesh=mesh)

# Sure: Some donated buffers aren't usable.
warnings.filterwarnings(
    "ignore", message="Some donated buffers weren't usable")

@functools.partial(jax.jit, donate_argnums=(0,), static_argnums=(1,))
def maybe_cast_to_f32(params, trainable):
  return jax.tree.map(lambda p, m: p.astype(jnp.float32) if m else p,
                      params, trainable)

# Loading all params in simultaneous - albeit a lot quicker and extra succinct -
# requires extra RAM than the T4 colab runtimes have by default.
# As an alternative we do it param by param.
params, treedef = jax.tree.flatten(params)
sharding_leaves = jax.tree.leaves(params_sharding)
trainable_leaves = jax.tree.leaves(trainable_mask)
for idx, (sharding, trainable) in enumerate(zip(sharding_leaves,
trainable_leaves)):
  params[idx] = big_vision.utils.reshard(params[idx], sharding)
  params[idx] = maybe_cast_to_f32(params[idx], trainable)
  params[idx].block_until_ready()
params = jax.tree.unflatten(treedef, params)

# Print params to indicate what the mannequin is manufactured from.
def parameter_overview(params):
  for path, arr in big_vision.utils.tree_flatten_with_names(params)[0]:
    print(f"{path:80s} {str(arr.form):22s} {arr.dtype}")

print(" == Mannequin params == ")
parameter_overview(params)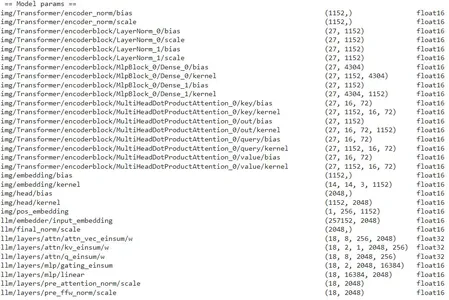
This step has accomplished all of the requirements for our fine-tuning course of, so we are able to proceed to the following step.
Additionally learn: SynthID: Google is Increasing Methods to Shield AI Misinformation
Step 4: Finetuning PaLiGemma
Earlier than continuing to the fine-tuning step, a couple of extra checks and preprocessing steps should be carried out. These are commonplace procedures, and their codes could be lengthy, so they don’t seem to be thought of within the present scope. Particulars of those will be present in further open-source assets talked about in subsequent sections. Regardless, a broad overview of the steps is talked about under.
- Create Mannequin Inputs
- Normalize picture information by changing photos to greyscale, eradicating the alpha layer, and resizing them to 224×224 pixels.
- Tokenize textual content by including flags to mark whether or not tokens are prefixes or suffixes to be used throughout coaching and analysis.
- Take away tokens after the end-of-sequence (EOS) token and return the remaining decoded tokens.
- Create Coaching and Validation Iterators
- Outline a coaching iterator to course of information in chunks, shuffle examples, and repeat them for a number of epochs. Preprocess photos and tokenize textual content with acceptable flags.
- Outline a validation iterator to course of validation information in an ordered method, preprocess photos, and tokenize textual content.
- View Coaching Examples
- Show a random choice of coaching photos and their descriptions to know the information on which the mannequin is being skilled.
- Outline Coaching and Analysis Loops
- Implement a stochastic gradient descent (SGD) coaching loop to optimize the mannequin parameters. Calculate the loss per instance, excluding prefixes and padded tokens from the loss calculation.
- Implement an analysis loop to make predictions on the validation dataset, deal with padding for small datasets, and guarantee solely precise examples are counted within the output.
With all these steps accomplished, we are able to now finetune the mannequin. The under code will obtain the identical. It runs the coaching loop for the mannequin over 64 steps, displaying the training charge (lr) and loss charge at every step. Each 16 steps, it outputs the mannequin’s predictions for a similar set of photos, permitting you to watch the advance within the mannequin’s skill to foretell descriptions. Early within the coaching, predictions could comprise errors like repeated or incomplete sentences, however as coaching progresses, the accuracy of the descriptions improves. By step 64, the mannequin’s predictions ought to carefully match the descriptions from the coaching information.
BATCH_SIZE = 8
TRAIN_EXAMPLES = 512
LEARNING_RATE = 0.03

TRAIN_STEPS = TRAIN_EXAMPLES // BATCH_SIZE
EVAL_STEPS = TRAIN_STEPS // 4

train_data_it = train_data_iterator()

sched_fn = big_vision.utils.create_learning_rate_schedule(
    total_steps=TRAIN_STEPS+1, base=LEARNING_RATE,
    decay_type="cosine", warmup_percent=0.10)

for step in vary(1, TRAIN_STEPS+1):
  # Make listing of N coaching examples.
  examples = [next(train_data_it) for _ in range(BATCH_SIZE)]

  # Convert listing of examples right into a dict of np.arrays and cargo onto gadgets.
  batch = jax.tree.map(lambda *x: np.stack(x), *examples)
  batch = big_vision.utils.reshard(batch, data_sharding)

  # Coaching step and report coaching loss
  learning_rate = sched_fn(step)
  params, loss = update_fn(params, batch, learning_rate)

  loss = jax.device_get(loss)
  print(f"step: {step:2nd}/{TRAIN_STEPS:2nd}   lr: {learning_rate:.5f}   loss: {loss:.4f}")

  if (step % EVAL_STEPS) == 0:
    print(f"Mannequin predictions at step {step}")
    html_out = ""
    for picture, caption in make_predictions(
        validation_data_iterator(), num_examples=4, batch_size=4):
      html_out += render_example(picture, caption)
    show(HTML(html_out))
Now you can check the fine-tuned mannequin utilizing a pre-defined perform referred to as `make_predictions`, which processes photos iteratively and performs inference on every one. This perform can be utilized to check our fine-tuned object detection mannequin.
print("Mannequin predictions")
html_out = ""
for picture, caption in make_predictions(validation_data_iterator(), batch_size=4):
html_out += render_example(picture, caption)
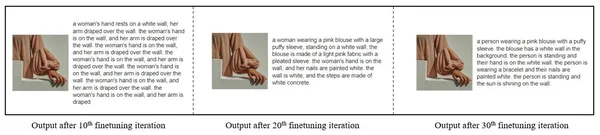
show(HTML(html_out))Beneath is a pattern of the mannequin outputs over every iteration. For the present goal, the fineunting was accomplished for 30 steps, because it was carried out for a demo goal. The dataset, variety of steps, and different hyperparameters will even change based mostly in your utilization and necessities.
Additionally learn: Google I/O 2024 Prime Highlights
Step 5: Saving the Finetuned Mannequin
As soon as finetuning is accomplished and the mannequin predictions have been checked, to make use of the identical mannequin additional or to have the ability to deploy it for the later phases, it may be saved utilizing the under code:
flat, _ = big_vision.utils.tree_flatten_with_names(params)
with open("/content material/fine-tuned-PaliGemma-3b-pt-224.f16.npz", "wb") as f:
  np.savez(f, **{ok: v for ok, v in flat})
Step 6: Deploying the Finetuned Mannequin
For deploying, we’ll depend on the Roboflow Inference server and deploy it on an AWS EC2 occasion. The Roboflow Inference Server permits you to deploy pc imaginative and prescient fashions to numerous gadgets, together with AWS EC2. The Inference Server depends on Docker to run. Should you don’t have already got Docker put in on the machine(s) on which you wish to run inference, set up it by following the official Docker set up directions. Upon getting Docker put in, run the next command to obtain the Roboflow Inference Server in your AWS EC2.
pip set up inference supervisionNow, the Roboflow Inference server might be operating, and you should utilize the finetuned mannequin within the EC2 server.
Conclusion
On this weblog, we have now walked by the great strategy of fine-tuning and deploying the PaLiGemma mannequin, a cutting-edge vision-language mannequin from Google. Beginning with putting in the mandatory dependencies and organising the environment, we leveraged numerous instruments and platforms, together with Kaggle for accessing mannequin weights, Roboflow for dataset preparation, and Azure Digital Machines for deployment. By following these steps, you possibly can harness the facility of PaLiGemma for a variety of vision-language duties comparable to object detection, picture captioning, and visible query answering. I hope this information gives a transparent and sensible pathway to boost your tasks with superior AI capabilities.
References
Along with this weblog, listed here are a couple of extra fascinating reads and inspirations for this weblog.
Key Takeaways
- Integration of Superior Fashions: PaLiGemma combines the capabilities of SigLIP and Gemma, offering a flexible and light-weight vision-language mannequin that excels in a number of languages and duties.
- Enhanced Imaginative and prescient-Language Capabilities: Not like many different VLMs, PaLiGemma successfully handles object detection and segmentation, making it a strong alternative for numerous vision-language actions, together with textual content studying, visible query answering, and picture/video captioning.
- Step-by-Step Advantageous-Tuning Course of: The tutorial gives an in depth, step-by-step information to fine-tuning PaLiGemma, protecting important steps comparable to organising dependencies, making ready information, and configuring mannequin weights utilizing JAX.
- Environment friendly Use of Sources: The tutorial demonstrates environment friendly useful resource administration and sensible deployment methods by using instruments like Roboflow for dataset preparation, Kaggle for mannequin weights, and Azure Digital Machines for deployment.
- Sensible Software and Deployment: The information culminates in deploying the fine-tuned mannequin on an EC2 server, showcasing apply theoretical data to sensible conditions and enabling customers to leverage PaLiGemma’s capabilities in real-world eventualities.
The media proven on this article aren’t owned by Analytics Vidhya and is used on the Creator’s discretion.
Ceaselessly Requested Questions
A. You should be accustomed to Python programming and have expertise coaching massive language fashions (LLMs). Data of JAX or Keras is useful for understanding the code snippets. Moreover, you’ll want entry to Kaggle to obtain the mannequin weights and datasets and an Azure account to deploy the mannequin.
A. First, log in to your Kaggle account and request entry to the PaLiGemma mannequin by its mannequin card on Kaggle. Settle for the phrases and generate an API key out of your Kaggle settings. Obtain the mannequin weights utilizing this API key and retailer it securely in your Colab occasion to entry the mannequin.
A. Your dataset must be in JSONL format, the place every line within the file represents a JSON object. For instance:{"image_path": "/path/to/image1.jpg", "label": "label1"} {"image_path": "/path/to/image2.jpg", "label": "label2"}
You need to use instruments like Roboflow to arrange and obtain datasets within the required JSONL format.
A. You might want to set the mannequin configuration to be appropriate along with your surroundings, comparable to a Colab T4 GPU. Load the mannequin weights and tokenizer, and appropriately arrange the mannequin parameters and information sharding. Use JAX and the mandatory libraries to arrange the mannequin for coaching.
A. After fine-tuning your mannequin, save the mannequin parameters. Arrange an Azure Digital Machine (VM) to host your mannequin. Switch the fine-tuned mannequin to the VM and use Azure’s deployment providers to make it accessible for inference. The precise deployment steps on Azure will rely in your VM configuration and most popular deployment methodology.
[ad_2]