[ad_1]

Picture by Editor | Midjourney & Canva
Robin Sharma stated, “Each grasp was as soon as a newbie. Each professional was as soon as an beginner.” You’ve heard about massive language fashions (LLMs), AI, and Transformer fashions (GPT) making waves within the AI house for some time, and you might be confused about tips on how to get began. I can guarantee you that everybody you see at the moment constructing advanced purposes was as soon as there.
That’s the reason, on this article, you may be impacted by the data you’ll want to begin constructing LLM apps with Python programming language. That is strictly beginner-friendly, and you may code alongside whereas studying this text.
What’s going to you construct on this article? You’ll create a easy AI private assistant that generates a response based mostly on the consumer’s immediate and deploys it to entry it globally. The picture beneath exhibits what the completed software seems like.
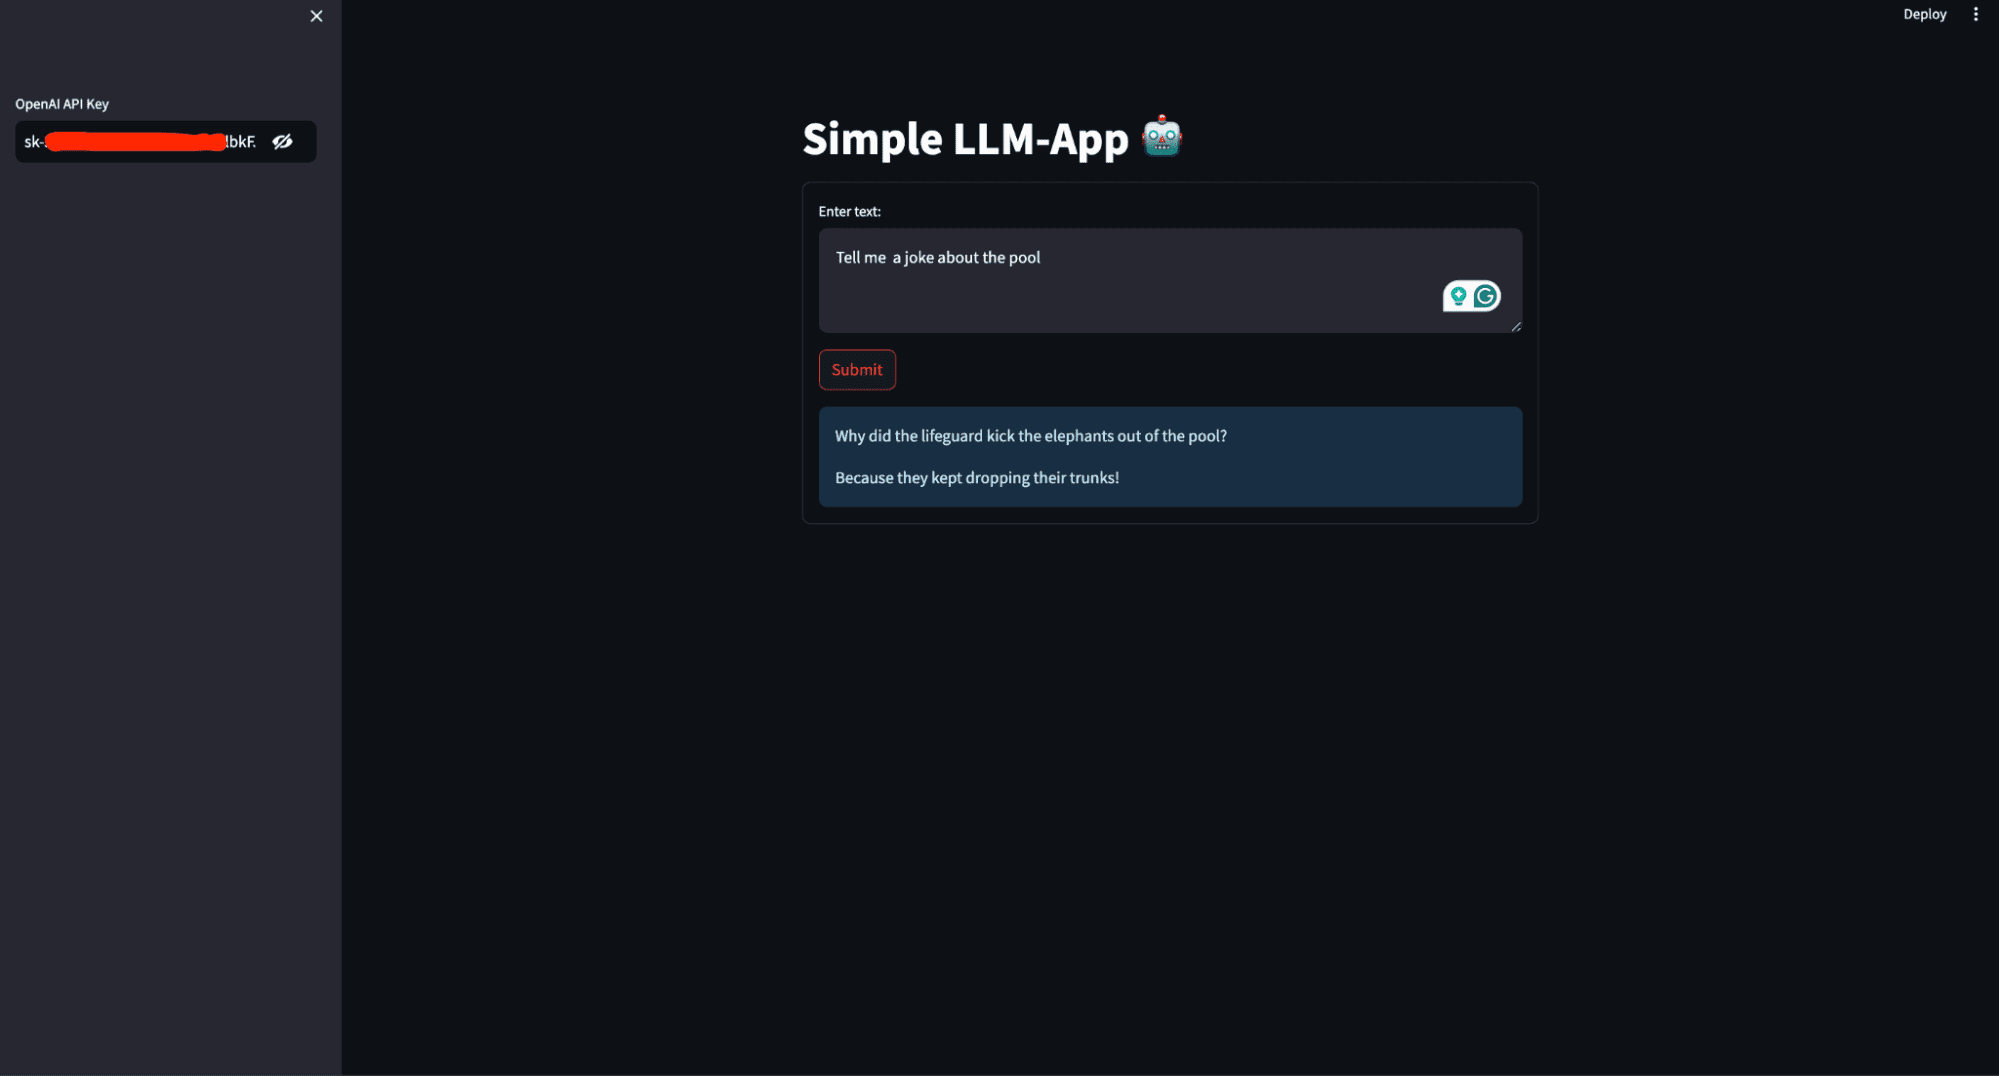
This picture exhibits the consumer interface of the AI private assistant that might be constructed on this article
Conditions
So that you can observe via with this text, there are some things you’ll want to have on lock. This consists of:
- Python (3.5+), and background writing Python scripts.
- OpenAI: OpenAI is a analysis group and expertise firm that goals to make sure synthetic normal intelligence (AGI) advantages all of humanity. One among its key contributions is the event of superior LLMs similar to GPT-3 and GPT-4. These fashions can perceive and generate human-like textual content, making them highly effective instruments for numerous purposes like chatbots, content material creation, and extra.
Join for OpenAI and replica your API keys from the API part in your account as a way to entry the fashions. Set up OpenAI in your laptop utilizing the command beneath:
- LangChain:LangChain is a framework designed to simplify the event of purposes that leverage LLMs. It supplies instruments and utilities to handle and streamline the varied facets of working with LLMs, making constructing advanced and strong purposes simpler.
Set up LangChain in your laptop utilizing the command beneath:
- Streamlit: Streamlit is a strong and easy-to-use Python library for creating net purposes. Streamlit lets you create interactive net purposes utilizing Python alone. You do not want experience in net growth (HTML, CSS, JavaScript) to construct purposeful and visually interesting net apps.
It is helpful for constructing machine studying and knowledge science apps, together with those who make the most of LLMs. Set up streamlit in your laptop utilizing the command beneath:
Code Alongside
With all of the required packages and libraries put in, it’s time to begin constructing the LLM software. Create a requirement.txt within the root listing of your working listing and save the dependencies.
streamlit
openai
langchain
Create an app.py file and add the code beneath.
# Importing the required modules from the Streamlit and LangChain packages
import streamlit as st
from langchain.llms import OpenAI
- Imports the Streamlit library, which is used to create interactive net purposes.
- from langchain.llms import OpenAI imports the OpenAI class from the langchain.llms module, which is used to work together with OpenAI’s language fashions.
# Setting the title of the Streamlit software
st.title('Easy LLM-App 🤖')
- st.title(‘Easy LLM-App 🤖’) units the title of the Streamlit net.
# Making a sidebar enter widget for the OpenAI API key, enter kind is password for safety
openai_api_key = st.sidebar.text_input('OpenAI API Key', kind="password")
- openai_api_key = st.sidebar.text_input(‘OpenAI API Key’, kind=”password”) creates a textual content enter widget within the sidebar for the consumer to enter their OpenAI API key. The enter kind is about to ‘password’ to cover the entered textual content for safety.
# Defining a operate to generate a response utilizing the OpenAI language mannequin
def generate_response(input_text):
    # Initializing the OpenAI language mannequin with a specified temperature and API key
    llm = OpenAI(temperature=0.7, openai_api_key=openai_api_key)
    # Displaying the generated response as an informational message within the Streamlit app
    st.data(llm(input_text))
- def generate_response(input_text) defines a operate named generate_response that takes input_text as an argument.
- llm = OpenAI(temperature=0.7, openai_api_key=openai_api_key) initializes the OpenAI class with a temperature setting of 0.7 and the supplied API key.
Temperature is a parameter used to regulate the randomness or creativity of the textual content generated by a language mannequin. It determines how a lot variability the mannequin introduces into its predictions.
- Low Temperature (0.0 – 0.5): This makes the mannequin extra deterministic and targeted.
- Medium Temperature (0.5 – 1.0): Offers a stability between randomness and determinism.
- Excessive Temperature (1.0 and above): Will increase the randomness of the output. Greater values make the mannequin extra artistic and numerous in its responses, however this may additionally result in much less coherence and extra nonsensical or off-topic outputs.
- st.data(llm(input_text)) calls the language mannequin with the supplied input_text and shows the generated response as an informational message within the Streamlit app.
# Making a kind within the Streamlit app for consumer enter
with st.kind('my_form'):
    # Including a textual content space for consumer enter
    textual content = st.text_area('Enter textual content:', '')
    # Including a submit button for the shape
    submitted = st.form_submit_button('Submit')
    # Displaying a warning if the entered API key doesn't begin with 'sk-'
    if not openai_api_key.startswith('sk-'):
        st.warning('Please enter your OpenAI API key!', icon='⚠')
    # If the shape is submitted and the API key's legitimate, generate a response
    if submitted and openai_api_key.startswith('sk-'):
        generate_response(textual content)
- with st.kind(‘my_form’) creates a kind container named my_form.
- textual content = st.text_area(‘Enter textual content:’, ”) provides a textual content space enter widget throughout the kind for the consumer to enter textual content.
- submitted = st.form_submit_button(‘Submit’) provides a submit button to the shape.
- if not openai_api_key.startswith(‘sk-‘) checks if the entered API key doesn’t begin with sk-.
- st.warning(‘Please enter your OpenAI API key!’, icon=’⚠’) shows a warning message if the API key’s invalid.
- if submitted and openai_api_key.startswith(‘sk-‘) checks if the shape is submitted and the API key’s legitimate.
- generate_response(textual content) calls the generate_response operate with the entered textual content to generate and show the response.
Placing it collectively here’s what you will have:
# Importing the required modules from the Streamlit and LangChain packages
import streamlit as st
from langchain.llms import OpenAI

# Setting the title of the Streamlit software
st.title('Easy LLM-App 🤖')

# Making a sidebar enter widget for the OpenAI API key, enter kind is password for safety
openai_api_key = st.sidebar.text_input('OpenAI API Key', kind="password")

# Defining a operate to generate a response utilizing the OpenAI mannequin
def generate_response(input_text):
    # Initializing the OpenAI mannequin with a specified temperature and API key
    llm = OpenAI(temperature=0.7, openai_api_key=openai_api_key)
    # Displaying the generated response as an informational message within the Streamlit app
    st.data(llm(input_text))

# Making a kind within the Streamlit app for consumer enter
with st.kind('my_form'):
    # Including a textual content space for consumer enter with a default immediate
    textual content = st.text_area('Enter textual content:', '')
    # Including a submit button for the shape
    submitted = st.form_submit_button('Submit')
    # Displaying a warning if the entered API key doesn't begin with 'sk-'
    if not openai_api_key.startswith('sk-'):
        st.warning('Please enter your OpenAI API key!', icon='⚠')
    # If the shape is submitted and the API key's legitimate, generate a response
    if submitted and openai_api_key.startswith('sk-'):
        generate_response(textual content)
Operating the appliance
The appliance is prepared; you’ll want to execute the appliance script utilizing the suitable command for the framework you are utilizing.
By working this code utilizing streamlit run app.py, you create an interactive net software the place customers can enter prompts and obtain LLM-generated textual content responses.
Whenever you execute streamlit run app.py, the next occurs:
- Streamlit server begins: Streamlit begins an area net server in your machine, usually accessible at `http://localhost:8501` by default.
- Code execution: Streamlit reads and executes the code in `app.py,` rendering the app as outlined within the script.
- Net interface: Your net browser routinely opens (or you may manually navigate) to the URL supplied by Streamlit (often http://localhost:8501), the place you may work together along with your LLM app.
Deploying your LLM software
Deploying an LLM app means making it accessible over the web so others can use and check it with out requiring entry to your native laptop. That is necessary for collaboration, consumer suggestions, and real-world testing, guaranteeing the app performs effectively in numerous environments.
To deploy the app to the Streamlit Cloud, observe these steps:
- Create a GitHub repository in your app. Make certain your repository consists of two information: app.py and requirements.txt
- Go to Streamlit Neighborhood Cloud, click on the “New app” button out of your workspace, and specify the repository, department, and predominant file path.
- Click on the Deploy button, and your LLM software will now be deployed to Streamlit Neighborhood Cloud and might be accessed globally.
Conclusion
Congratulations! You’ve got taken your first steps in constructing and deploying a LLM software with Python. Ranging from understanding the conditions, putting in mandatory libraries, and writing the core software code, you will have now created a purposeful AI private assistant. Through the use of Streamlit, you have made your app interactive and straightforward to make use of, and by deploying it to the Streamlit Neighborhood Cloud, you have made it accessible to customers worldwide.
With the talents you have discovered on this information, you may dive deeper into LLMs and AI, exploring extra superior options and constructing much more subtle purposes. Hold experimenting, studying, and sharing your data with the neighborhood. The chances with LLMs are huge, and your journey has simply begun. Blissful coding!
Shittu Olumide is a software program engineer and technical author keen about leveraging cutting-edge applied sciences to craft compelling narratives, with a eager eye for element and a knack for simplifying advanced ideas. You can even discover Shittu on Twitter.
[ad_2]