[ad_1]
Sure, the iMac OS9 9.2.2 boot disk works on this Mac mini

It is easy to make boot disks on outdated Macs for older {hardware}, however because the years have gone on, it is gotten a bit of tougher. This is tips on how to make traditional Mac OS 9 and early Mac OS X boot media in your trendy Mac.
In sure circumstances you might wish to create bootable macOS media on trendy Macs to make use of for set up on older Mac computer systems. Whereas DVD drives are not included on most Macs, you may nonetheless use an exterior USB DVD drive at this time to entry these disks.
Mac OS 9
Earlier than the Mac OS X period, Apple shipped an earlier model of Mac OS known as Mac OS 9.
Mac OS 9 was the ultimate incarnation of Apple’s unique Mac working system. The ultimate model of Mac OS 9 was 9.2.2. which shipped in late 1999. All Mac OS 9 computer systems used PowerPC CPUs, which had been a results of a collaboration between Apple, IBM, and Motorola.
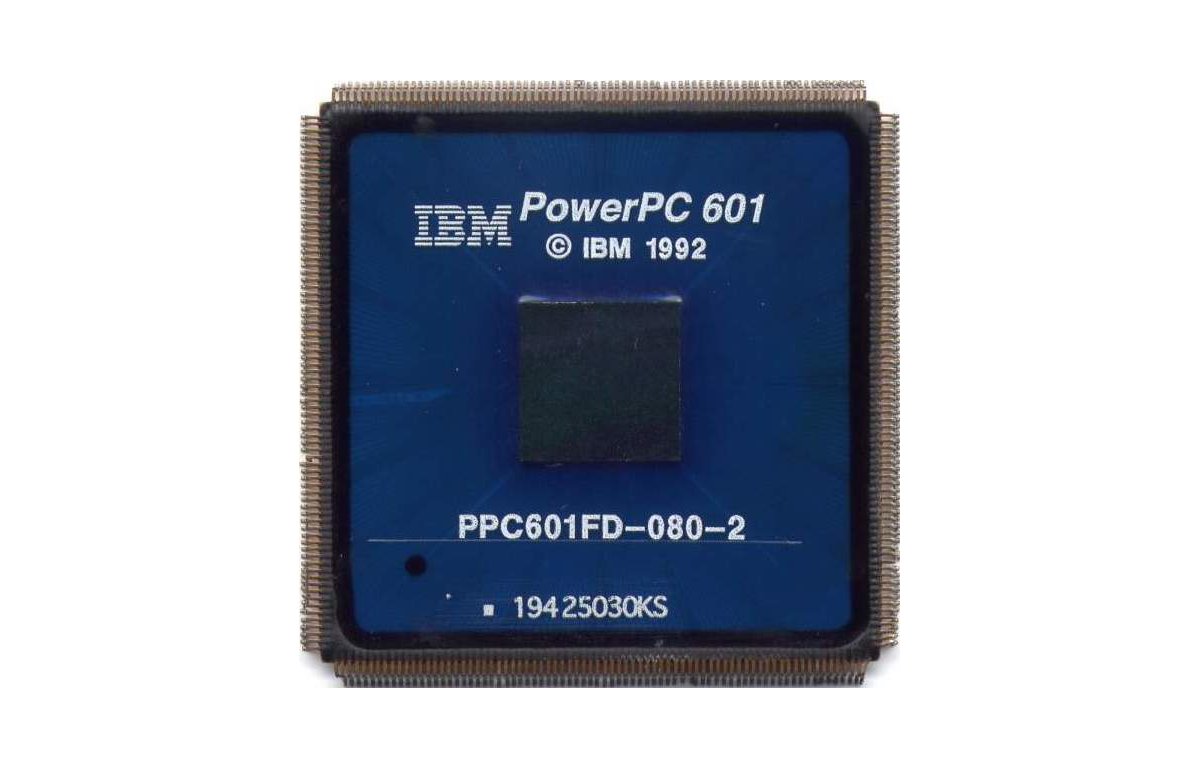
IBM’s PowerPC 601 CPU – the primary PowerPC CPU utilized in Macs.
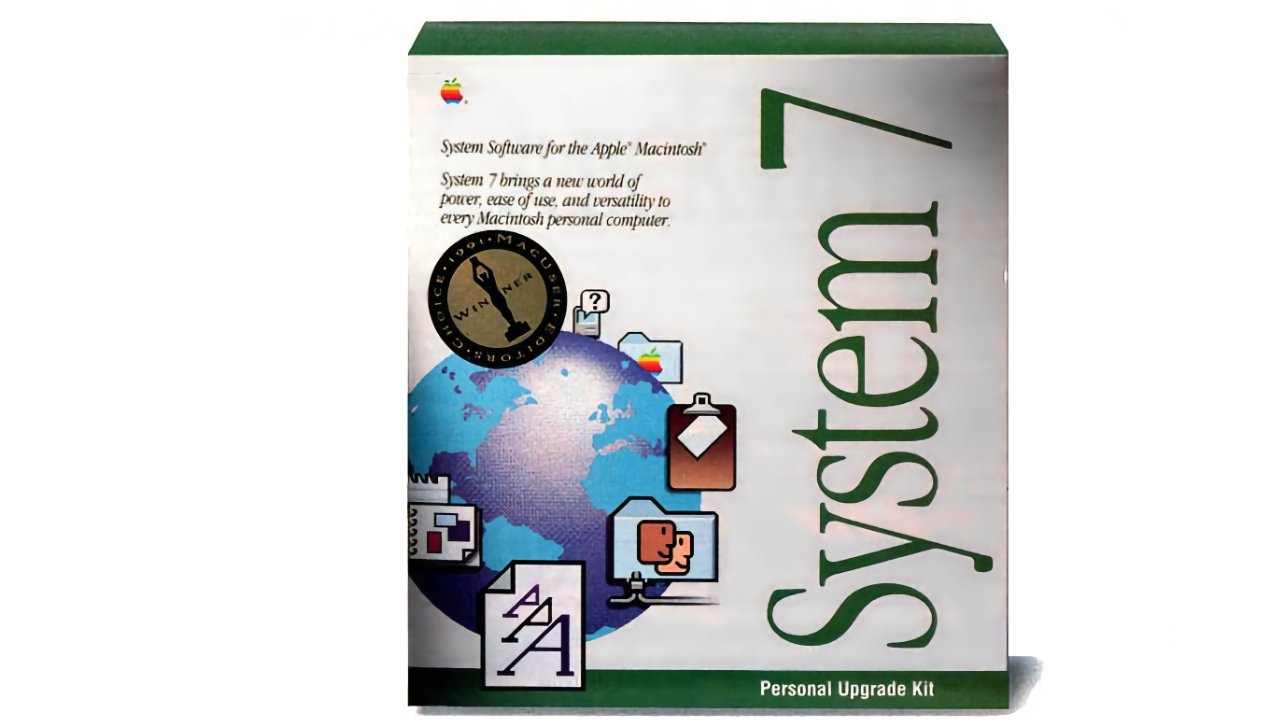
Earlier than Mac OS 9 there was Mac OS 8, and earlier than that, System 7 – the primary shade model of the Mac’s unique black and white Mac OS.
The model of the Mac OS earlier than System 7 was merely known as System 6. In truth, the unique Macintosh OS did not have an official identify – having shipped on 3.5-inch floppy disks in units included with every Mac:
The unique Mac OS wasn’t an actual working system in at this time’s phrases, or as we would consider a UNIX or Linux-based OS. As a substitute it was a easy single consumer, non-multitasking OS which was less complicated and extra restricted in what it may do
System 7 shipped on a multi-floppy disk set during which customers needed to insert a number of disks so as because the installer program prompted. Mac OS 8 and 9 had been launched on CD-ROM installer media.
Mac OS X’s retail field normally included two DVD-ROM discs, and in early variations a single retail copy of Mac OS 9 on CD – for the reason that early variations of Mac OS X additionally included a Mac OS 9 emulation compatibility layer known as Traditional.
Some late 1990’s Macs equivalent to the unique iMac, eMac, iBook laptops, and desktop G3 and G4 fashions included Mac OS X plus numerous extra Apple apps in addition to third-party DVDs.
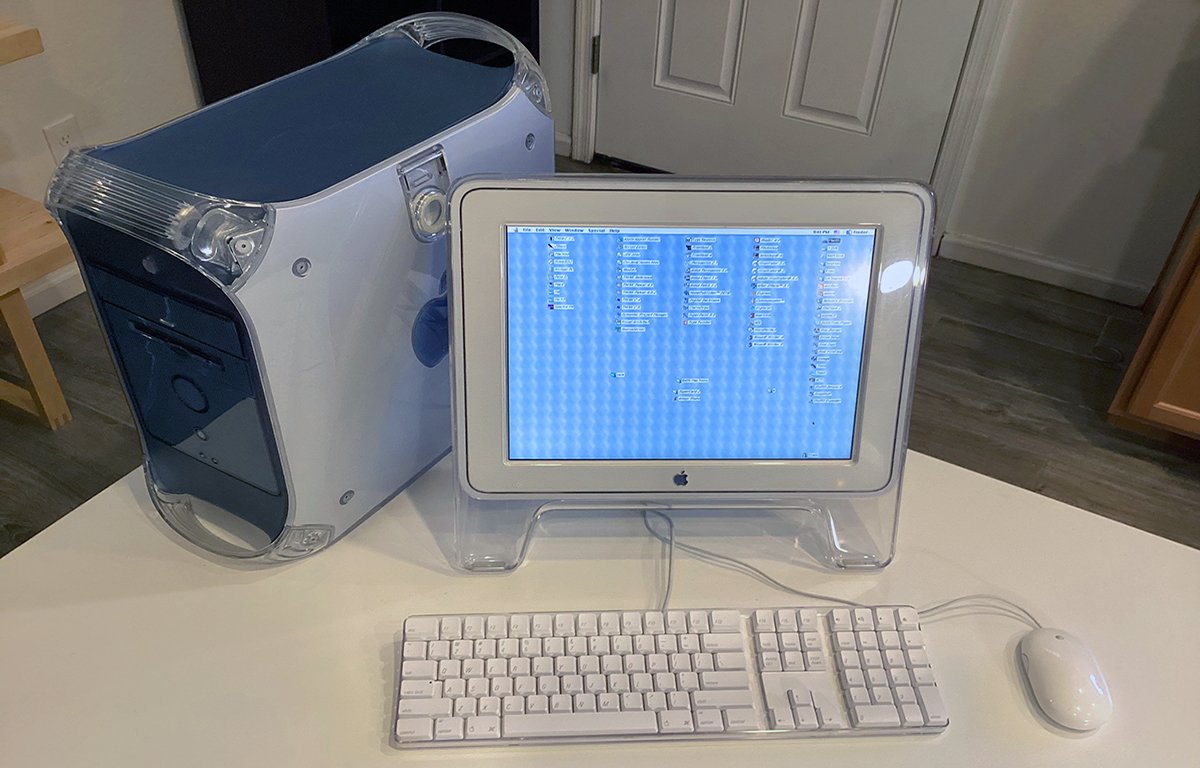
A totally restored PowerPC-based G4 Macintosh from 1999 at this time booted into Mac OS 9.2.2.
Most of those DVD or CD-ROM installer disks contained bootable variations of Mac OS. To be able to boot from an exterior Mac OS installer disk, a couple of situations should first be met.
Merely copying a Mac OS installer information to new clean media will not work in each case as a bootable installer.
Thirty years in the past, software program got here in bins
You possibly can nonetheless make Mac OS installer boot media on a CD, DVD, or on a USB thumb drive at this time if sure situations are first met:
- Mac OS 9: Media should include a System Folder and a “blessed” System file plus an installer
- Early Mac OS X: Media should include the right model of Mac OS X for the pc you wish to set up to
- Later Mac OS X: Media should include a model of Mac OS X which matches the structure of the machine, plus right model
There are a number of instruments you should use to make bootable media for Mac OS 9 and Mac OS X. You should use a third-party app equivalent to Roxio’s Toast ($69), or you should use a free device equivalent to Balena Etcher, if it helps the model of Mac OS you wish to create.
There are quite a few extra instruments out there for making bootable Mac OS X disks equivalent to Set up Disk Creator from MacDaddy, or in case you are utilizing macOS 10.10 Catalina, DiskMaker X Professional., which is donationware.
In case you are utilizing macOS El Capitan by way of Sonoma, you can even use a command-line device discovered contained in the macOS installer app known as createinstallmedia.
To take action, you may have to be booted into a type of variations of macOS, obtain the corresponding macOS installer from Apple, then run the next command within the macOS Terminal to create a bootable installer on one other drive:
sudo /Purposes/Set up macOS Catalina.app/Contents/Sources/createinstallmedia --volume /Volumes/Untitled
The above command assumes you’ve a macOS Prolonged (HFS+) quantity mounted in your Desktop named “Untitled”.
createinstallmedia will copy over all of the information have to boot the macOS installer from the quantity you are copying to, in addition to a restoration partition in case something goes improper.
Apple has a tech notice (101578) on how to do that.
When you have Toast or one of many different well-liked third-partyMac DVD-ROM burning software program packages, you may first make an .iso disk picture of a bodily Mac OS installer DVD or CD, save the file as a Toast file, then open the Toast file and burn it to a brand new clean DVD or CD utilizing a DVD-ROM burner drive.
Toast has particular choices in its consumer interface which let you mark the burned disk as bootable.
Toast additionally has the benefit of going all the best way again to Mac OS 8 – and model 5.x from the late 1990’s runs on Mac OS 9. It is also extensively appropriate with most third-party exterior DVD burner drives on the market.
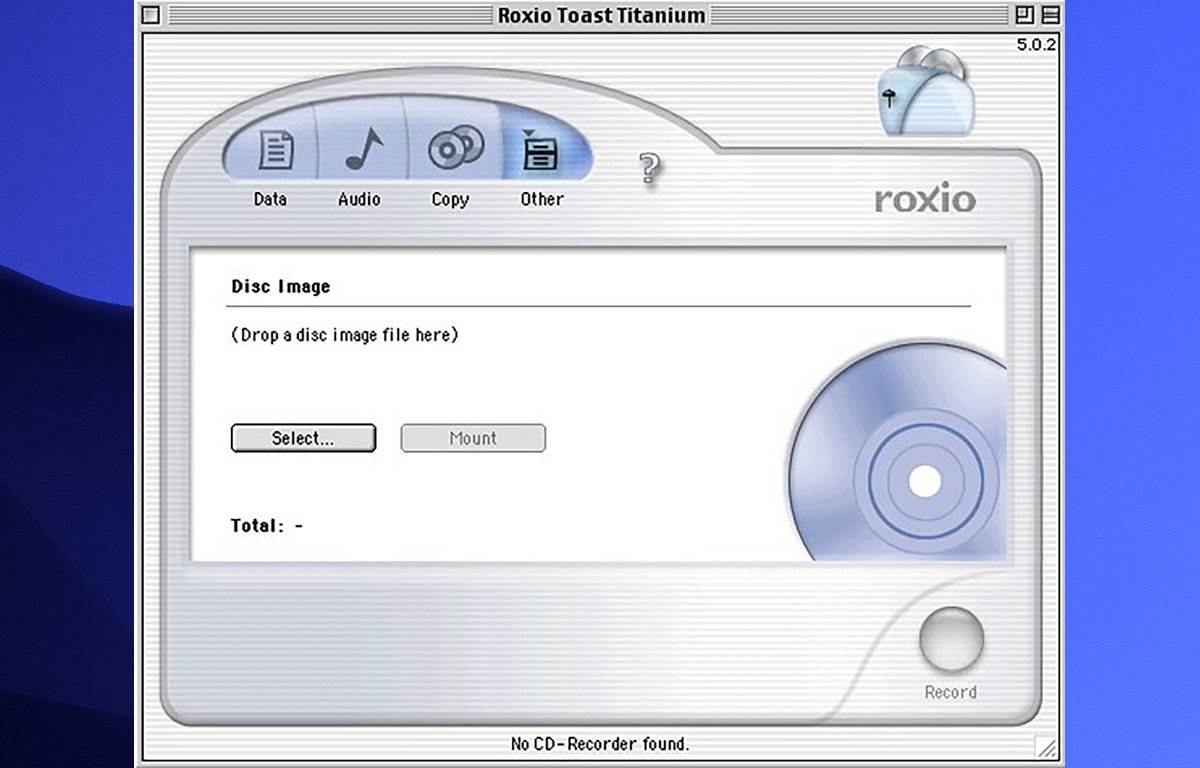
Toast Titanium 5 from Roxio.
You too can make .iso information from Mac OS DVD or CDs utilizing macOS’s Disk Utility, then import them into Toast and burn them. Nevertheless, in some instances, not all the data required for booting from the burned disk will likely be preserved.
There are additionally quite a lot of installer builder scripts out there on-line equivalent to gibMacOS which let you construct Web Restoration USB installers.
If you wish to burn a DVD or CD boot disk however your Mac would not have an inner DVD drive, there are various exterior USB DVD-R drives out there in the marketplace at affordable costs. Apple nonetheless sells their very own Apple USB SuperDrive ($79) on-line on the Apple Retailer.
When you have an older Mac which runs the model of Mac OS X which you wish to make a boot disk for, there’s one straightforward solution to make bootable media: create a brand new disk partition or .iso file, set up the model of Mac OS X onto it you need, then copy that model’s Mac OS X installer onto the brand new partition.
You possibly can then make an .iso CD/DVD picture from that quantity utilizing Disk Utility, then use Disk Utility to make a brand new bootable installer disk from the unique set up.
This works for each USB thumb drives, and CD’s/DVD’s as Disk Utility’s goal disk when copying. For those who’re utilizing a USB thumb drive because the copy goal, the Mac you propose to put in onto should have the ability to boot from USB.
While you boot from the newly copied Mac OS X quantity, you may run the installer from there and goal the quantity you need for set up.
Observe that on the whole Apple solely helps older machines as much as sure variations of Mac OS X or macOS. After the cutoff model of the OS, newer machines cannot run older variations of macOS with out use of particular third-party instruments, which modify macOS in reminiscence at boot time.
Test to guarantee that the Mac you’re concentrating on for set up helps the model of macOS or Mac OS X you’re creating the bootable installer disk for.
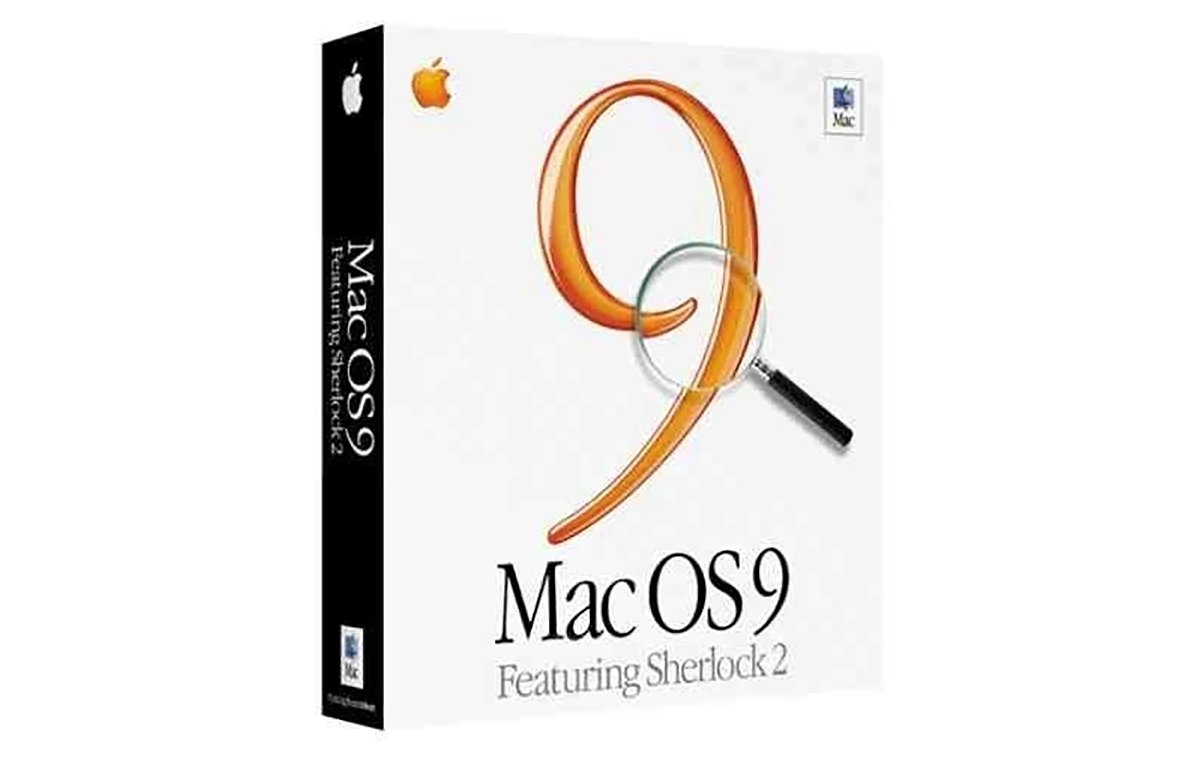
Mac OS 9’s retail packaging.
A phrase about quantity codecs
Bear in mind that Apple nonetheless helps two disk codecs for native macOS volumes: APFS, and macOS Prolonged (HFS+). For contemporary Macs, Apple dropped assist for putting in onto and booting from HFS+ volumes.
So in case your Mac or model of macOS would not assist HFS+ booting, you may’t boot these machines utilizing an HFS+ installer disk.
Earlier than you make your installer media, confirm that the Macs you wish to goal for set up assist the format you are going to construct the installer media disk onto.
Newer variations of macOS solely permit bootable set up onto APFS volumes.
If you wish to make bootable media for Mac OS 9 you’ve a number of choices:
- Burn a direct copy of the Mac OS 9 set up CD utilizing a utility equivalent to Toast
- Picture the Mac OS 9 set up CD to a disk picture file, then burn it to disk utilizing a DVD-R burner drive
- Burn a replica of the Mac OS 9 set up CD within the Finder from a disk picture
- Picture an current Mac OS 9 set up together with the installer information onto a USB thumb drive
- Boot an older Mac right into a NetBoot server, run the OS 9 Installer in Traditional, then set up OS 9 onto an exterior partition
The fourth and fifth choices are a bit trickier than the primary three, however they’ll work when you make use of a bit of voodoo.
The way to burn a replica of the Mac OS 9 set up CD to a different CD
Utilizing this methodology, you may first acquire a replica of the unique Mac OS 9 retail CD, or one of many bundled Mac OS 9 installer disks that got here with a Mac which may boot OS 9.
The ultimate model of Mac OS 9 Apple shipped was 9.2.2, though 9.0.x or 9.1 may go relying in your {hardware} since updaters are nonetheless out there. Older machines just like the eMac and the final of the native OS9 G4 towers required 9.2.2.
So, do your homework earlier than you begin blowing by way of disks.
After getting the installer CD and a DVD-R drive, insert the installer CD and run the app you’ll use to make a CD copy.
In most CD/DVD duplication software program you may choose the unique CD because the supply, and a second drive which is able to include a clean CD-R or DVD-R disk because the vacation spot. On this case you may want two drives – one for every bodily disk.
There are a number of causes you might not wish to use this methodology — specifically direct optical disk-to-disk copies are gradual and unreliable. Most CD-R/DVD-R burners depend on a continuing stream of knowledge from the supply to burn the vacation spot disk.
In case your supply drive cannot sustain or is slower than the required switch fee for the vacation spot burner, the copy will probably fail and you will have an unreadable vacation spot disk.
Usually CD-R/DVD-R disk burning is gradual and susceptible to errors, so you do not wish to try something which could make it tougher.
A significantly better approach is to picture the supply disk first to a disk file (.iso, .toast, and so on), save that file on a quick stable state or RAID drive, then burn the picture from there to the vacation spot disk.
This makes information throughput a lot sooner and dependable and takes many of the likelihood for errors on the learn aspect out of the equation.
Burn a replica of the Mac OS 9 set up CD within the Finder from a disk picture
You too can burn a replica of a Mac OS 9 installer CD from a picture file within the macOS Finder. To take action, copy a picture file of the Mac OS 9 installer CD to your Desktop in your Mac.
Subsequent, Management-click on the picture file and choose Burn to Disc from the popup menu. This may carry up Finder’s disc burning window.
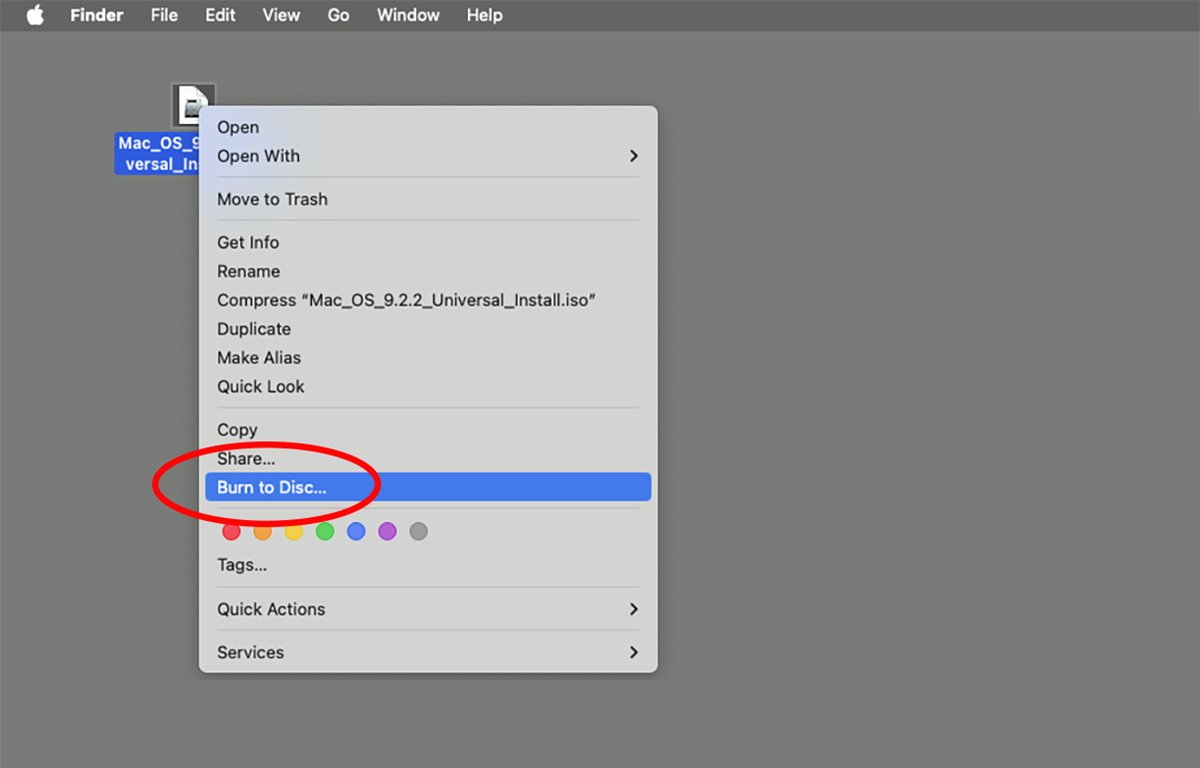
Choose “Burn to Disc…” within the Finder.
Insert a clean CD-R disk into your DVD-R drive, choose the burn settings, then click on the Burn button.
Recording will begin, because the Finder copies the contents of the Mac OS 9 picture file onto the CD-R disk.
Verification will begin after burning accomplished, at which level Finder will eject the disk (except an error occurred). You too can flip off verification within the settings window earlier than burning when you like.
Some customers have reported booting issues utilizing the Finder to burn bootable OS 9 disks, however generally it ought to work.
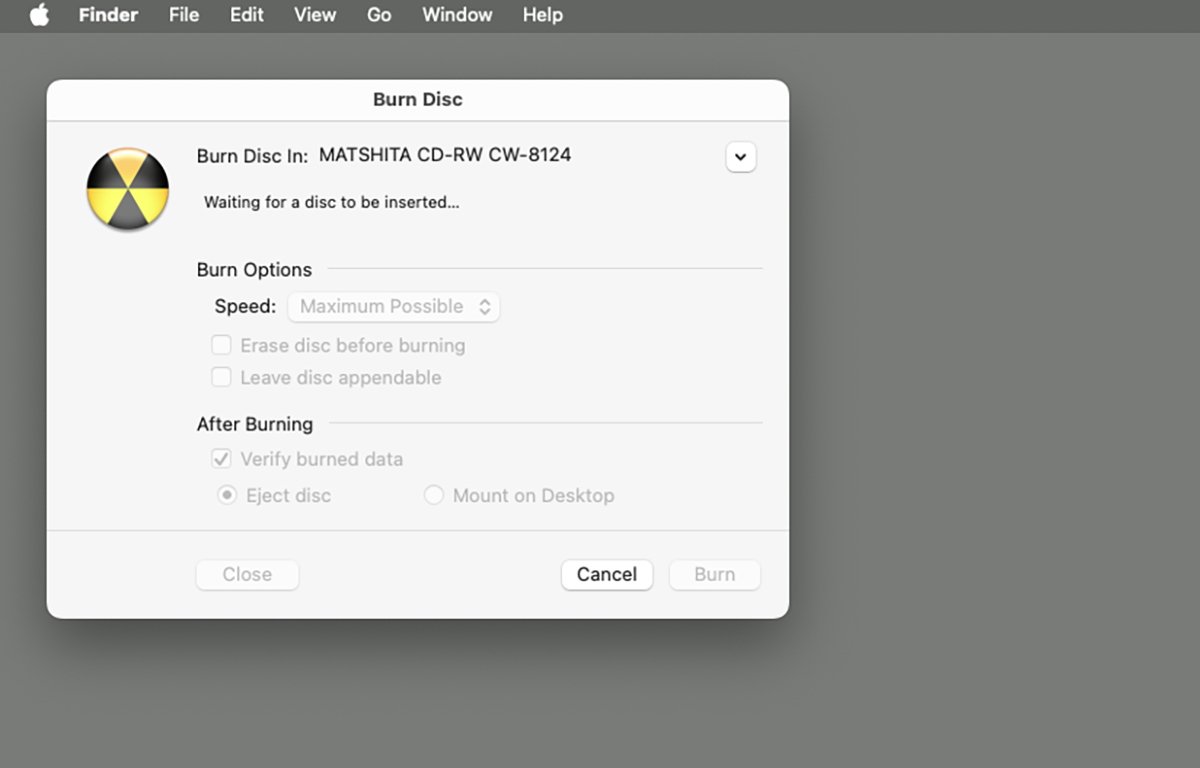
The Finder’s burn choices window.
Useful resource forks and booting from a USB installer
Observe that in Mac OS 9 and earlier many information used particular forks known as useful resource forks. The burning/copying software program you employ should both have the ability to make copies on the bit-level, or else pay attention to tips on how to learn and write useful resource forks to and from disk volumes.
Useful resource (.rsrc) information are used as enter information when constructing traditional Mac OS software program. These information get copied at construct time together with compiled code and information right into a single app file containing two forks – a useful resource fork and a knowledge fork.
Sources have each a sort and a numerical ID to allow them to be situated and run by the app at runtime.
All totally lowercase useful resource sorts are reserved for Apple’s use.
Compiled is normally saved in a useful resource fork as a useful resource of sort ‘CODE’ (all assets in Mac OS 9 and earlier have a four-character code to indicate their sort).
If, throughout copy a few of the Mac OS 9 information have their useful resource forks eliminated or broken, the OS will not boot. The installer information may turn into broken.
Useful resource fork harm or removing can happen throughout file copy if the software program doing the copy would not find out about useful resource forks.
In concept, upon getting an accurate disk picture file of a bootable Mac OS 9 disk or installer disk, you may then picture that quantity to a USB thumb drive if sure situations are met (see beneath).
This makes a precise copy of the unique disk onto the thumb drive, the place all its contents are preserved intact.
On this state of affairs, the goal Mac should have the ability to boot from USB for the USB thumb drive to work.

Apple’s unique useful resource fork editor – ResEdit.
Utilizing the bless command
Going all the best way again to early variations of Mac OS, Apple included sure particular settings on the System Folder and System file within the System Folder which marked a System Folder as bootable.
This was added as a result of in some instances customers would copy System Folders, or System information, mixing and matching information, and the Finder or System would not acknowledge the System file as a bootable file.
When this occurred it could render any constructed installer disk un-bootable.
To resolve this drawback, Apple added the idea of a blessed System Folder and System file. To ensure that any given System Folder and System file for use for booting, it needs to be marked as blessed or else the system will not boot.
For instance, in some instances in Mac OS 8 or Mac OS 9, when you drag the System file out of the System Folder, then again in, or into one other System Folder, it will not be marked as blessed and the system will not boot.
To treatment this drawback, you should use the bless command to reset the blessed state of a System Folder or file.
The Bless command can also be utilized by the Startup Disk pane of macOS’s System Settings app to alter the Startup Disk. Bless can solely be run as the foundation consumer.
Bless may inform the Mac’s firmware to search for a NetBoot distant server in addition from on power-on. You should use the Data Mode of Bless to print the at the moment blessed System Folder or machine in addition from.
To learn extra concerning the bless command and tips on how to use it, in macOS’s Terminal sort:
In Mac OS 9 and earlier, probably the most widespread causes {that a} newly constructed Mac OS 9 installer disk will not boot is as a result of the System file or folder would not have the right Bless settings.
Some CD/DVD burning software program equivalent to Toast will be certain the right Bless settings are made earlier than burning the vacation spot quantity.
After getting your newly constructed Mac OS 9 set up disk, connect or insert it into your traditional Mac, reboot, and maintain down the Choice key on the keyboard. This may show a quantity choice menu from which you’ll choose your newly constructed installer disk.
In case your installer disk would not seem within the boot choice display, it probably means the System Folder did not get blessed correctly, or that a number of information within the System Folder are broken.
When you boot into your Mac OS 9 installer disk, you may run the Mac OS 9 installer from there.
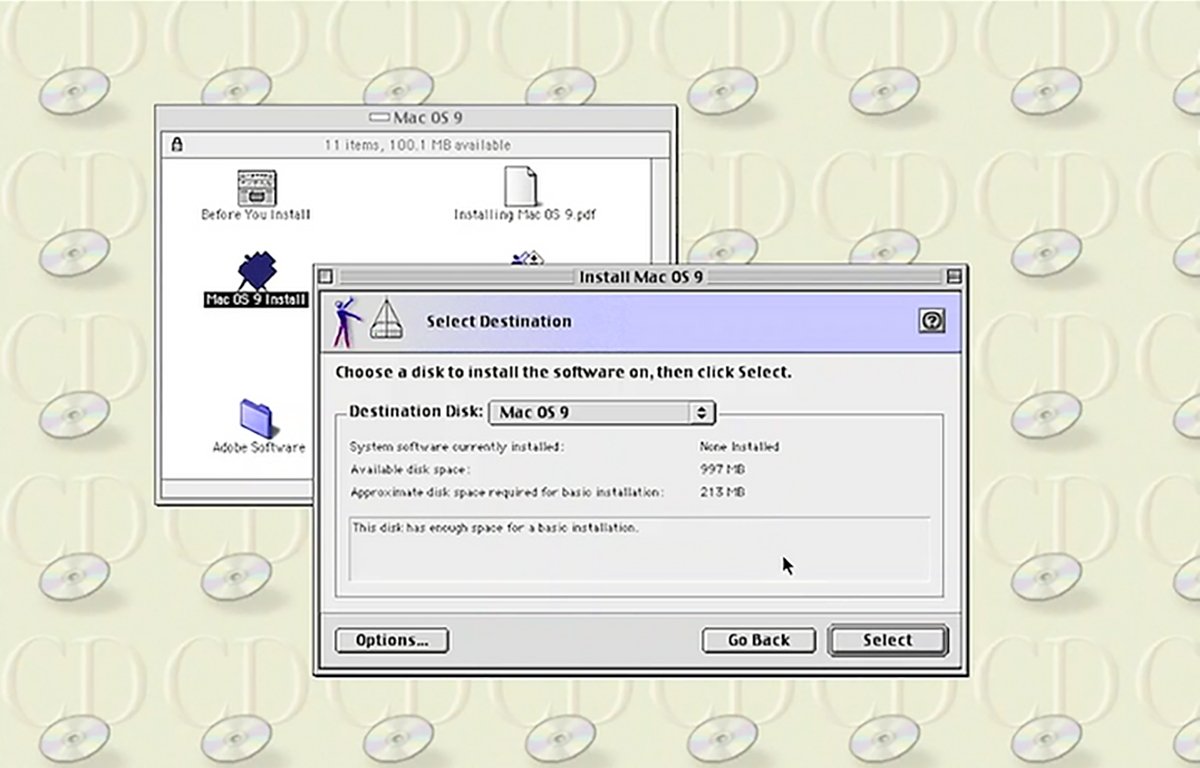
The Mac OS 9 installer runing from a Mac OS 9 boot CD.
When you have the Mac OS 9 emulator SheepShaver put in, you may check your new Mac OS 9 installer disk through the use of it as a Startup Disk in SheepShaver.
SheepShaver was up to date in January 2024 to work with macOS Sonoma. There’s additionally a model of SheepShaver for Home windows.
The unique Mac OS 9 retail CD is pretty easy. It comprises a blessed System folder, an installer folder, a couple of Learn Me’s, and few extra installer tome information.
By imaging and copying the unique CD, you make certain you’ve all the unique information wanted to each boot into OS 9, and run its installer from there.
NetBoot and the soul of a brand new (World ROM) machine
When you have an older Mac which runs each Mac OS X, contains the Traditional Mac OS 9 emulator, and may distant boot right into a NetBoot server, you should use Traditional to construct a Mac OS 9 installer disk. This strategy isn’t for the faint of coronary heart and it is not performant. Nevertheless it works.
To make use of NetBoot your Mac should have a New World ROM in it. NetBoot is not supported on any Mac which comprises a T2 safety chip, or an Apple Silicon CPU.
To make use of this methodology, first you may have to boot into an out there NetBoot server over a community.
NetBoot works by serving a standardized disk picture model of Mac OS from a server over a community to a neighborhood Mac able to booting the identical model of the OS.
Besides right into a NetBoot server, Restart your Mac and maintain down the Choice key on the keyboard. When the boot choice menu seems, wait a couple of seconds for the pc to scan for NetBoot servers.
If any seem, click on the one you need, then click on the best arrow in addition into that server.
Booting could take some time because the OS is transferred over the community. Usually any Mac booted from NetBoot will likely be slower than a neighborhood boot. So be affected person.
Additionally notice that the Traditional surroundings should already be preinstalled onto the model of Mac OS you are booting into over the community.
And if efficiency wasn’t already an issue it is likely to be now since you’re now additionally going to run the Traditional surroundings from the System Preferences pane within the remote-booted copy of Mac OS you booted into!
This would possibly change into extremely gradual, except you’ve a particularly quick community (sooner than most residential fiber connections as of late).
Utilizing Traditional from a NetBoot server means you are booting the OS over the community, then operating a Mac OS 9 emulator on prime of it.
Assuming you’ve the time to spare, nonetheless, upon getting Mac OS 9 operating within the Traditional surroundings, you may construct a Mac OS 9 installer disk simply as if Mac OS 9 was operating on the native machine.
NetBoot additionally helps Mac OS 9 instantly so in case your outdated Mac can boot Mac OS 9 domestically, it might probably additionally NetBoot instantly into Mac OS 9 from a NetBoot server. Doing this could pace issues up a bit versus operating Traditional in Mac OS X from a NetBoot server.
When you have an older model of Mac OS X Server (which is now discontinued), you should use Server’s System Picture Utility to make NetBoot pictures.
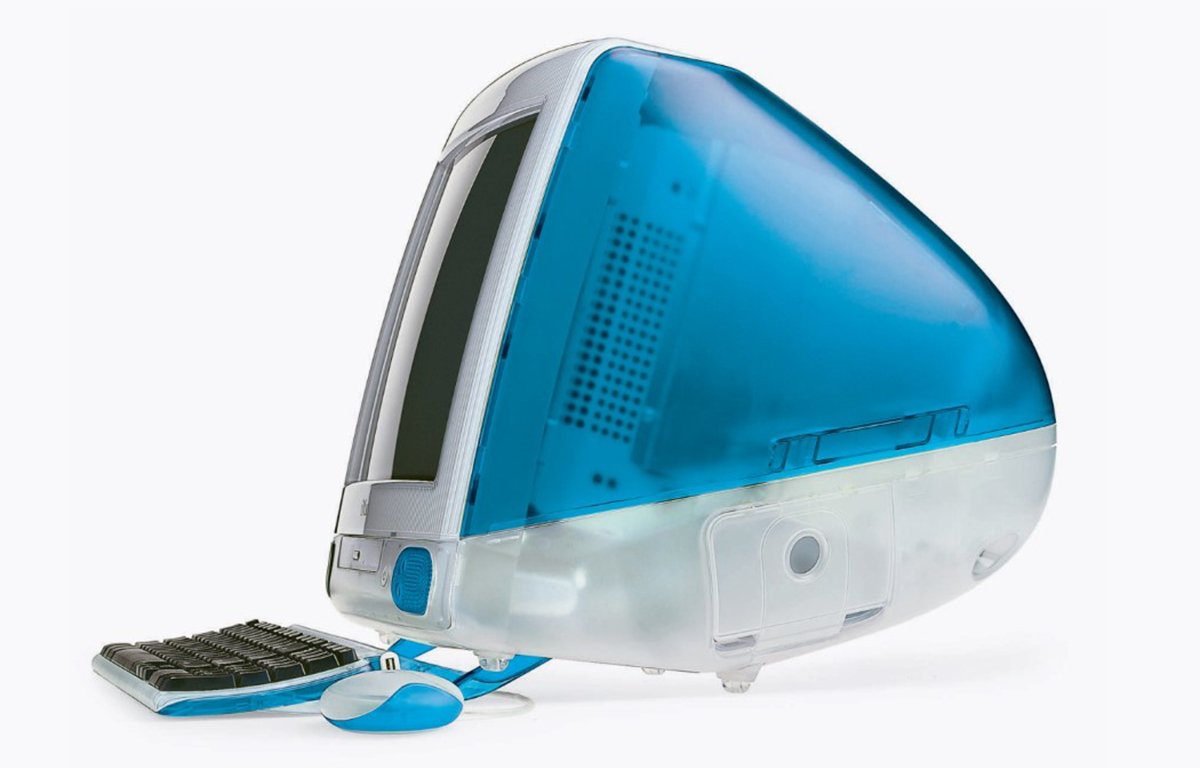
Apple’s unique iMac launched in 1998. The second of the New World ROM machines.
What if my new Mac OS 9 installer disk will not boot?
For those who discover your newly created Mac OS 9 installer disk will not boot there are a couple of straightforward methods you may nonetheless run the Mac OS 9 installer. First, and most clearly, you may boot your Mac OS 9 machine instantly into the Mac OS 9 retail CD from its CD/DVD drive.
As soon as booted into the CD drive, you may copy the installer elements of the CD to an exterior USB thumb drive formatted as HFS+.
Whereas this USB drive will not be bootable it’s going to permit you to run the Mac OS 9 installer from any Mac OS 9 machine just by inserting it right into a USB port.
There’s nothing that claims the Mac OS 9 installer has to be run from the boot drive. This state of affairs is beneficial for instances the place you have already got a working Mac OS 9 machine and solely want the installer to put in onto a 3rd disk.
In truth, assuming all of the installer information are current and of their right places, the Mac OS 9 installer will run fairly effectively from a non-boot drive.
One other solution to run the Mac OS 9 installer is to create two new HFS+ partitions on a USB exterior drive, set up a clear copy of Mac OS 9 onto one quantity from the OS 9 set up CD, then run a disk copy program to picture the OS 9 CD onto the second quantity.
By doing this you find yourself with a pristine new copy of OS 9 you may boot into, however you may nonetheless run the installer from the second partition to put in onto one other disk.
It is extremely unlikely the newly put in exterior copy of OS 9 will not boot except the goal machine would not assist that model of Mac OS 9. It’s because throughout set up the Mac OS 9 installer is aware of tips on how to bless the newly put in System Folder so it’s going to boot.
You possibly can then switch this exterior USB drive to a different Mac able to booting OS 9 and boot into it. As soon as booted, you may run the installer from the second exterior partition, erase the goal Mac’s inner drive and set up onto it.
There are various methods to construct a contemporary installer disk for older Macs, and we have solely touched on a couple of of essentially the most easy methods right here.
In a future article we’ll additionally discover extra superior methods to construct older installer disks on trendy Macs together with the usage of the Terminal instructions dd and ditto.
[ad_2]