[ad_1]
App Attest and DeviceCheck are essential to retain income.

App builders can reduce fraud through the use of App Attest and DeviceCheck, two instruments offered by Apple. Here is how you can use them to stop unauthorized modifications to your app, and to stop customers from illegitimately buying premium content material.
As an app developer, there are a number of methods that you may generate income out of your creations. Nonetheless, not everybody could also be prepared to pay, however nonetheless wish to entry some paid premium options.
Builders search to keep away from this type of habits. That is the place Apple’s App Attest and DeviceCheck step in.
Through the use of Apple’s DeviceCheck framework, you’ll be able to guarantee solely licensed customers can entry premium content material and promotions.
DeviceCheck
Apple gives the DeviceCheck framework to assist your app cut back tried fraudulent use of premium app options.
DeviceCheck helps mitigate fraud on promotional choices in apps.
For instance, in case your app presents promotions or premium content material, some customers might attempt to abuse the options to get a number of free gadgets. They may do that by uninstalling after which re-installing your app.
The DeviceCheck framework permits your app to see if a selected {hardware} system has already obtained a promotional supply.
These checks are tied to the Safe Enclave in every Apple system. They’re mixed with an Apple Account and a personal cryptographic key to make sure authorization.
- Two system state bits saved by Apple together with a timestamp
- Per system, per developer
- Persistent throughout {hardware} system resets
The 2 bits saved by Apple tie every Apple developer to a recognized state for any beforehand registered promotions per app. Together with the timestamp you should utilize the bits any means you want to ensure that your app to find out promotion standing.
DeviceCheck retains observe of units on a per-device foundation, per app developer.
The DeviceCheck state is saved throughout system resets, ought to the Apple system be utterly reset to manufacturing unit situation.
These checks can be utilized by your app to see if a given promotion was beforehand utilized by any app by any Apple Account on any Apple system.
App Attest
App Attest can be a part of the DeviceCheck.framework and lets you observe any given service your app options so as to decide if that service is one your app acknowledges.
With a purpose to use App Attest you will have both a server or cloud-based service to obtain hardware-based tokens from the consumer’s system, together with an App Attest request. Your server should then ahead these app requests on to an Apple App Attest server for verification.
If the Apple server returns that the app and repair are legitimate, your server informs the sending system that the request is legitimate.
Since every request is tied to particular system {hardware} data, requests cannot be cast or copied for different units.
App Attest additionally prevents illegitimate copies of premium app or service options from being copied from one system to a different.
Three simple items
App Attest gives three key items of information your app can use to confirm {that a} request got here from an genuine, licensed Apple system:
- Real Apple system
- Genuine utility identification
- Trustable payload
Checking for a real Apple system lets you confirm that the app and premium content material are, in actual fact, being run on an actual Apple system.
Genuine utility identification makes positive that the app which is making the request is your app and that it’s a authentic copy. One which has been downloaded from the App Retailer.
Trustable payloads might be checked to substantiate the premium function or promotional content material is permitted, has been bought, and has not been tampered with.
Through the use of these three items of information, your app can make certain the content material ought to be out there to the consumer. This prevents hackers and jail-breakers from trying to obtain or reuse premium content material paid for and licensed on one other Apple system.
The real system examine is completed by a an examination of a safe key pair on the system, which is utilized by the Safe Enclave. It is mixed with an App Attest request from the system which is generated utilizing the legitimate key pair.
Safe key pairs are half of what’s known as Public Key Infrastructure (PKI) which makes use of encryption to create safe keys and sends them over a community.
Through the use of safe keys and digital signatures, an app and system can affirm a request originates from who it claims to.
PKI is extraordinarily safe and even probably the most performant supercomputers on this planet require years to crack it.
When your app makes an App Attest request, it may well use the safe keys to take action, which may then be verified by the server. Every safe key’s distinctive per set up and usually are not synced or copied throughout units.
An encoded copy of every requesting app’s Bundle ID can be despatched with every request for verification.
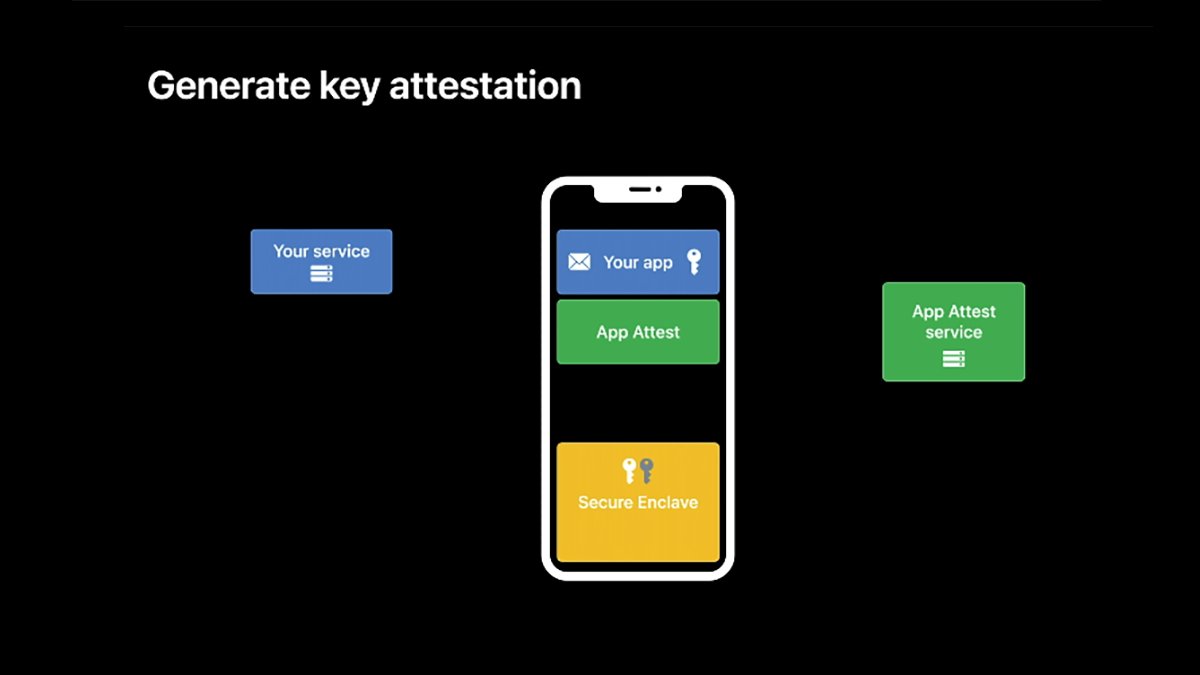
Producing a key attestation.
Including App Attest to your app
So as to add App Attest to your app in Xcode, you could first embrace the DeviceCheck.framework within the Construct Information tab in every venture goal’s frameworks pane.
With a purpose to use App Attest in your app, the app should be operating on a tool with a Safe Enclave. Due to this fact you could all the time examine for the power to make use of App Attest in your app earlier than you truly accomplish that.
There are additionally three components to including App Attest to your app:
- Producing an AppAttest key
- Verifying keys
- Producing and verifying assertions
To create an AppAttest key in your app’s code, use the .shared property on the DCAppAttestService class object like this:
let appAttestService = DCAppAttestService.shared
This creates an area variable named appAttestService from the .shared property and shops a duplicate of the shared service object.
After you have an occasion of the .shared property, you should utilize it to create a key:
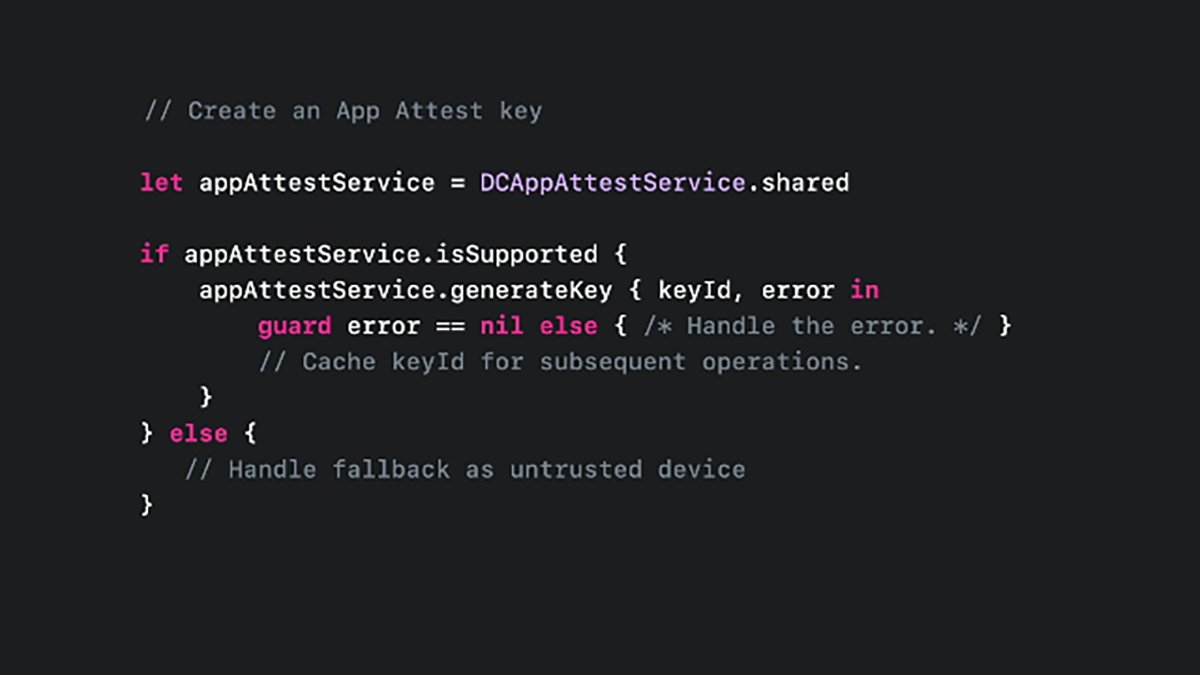
Producing a tool key for App Attest.
Within the above code, you first get a shared occasion of the DCAppAttestService class. Then you definitely examine its .isSupported property to verify AppAttest is accessible on this system, after which generate a key with the .generatekey methodology.
If .generatekey returns an error, you examine for it and deal with it, else the secret’s returned in keyId.
After you have the important thing, you’ll be able to then retailer it away for later use – most certainly in an object you outlined and created beforehand.
The DeviceCheck.framework additionally helps Goal-C interfaces in case you are nonetheless utilizing that language as an alternative of Swift.
If the .isSupported property returns NO or the important thing returns nil you’ll be able to’t use AppAttest in your app.
Bear in mind there are some circumstances by which code should still return NO for the .isSupported. Even when the system does have a Safe Enclave in it (often if the code known as from an app extension).
Your app should be ready to deal with these circumstances as nicely. In these conditions assume the caller is untrusted, then devise your individual code logic primarily based on a set of danger evaluation guidelines to find out if the premium options ought to be allowed.
This strategy is a second-best validation when the .isSupported property returns NO.
Validate key
Assuming you do have a sound key from the above code, the following step is to validate or attest the important thing.
To do that your app might want to create a one-time server problem. This problem is designed to attest the important thing you generated with a problem out of your server, which validates the important thing together with consumer account data.
You will have to additionally devise server-side code to do that for every key attest prevalence.
Key attestation gives a further degree of safety by stopping man-in-the-middle and replay assaults.
Step one on this course of is to generate a key attestation. You utilize the identical app attest server object as above, however with the .attestKey methodology.
Utilizing this methodology, you cross the unique keyID, a consumer knowledge hash, an attestationObject, and an optionally available error variable which the .attestKey methodology takes as enter.
On return, the attestationObject can be utilized for the server problem.
The aim of the .attestKey methodology is to make use of the system’s personal key to create an opaque {hardware} attestation request. One tied to the important thing and this particular system.
This {hardware} attestation is then despatched to an Apple attestation server for {hardware} verification. As soon as verified, the Apple server will return an nameless attestation object to your app.
Solely Apple’s server is aware of how you can confirm the system at a {hardware} degree primarily based on the data despatched to it, thus making it very troublesome for hackers to intercept the request and return a false optimistic that allows the premium options.
As soon as the app receives the response from Apple and makes positive it’s legitimate, the app ought to then ship the response together with any customized payload to your server for last verification.
This moderately advanced course of, mixed with Apple’s {hardware} verification and a personal key, makes it very troublesome for anybody to hack your premium options and allow unauthorized content material.
There are 4 further sections within the DeviceCheck framework documentation that you’re going to wish to take a look at:
- Accessing and modifying per-device knowledge
- Assessing fraud danger
- Establishing your app’s integrity
- Validating apps that connect with your server
Dealing with errors
Within the above code, we noticed a few of Apple’s DeviceCheck APIs return an optionally available error code.
Your app ought to deal with these codes and inform the consumer if any errors happen.
Try the documentation for the DCDevice and DCError courses within the DeviceCheck framework.
You can too get hold of consumer displayable error codes from any DeviceCheck framework API which returns a DCError by getting the worth of its .Code property. That is outlined as an enum (a quantity) which might be mapped to a set of predefined Apple error codes.
Utilizing an ordinary Swift/C case assertion, you’ll be able to then map an error code consequence to a user-displayable string your app reveals to the consumer.
At the moment, there are 5 predefined DCError codes set by Apple:
- featureUnsupported
- invalidInput
- invalidKey
- serverUnavailable
- unknownSystemFailure
featureUnsupported signifies that some or the entire DeviceCheck API is not out there. invalidKey means the important thing you tried to make use of failed.
On any error return from an Apple API or the important thing attestation, your app ought to show an applicable localized textual content string to the consumer, informing them why it did not work.
You can too examine the worldwide variable DCErrorDomain after errors to find out the area of the final occurring error.
Consider error domains as classes errors are organized into. Through the use of the DCErrorDomain string, you can provide customers further helpful data on what sort of error occurred.
DeviceCheck and AppAttest are welcome additions to Apple app improvement. Through the use of them in your app, you’ll be able to safe your premium options and income with out an excessive amount of further work.
[ad_2]